How to Manage Notifications in Microsoft Teams on Windows 11

Notification settings in Microsoft Teams on Windows 11 control the banners, sounds, and alerts that appear on your screen when someone messages you or mentions your name. Too many alerts interrupt your workday, but you can change these settings to hide non-urgent pop-ups or set quiet hours.
Open Microsoft Teams and click your profile picture at the top right to adjust what alerts reach your desktop and keep your focus on important tasks.
Access Teams notification settings by clicking the (…) icon, selecting Settings, then Notifications and activity. Customize banner styles, sounds, and quiet hours to control alerts for messages and activity. You can also mute specific channels for less noise.
Why manage Teams notifications?
Managing your Microsoft Teams notifications helps you stay focused by reducing distractions from constant pings and pop-ups.
What happens when done?
Once you finish configuring your settings, you’ll have a quieter, distraction-free environment. You won’t be overwhelmed by constant banners or sounds anymore. Instead, you’ll receive alerts only when you choose, helping you stay organized and calm throughout your workday.
How to access notification settings
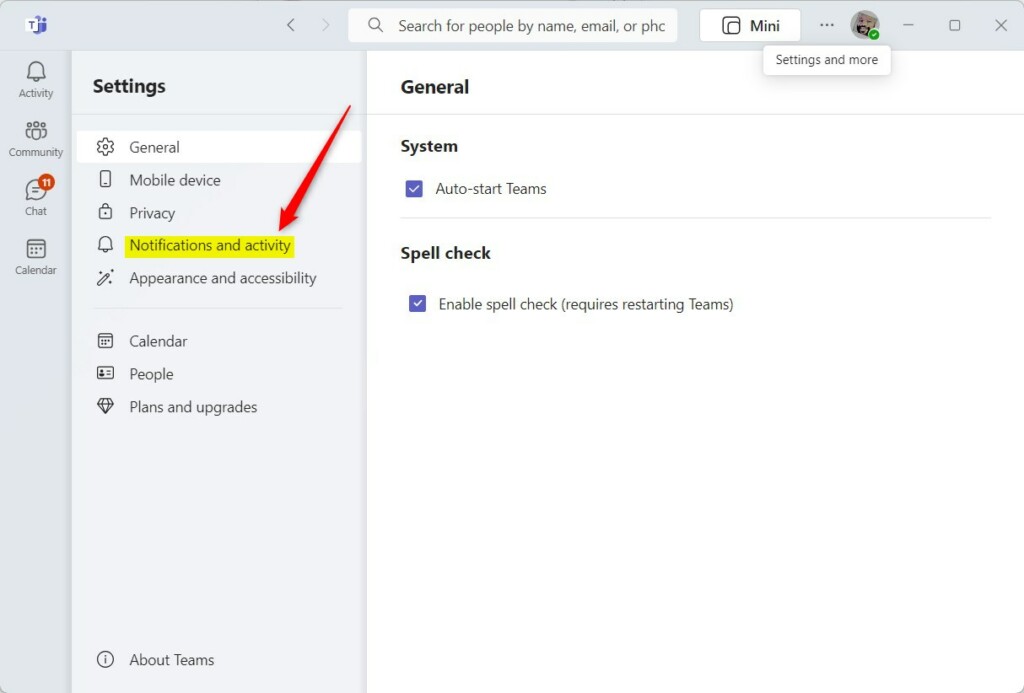
To start, open the Microsoft Teams app on your Windows 11 computer. Click the Settings and more (…) icon located at the top right, next to your profile picture. Select Settings from the dropdown menu, then click the Notifications and activity tab on the left sidebar.


Granular channel and thread management
Manage Teams notifications for specific channels to avoid getting too many alerts.
Presence and Meeting alerts
Control how you get alerted for Teams meetings, like when a meeting starts or someone joins.
Troubleshooting and common issues
Microsoft Teams notifications not showing up on Windows 11 usually happens when Windows Focus Assist (a tool that hides alerts during certain times) blocks them. To fix missing alerts and manage Teams notifications properly, turn off Focus Assist or add Teams to your priority list in the Windows settings app so messages and calls come through right away.
This applies if you modify files in C:\Windows\System32 or registry keys like HKEY_CURRENT_USER\Control Panel\Desktop. These are advanced system settings; standard user settings in Teams don't need this level of access.
For more detailed information, visit the official Microsoft support page.
Summary
Customizing your Microsoft Teams notification settings for sounds, banners, and emails helps you avoid distractions while working.
Was this guide helpful?

About the Author
Richard
Tech Writer, IT Professional
Richard is a writer at Geek Rewind who turns complex IT tasks into clear, step-by-step guides. He draws on years of hands-on experience in system administration and enterprise IT operations, focusing on Windows, Linux and WordPress: the problems people actually run into, and the fixes that work. His server and WordPress guides come from systems he runs himself. Richard builds and maintains the platform behind Geek Rewind, from its Ubuntu servers and Nginx configuration to its custom WordPress plugins. Many new tutorials start with readers' questions, and he's always glad to answer them in the comments.



[…] preview on or off, turn spell check on or off, turn on or off phone number in search results, manage notifications, turn on or off suggested replies in chat, and […]
[…] or off, turn spell check on or off, turn on or off phone number in search results, manage notifications, turn on or off suggested replies in chat, and […]
[…] preview on or off, turn spell check on or off, turn on or off phone number in search results, manage notifications, turn on or off suggested replies in chat, enable or disable sound notifications, and […]
[…] or off, turn spell check on or off, turn on or off phone number in search results, manage notifications, turn on or off suggested replies in chat, enable or disable sound […]