How to Manage Notifications in Messenger on Windows 11

Messenger notifications on Windows 11 let you know when someone messages or calls you. The Messenger Desktop app is a separate program from Facebook that allows you to chat, call, and share files without using a web browser.
You can control how these alerts appear, including turning them all off or on at once. This is useful if you need to focus on work or want to stay updated on important messages.
The app provides several options, such as changing your online status and controlling message previews. You can also easily mute or unmute all notifications with a few clicks.
Access Messenger settings in the desktop app to manage notifications. You can choose to turn all notifications off, or customize sounds and pop-ups for messages and calls to suit your needs.
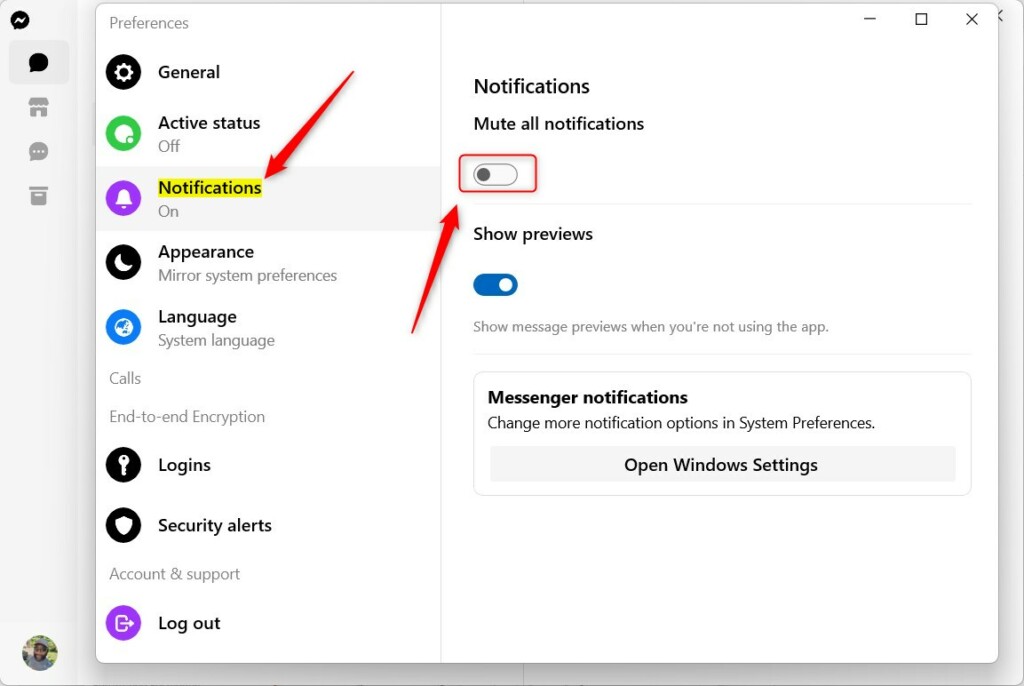
Turn all notifications on or off in the Messenger app
As mentioned above, users can turn all notifications on or off in the Messenger app on Windows. When off, they won’t receive any notifications from the app.
Here’s how to do that.
First, launch the app by clicking the Start menu and selecting it on the All Apps list.

You can also launch the app from the Taskbar or Taskbar overflow.

When the app opens, click your profile image and select Preferences at the bottom left of your screen.

Next, select the Notifications tab on the left. Under “Mute all notifications,” toggle the switch button below it to the On position to mute all notifications.
To disable it, toggle the switch button to the Off position to unmute all notifications.
That should do it!
Conclusion:
- In this article, we have detailed the steps to mute or unmute all notifications in the Messenger Desktop app on Windows.
- These instructions can help you manage notifications based on your current activities and needs.
- Feel free to use the comment section below to report any inaccuracies or provide additional insights.
Was this guide helpful?

About the Author
Richard
Tech Writer, IT Professional
Richard, a writer for Geek Rewind, is a tech enthusiast who loves breaking down complex IT topics into simple, easy-to-understand ideas. With years of hands-on experience in system administration and enterprise IT operations, he’s developed a knack for offering practical tips and solutions. Richard aims to make technology more accessible and actionable. He's deeply committed to the Geek Rewind community, always ready to answer questions and engage in discussions.


[…] you use the Messenger app on Windows, you can turn auto-start on or off, change your online status, turn message preview on or off, mute or unmute all notifications, change skintone for emojis and hand gestures, turn to spell-check and auto-correction on […]
[…] you use the Messenger app on Windows, you can turn auto-start on or off, change your online status, turn message preview on or off, mute or unmute all notifications, change skintone for emojis and hand gestures, turn to spell-check and auto-correction on […]
[…] you use the Messenger app on Windows, you can turn auto-start on or off, change your online status, turn message preview on or off, mute or unmute all notifications, change skintone for emojis and hand gestures, turn spell-check and auto-correction on or off, […]
[…] you use the Messenger app on Windows, you can turn auto-start on or off, change your online status, turn message preview on or off, mute or unmute all notifications, change skintone for emojis and hand gestures, turn spell-check and auto-correction on or off, […]
[…] you use the Messenger app on Windows, you can turn auto-start on or off, change your online status, turn message preview on or off, mute or unmute all notifications, and […]
[…] Teams works with your system settings. You can also manage how these alerts appear in the Notifications Center by adjusting your Windows Notifications settings. If you select Only show feed, you will only see […]