How to Manage Most Used Apps on Windows 11 Start Menu
You can manage the “Most Used Apps” list on your Windows 11 Start menu to quickly access your frequently opened programs.
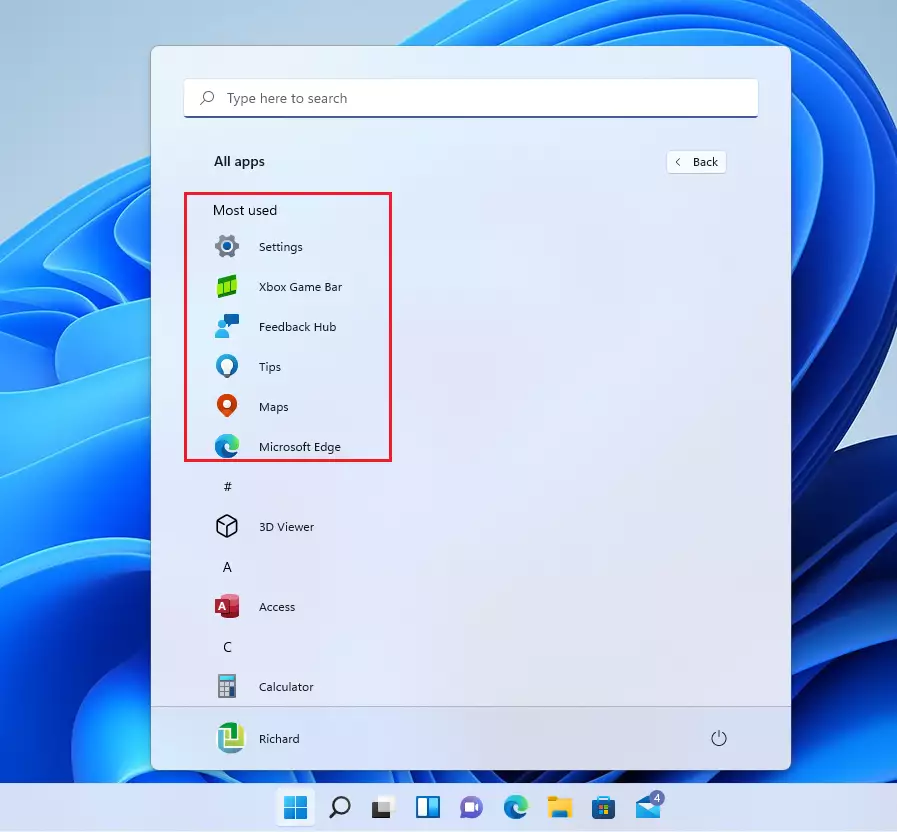
This feature automatically displays up to six of the applications you launch most often, making them readily available directly within the Start menu’s “All apps” view.
Personalizing this list helps you streamline your workflow, either by keeping your essential tools visible or by opting for a cleaner Start menu appearance.
You can easily toggle this setting on or off through the Windows 11 personalization options.
To manage most used apps on the Windows 11 Start menu, go to Settings > Personalization > Start and toggle “Show most used apps.” This enables or disables the dynamic list of frequently opened applications.
How to enable or disable the Most Used Apps list
You can easily turn the Most Used Apps list on or off in Windows 11 through the Settings app. This helps you control which apps appear in your Start menu based on how often you use them, keeping your quick access list tidy.
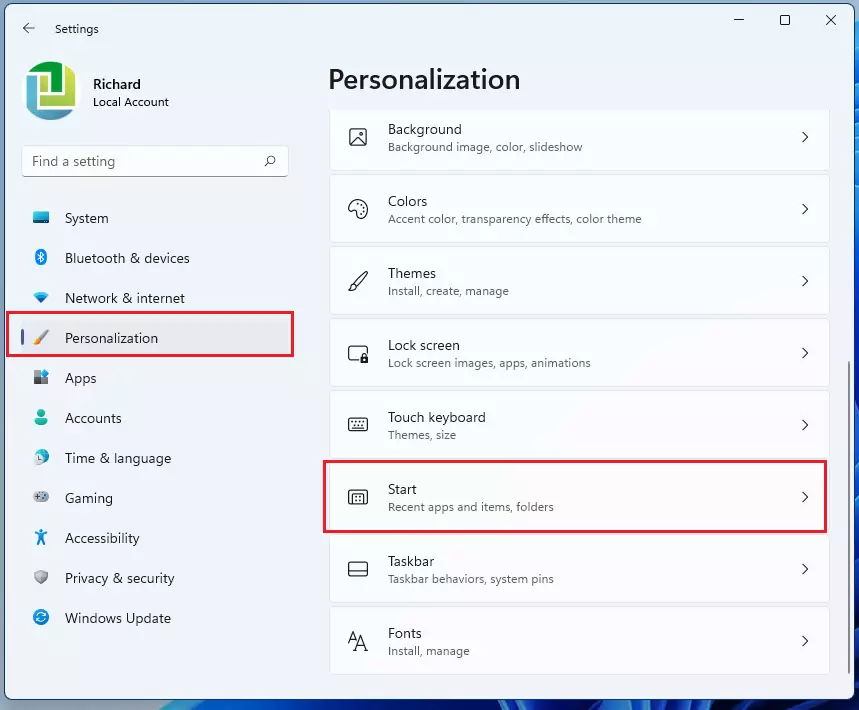
- Open the Settings menu by pressing the Windows key + I on your keyboard. Alternatively, click Start and then click Settings.

- In the Settings window, click Personalization on the left side of the screen.
- Click on the Start tile to see more options.
- Look for the setting labeled Show most used apps.
- Toggle the switch to On if you want to see the list, or Off if you want to hide it.

After you make this change, your “All apps” menu will update immediately to reflect your choice.
Advanced Configuration: Registry Editor
For more detailed control over your Windows 11 settings, you can use the Registry Editor to manage the Most Used Apps list. By changing a specific value, you can turn this feature on or off directly within the system’s settings.
HKEY_CURRENT_USER\Software\Microsoft\Windows\CurrentVersion\Explorer\Advanced
Enterprise Configuration: Group Policy
IT administrators can manage the Most Used Apps list across many Windows 11 computers using the Group Policy Editor. This tool allows for setting system-wide rules and enforcing privacy settings for frequently used programs on an organization’s network.
User Configuration\Administrative Templates\Start Menu and Taskbar
Find the policy named Remove the frequently used programs list from the Start Menu to enforce your organization’s privacy settings.
Troubleshooting Common Issues
If the list is missing, ensure your privacy settings allow app tracking. Go to Settings > Privacy & security > General and check if Let Windows improve Start and search results by tracking app launches is turned on. If this is off, the “Most Used” list cannot populate.
Summary
Managing the “Most Used Apps” list in Windows 11 is a great way to personalize your Start menu. Whether you use the Settings app, Registry Editor, or Group Policy, you have full control over your app usage tracking. For more tips, check our Windows 11 Start Menu Customization guide.

No comments yet — be the first to share your thoughts!