How to Enable or Disable Show Snap Groups on Alt+Tab, Task View, and Taskbar in Windows 11

Snap groups in Windows 11 bundle your open windows together so you can switch back to a whole set of apps at once. You can do this from Alt+Tab, Task View, or by hovering over an app on the taskbar. A group forms automatically when you snap two or more windows side by side, either with the Win + Arrow keys or by dragging them with the mouse.
Some people find the groups distracting, because one Alt+Tab entry can bring back several windows when they only wanted one. This tutorial shows two ways to turn snap groups on or off: the Settings app, and the Registry Editor.
Open Settings , navigate to System Multitasking, and toggle “Show my snapped windows…” to enable or disable Snap Groups. This setting controls their appearance in Alt+Tab, Task View, and on the taskbar .
Method 1Changing Settings for Snap Groups (The Easiest Way)
The Settings app is the safest and fastest way to change this. It works the same on Windows 11 Home and Pro. One setting controls whether snapped windows are shown on the taskbar , in Task View, and in Alt+Tab. You don’t touch any system files.
- Open Settings . Press
Windows key + Ion your keyboard, or click the Start button and choose the gear icon. The Settings window opens.
Windows 11 Start menu with Settings gear icon highlighted. - Go to Multitasking. In the menu on the left, click
System. Then selectMultitaskingon the right. You should now see a list of multitasking options.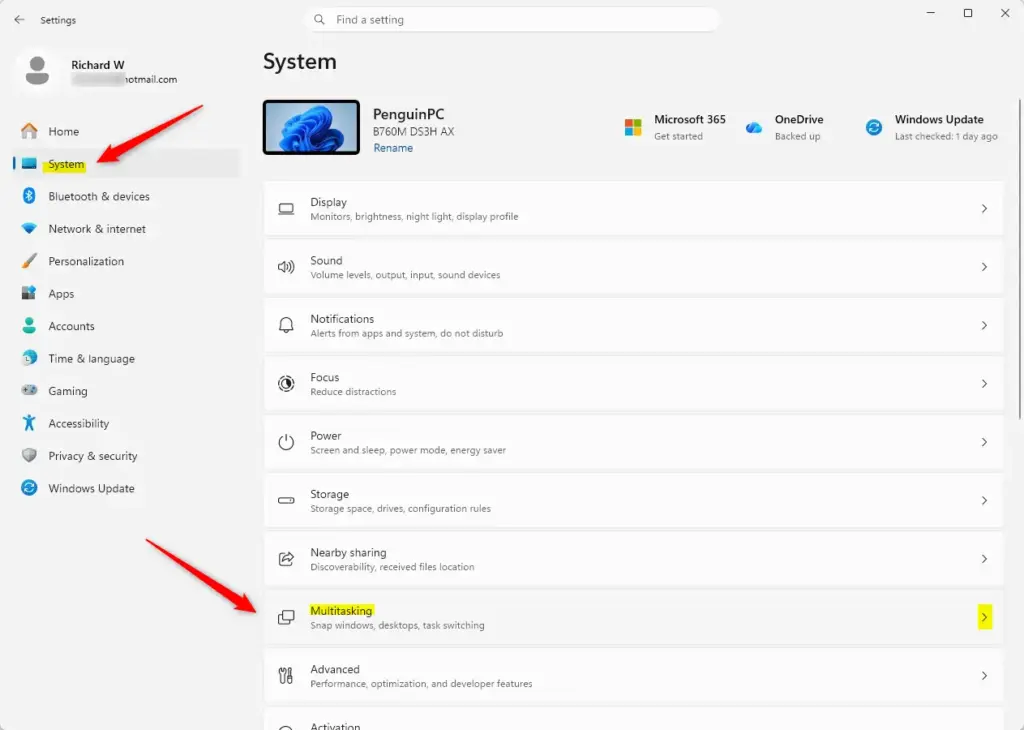
- Find the Snap Windows section. Scroll down to
Snap windows. If the section is collapsed, click the small arrow next to it to show all its options. If the main Snap windows switch is off, the options under it stay hidden, so turn that switch on first.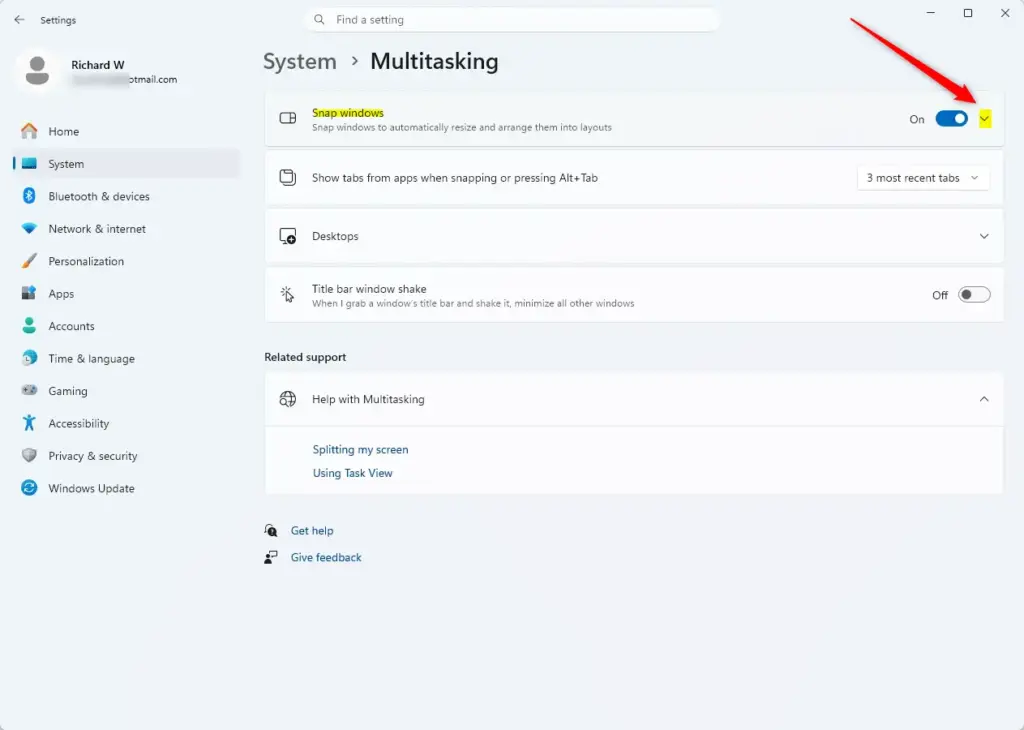
- Turn snap groups on or off. Find the option that reads “Show my snapped windows when I hover over taskbar apps, in Task View, and when I press Alt+Tab.” To turn snap groups off, clear the checkbox next to it. To turn them on, tick the checkbox.
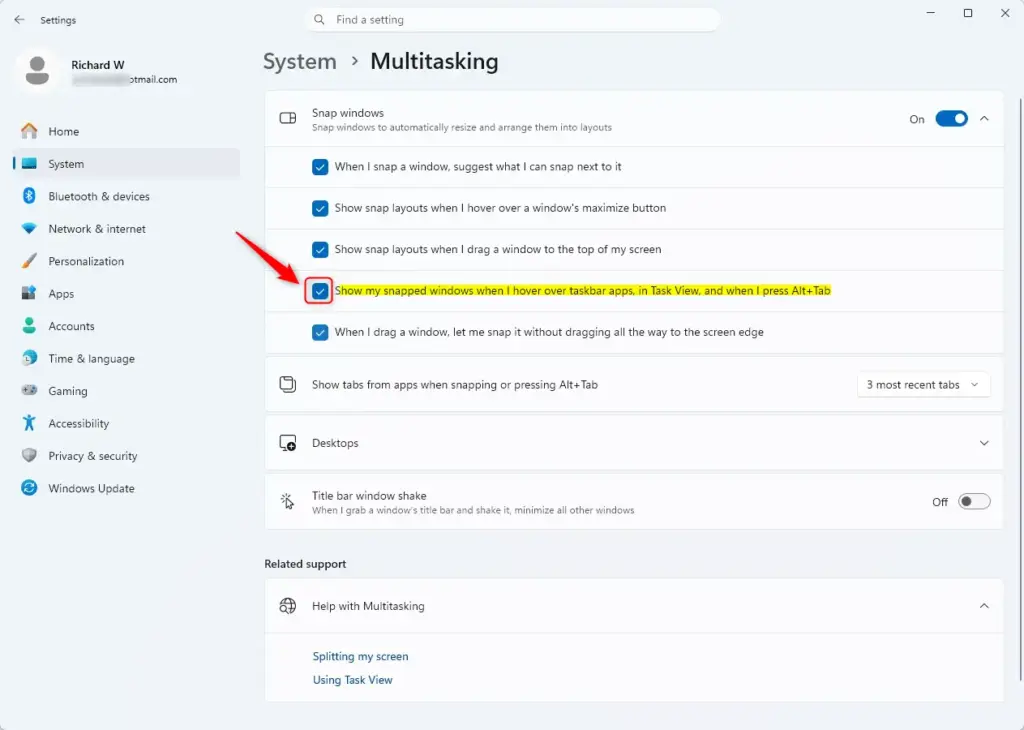
- Close Settings. The change applies right away and needs no restart. Open Alt+Tab or Task View to check. With the option off, each window is listed on its own instead of as part of a group.
To undo the change, come back to the same page and flip the checkbox the other way. Turning this option off does not stop you from snapping windows. It only changes how snapped windows are shown when you switch between apps.
It doesn’t need special permission, and it only affects your own account.
Method 2Using the Registry Editor to Control Snap Groups
The Registry Editor lets you force snap groups on or off when the Settings app doesn’t give you the option, or when it doesn’t seem to apply your choice. This is an advanced method. You edit a system key that controls how snapped windows appear in the taskbar and task switcher. A wrong edit can cause problems, so use the exact path given here and back up your registry first.
Warning: Make a backup copy of your registry before you change anything. Open the Registry Editor, go to File > Export, and save a copy of the whole registry or just the part you are about to change. If something goes wrong later, you can restore from that file.
Manual Steps for Editing the Registry:
- Open Registry Editor. Press
Windows key + Rto open the Run box. Typeregeditand press Enter. If User Account Control asks whether you want to allow the app to make changes, clickYes. The Registry Editor window opens. - Go to the right location. Click the address bar at the top of the Registry Editor. Paste or type this path and press Enter:
HKEY_CURRENT_USER\Software\Microsoft\Windows\CurrentVersion\Explorer\AdvancedThe left pane jumps to that key. It works like navigating folders on your computer, except you're working with registry keys instead of files. - Look for the value. In the right pane, look for an entry named
EnableSnapAssistFlyout. It is a DWORD (32-bit) Value. If it's there, skip ahead to the step where you set the value data. - Create the value if needed. If you don't see
EnableSnapAssistFlyout, right-click an empty spot in the right pane and chooseNew. Then selectDWORD (32-bit) Value. Name the new value exactlyEnableSnapAssistFlyout. The name must match exactly, or Windows will ignore it. - Set the value data. Double-click the
EnableSnapAssistFlyoutvalue. A small edit window opens. Enter the number that matches what you want:- To show snap groups (turn them on): set the
Value datato1. - To hide snap groups (turn them off): set the
Value datato0.
OKafter you enter the number. The new data now shows in the right pane. - To show snap groups (turn them on): set the
- Close Registry Editor. You can now close the window.
- Restart or sign out. For the change to take full effect, sign out of your Windows account and sign back in, or restart the computer. After that, check Alt+Tab and Task View to confirm the behavior.
To undo the change, repeat the steps and set the value data back to the other number, or restore the registry backup you saved earlier. After the registry edit, open the Settings page from the first method to see whether the checkbox now matches your choice.
In short, you open the Registry Editor from the Run box, go to the exact key, and set the value to turn the feature on or off. Always back up your registry before you change any value.
Summary
For most people, the Settings app is the right choice. Go to Multitasking and use the Snap windows option. It is quick, it takes effect immediately, and it is easy to reverse. Use the Registry Editor only when Settings doesn't offer the option or doesn't apply your choice, and back up the registry first.
Have a question about this guide?
Answered by AI from this guide. Good questions may be added to this page — please don't include personal details.
Did this guide fix your problem?

About the Author
Richard
Tech Writer, IT Professional
Richard is a writer at Geek Rewind who turns complex IT tasks into clear, step-by-step guides. He draws on years of hands-on experience in system administration and enterprise IT operations, focusing on Windows, Linux and WordPress: the problems people actually run into, and the fixes that work. His server and WordPress guides come from systems he runs himself. Richard builds and maintains the platform behind Geek Rewind, from its Ubuntu servers and Nginx configuration to its custom WordPress plugins. Many new tutorials start with readers' questions, and he's always glad to answer them in the comments.
No comments yet — be the first to share your thoughts!