How to Enable or Disable Snap Windows in Windows 11

Snap Windows in Windows 11 resizes open programs and locks them into side-by-side layouts or screen corners. You can see up to four apps at once on a single display without dragging window borders by hand.
Arranging several programs by hand gets messy fast, and Snap clears the clutter in seconds. You control both Snap Layouts and Snap Windows from the Settings app . This guide also covers two other ways to turn the feature on or off.
Press Win+I to open Settings, click System, then Multitasking, and toggle Snap windows On or Off. The change takes effect immediately without requiring a restart.
What is Snap Windows?
Snap windows resizes and arranges open apps into side-by-side layouts or grids. You can view and switch between several programs at the same time without resizing each window yourself.
Microsoft’s support page “Snap Your Windows” covers the feature in more depth. It is a good reference if you want to see every layout and shortcut Microsoft documents. The steps below cover the on and off switch.
Why Use Snap Windows?
Snap windows saves time when you have a lot of windows open. Windows handles the positioning, so you do not have to line up borders yourself. Comparing two documents, or working between a browser and a spreadsheet, becomes much faster.
How to Turn Snap Windows On or Off in Settings
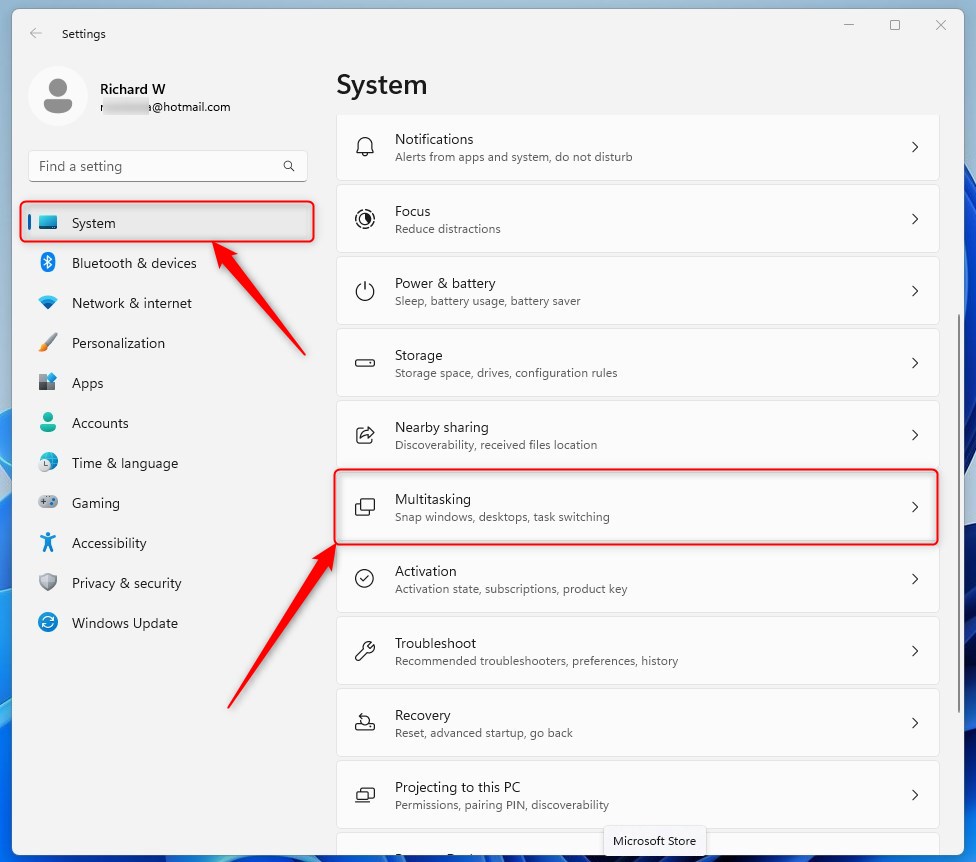
- Press Win+I on your keyboard to open Settings .
- Click on System on the left side.
- Click on Multitasking on the right side.
- Under Snap windows, toggle the switch to On to enable it, or Off to disable it.
The Settings app is the simplest way to turn Snap windows on or off. The steps are the same on Windows 11 Home and Pro, and no restart is needed.
- Press the Windows key + I to open Settings. The Settings window opens.
- Select System in the left-hand list.
- Scroll down the right-hand pane and click Multitasking. The Snap windows options appear at the top of the page.
- Switch the Snap windows toggle to On or Off. The change takes effect immediately, so you can test it by dragging a window to the left or right edge of the screen.
When the toggle is on, you can expand the Snap windows section to see the extra options underneath it. These cover things like snap layout suggestions. When the toggle is off, those options are hidden or greyed out. To undo the change, return to the same page and flip the toggle back.
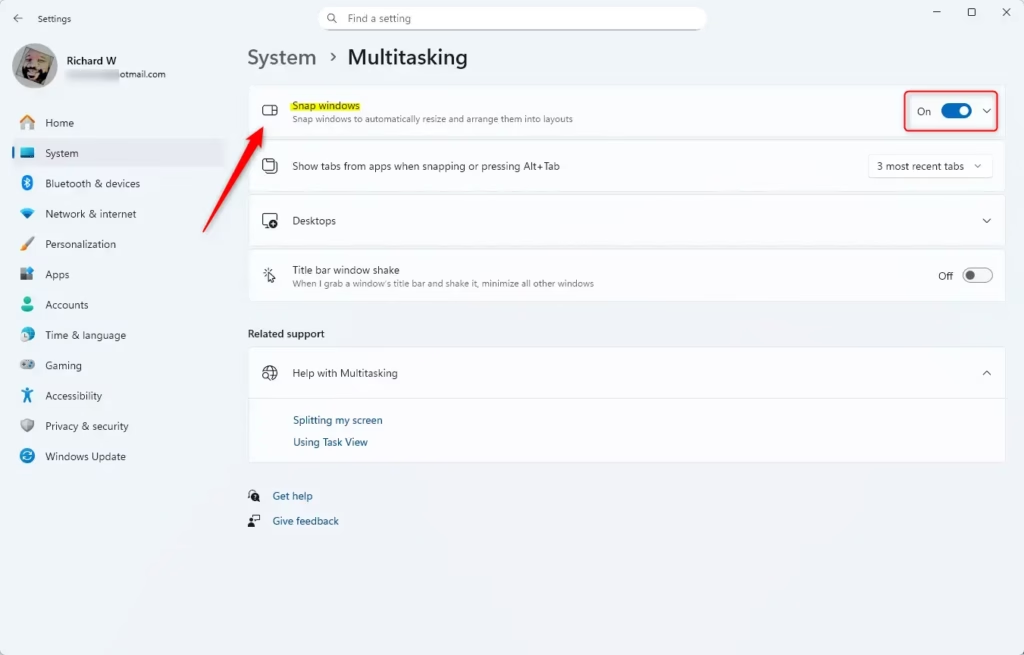
What happens when disabled: Turning off Snap windows removes the ability to drag windows to screen edges for automatic snapping. Maximizing a window vertically by dragging it to the top edge also stops working. Manual resizing is then the only option.
How to Turn Snap Windows On or Off Using Control Panel
- Open the Control Panel. You can search for it in the Start menu.
- Make sure your Control Panel view is set to Small icons or Large icons.
- Click on Ease of Access Center.
- Click on any of these links:
- Make the mouse easier to use
- Make the keyboard easier to use
- Make it easier to focus on tasks
- Look for the option Prevent windows from being automatically arranged when moved to the edge of the screen.
- Check this box to turn off Snap windows, or uncheck it to turn on Snap windows.
- Click OK to save your choice.
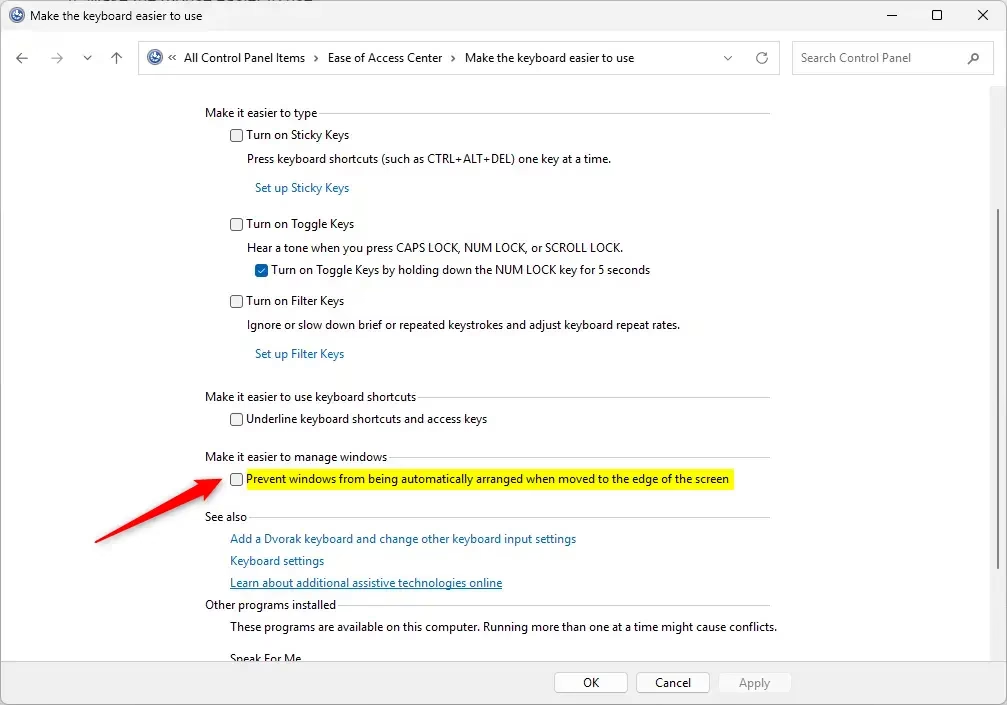
You can also manage this behavior from the Control Panel through an accessibility option. This is handy if you are used to the older interface or cannot reach the Settings page.
- Open the Start menu, type Control Panel, and select it from the results.
- Open the Ease of Access Center. If you do not see it, set the View by option at the top right to large or small icons.
- Click Make the mouse easier to use.
- Under the section for making it easier to manage windows, tick Prevent windows from being automatically arranged when moved to the edge of the screen to stop snapping. Clear the tick to allow it again.
- Click Apply, then OK.
This option changes the same behavior as the Snap windows toggle in Settings. If the two seem to disagree, check both places.
How to Turn Snap Windows On or Off Using the Registry (Advanced)
Back up the registry before you change anything. If you are not comfortable with it, ask someone experienced to help.
Flag: Administrator access is required for the steps that follow.
Registry changes often only show up after you sign out and back in, or restart the PC. To undo a change, restore your backup or set the value back to what it was before.
Turn On Snap Windows (Default)
reg add "HKCU\Control Panel\Desktop" /v WindowArrangementActive /t REG_SZ /d 1 /fTurn Off Snap Windows
reg add "HKCU\Control Panel\Desktop" /v WindowArrangementActive /t REG_SZ /d 0 /fThings to Know About Snap Windows
Windows 11 snap windows needs a screen resolution of at least 1024x768 pixels to work correctly. A resolution of 1366x768 or higher gives the best layout results. If snap layouts look cramped or do not appear, check your display resolution in Settings System Display
- Screen Size: Your screen resolution should be at least 1024x768 for Snap windows to work well. Windows 11 recommends 1366x768 or higher.
- New Features: Recent Windows 11 updates show helpful tips when you use Snap. They also suggest Microsoft Edge tabs for snapping side by side.
- What Happens When Disabled: Turning Snap off stops windows from snapping when dragged to edges. It also disables vertical maximize by double-clicking the top edge.
Summary
Managing Windows 11 snap windows takes a few seconds in either the Settings app or the Control Panel. Either one lets you enable or disable the feature so you can organize your open programs the way you prefer.
Snap windows can be turned on or off in three ways:
- Using the Settings app (quick and easy)
- Through the Control Panel's Ease of Access Center
- By editing the Windows Registry (for advanced users)
With Snap windows on, Windows arranges your open applications for you. With it off, you place and size every window yourself.
Was this guide helpful?
0% of readers found this helpful (1 votes)

About the Author
Richard
Tech Writer, IT Professional
Richard is a writer at Geek Rewind who turns complex IT tasks into clear, step-by-step guides. He draws on years of hands-on experience in system administration and enterprise IT operations, focusing on Windows, Linux and WordPress: the problems people actually run into, and the fixes that work. His server and WordPress guides come from systems he runs himself. Richard builds and maintains the platform behind Geek Rewind, from its Ubuntu servers and Nginx configuration to its custom WordPress plugins. Many new tutorials start with readers' questions, and he's always glad to answer them in the comments.


No comments yet — be the first to share your thoughts!