How to Change Start Menu All Apps View in Windows 11

The All apps view in Windows 11 lists every program installed on your PC. By default it may show apps in categories or a grid. Switching to a vertical list layout makes it easier to scan alphabetically and find what you need.
You make the change with the Registry Editor, the built-in tool for low-level system settings. It works the same on Home and Pro editions. This tweak applies to Windows 11 version 22H2 and newer builds. The whole job is one value and one restart of Windows Explorer , and you can undo it at any time by setting the value back.
Open Registry Editor by pressing Win+R, typing regedit, and pressing Enter. Navigate to 🗝️HKEY_CURRENT_USER\
What is the “All Apps” View?
The All apps view is a complete alphabetical list of every program on your computer. Use it to find software that isn’t pinned to the Start menu and doesn’t appear in your recent files. The Start menu has three main areas:
- Pinned: Apps you choose to keep visible and easy to reach.
- Recommended: Apps or files Windows thinks you might want to open soon.
- All apps: Every program installed on your computer.
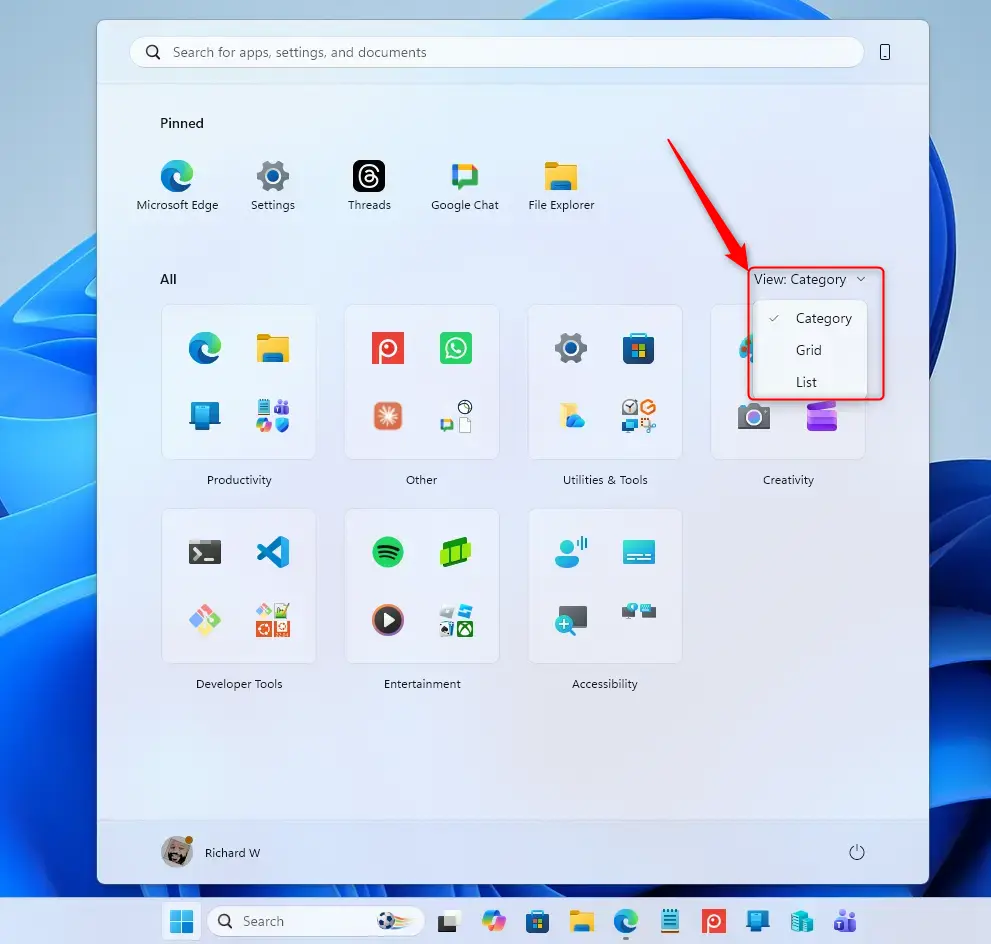
You can display the All apps list in three ways. Which one you get affects how quickly you can find and open an application.
- Category View: This is the default. Windows groups apps by type, such as “Creative apps” or “Utilities.” A category only shows up if it has at least three apps. Apps that don’t fit go into an “Other” category.
- Grid View: Your apps appear in a grid, sorted alphabetically. It’s good for a quick visual scan.
- List View: A plain, alphabetical, single-column list of all your apps. This is the view the registry tweak below gives you.
Not every build of Windows 11 offers all three views. If your build doesn’t show Category view, you may only see Grid and List.
Windows normally remembers the view you last picked, so you often don’t need the registry at all. Use the Registry Editor if you want to force a specific view, or if the normal method isn’t working or isn’t offered on your build.
Opening the Registry Editor
A wrong change can cause problems in Windows. This tweak touches one value only, so stay inside the steps below and don't change anything else.
Step 1Open the Run Box
Open the Run box using either of these methods:
- Press Windows key + R on your keyboard at the same time.
- Right-click the Start button and choose Run from the menu.
A small window appears with a box labeled "Open:". If nothing appears, try the other method.
Step 2Type the Command
Click in the "Open:" box and type the following command:
regeditStep 3Press Enter or Click OK
- Press the Enter key, or click OK.
- If a permission prompt (User Account Control) appears, click Yes. You should now see the Registry Editor window, with a folder tree on the left and values on the right.
If you don't see the prompt or the editor, your account may be restricted. You'll need an administrator account on that PC.
Only change settings if you know what you're doing, and follow these steps exactly.
Finding the Right Setting in the Registry
With the Registry Editor open, the next job is to find the setting that controls the Start menu's All apps view.
Step 4Go to the Correct Location
Use the left sidebar to browse to the folder for this setting. The location is HKEY_CURRENT_USER\Software\Microsoft\Windows\CurrentVersion\Start. Because it sits under HKEY_CURRENT_USER, the change only applies to your own account, not to other users on the PC.
- In the left sidebar, expand HKEY_CURRENT_USER and keep opening folders in the order of the path above.
- Click the final Start folder. Its contents appear in the right-hand pane.
Here is the path again so you can check it:
HKEY_CURRENT_USER\Software\Microsoft\Windows\CurrentVersion\StartOnce you reach this location, look in the right-hand pane for a value named AllAppsViewMode. If you can't find it, check that you opened the correct Start folder and that you're on Windows 11 22H2 or newer. Older builds may not have the value.
Changing Your "All Apps" View
Now set the value to the view you want.
Step 5Change the View Setting
The AllAppsViewMode value decides which layout Start uses. Type 0 for category view, 1 for grid view, or 2 for list view.
- Double-click
AllAppsViewMode. A small window opens with a "Value data:" box. - Replace the number in Value data with the one for your preferred view:
- Category View (default): enter 0.
- Grid View: enter 1.
- List View: enter 2.
- Enter only the number (0, 1, or 2). Leave the "Base" option on Hexadecimal. For these small numbers, Hexadecimal and Decimal give the same result.
- Click OK. The value in the right-hand pane should now show your new number.
To undo the change later, open the same value and enter 0 to go back to the default Category view.
Step 6Close Registry Editor and Restart Explorer
The setting won't show up until Windows Explorer restarts. Explorer is the process that runs your taskbar, desktop icons and Start menu. Restarting it applies the change without rebooting the whole computer.
- Press Ctrl + Shift + Esc to open Task Manager.
- On the Processes tab, find Windows Explorer. If Task Manager opens in a compact view, click More details first.
- Right-click Windows Explorer.
- Select Restart from the menu.
Your taskbar and desktop icons disappear for a moment and then come back. That means Explorer has restarted. If the view still hasn't changed after this, sign out and back in, or restart the PC, and check again.
Step 7Check Your Start Menu
- Open the Start menu.
- Click the All apps button.
Your applications should now appear in the view you selected: Category, Grid, or List. If you still see the old layout, go back to the registry value and confirm it holds the number you entered.
Summary
You can switch the All apps view to a list by editing one value in the Registry Editor and restarting Windows Explorer. The same value gives you category or grid view too, and setting it back to 0 returns you to the default.
Was this guide helpful?
0% of readers found this helpful (1 votes)

About the Author
Richard
Tech Writer, IT Professional
Richard is a writer at Geek Rewind who turns complex IT tasks into clear, step-by-step guides. He draws on years of hands-on experience in system administration and enterprise IT operations, focusing on Windows, Linux and WordPress: the problems people actually run into, and the fixes that work. His server and WordPress guides come from systems he runs himself. Richard builds and maintains the platform behind Geek Rewind, from its Ubuntu servers and Nginx configuration to its custom WordPress plugins. Many new tutorials start with readers' questions, and he's always glad to answer them in the comments.
No comments yet — be the first to share your thoughts!