How to Enable Expanded Start Menu in Windows 11

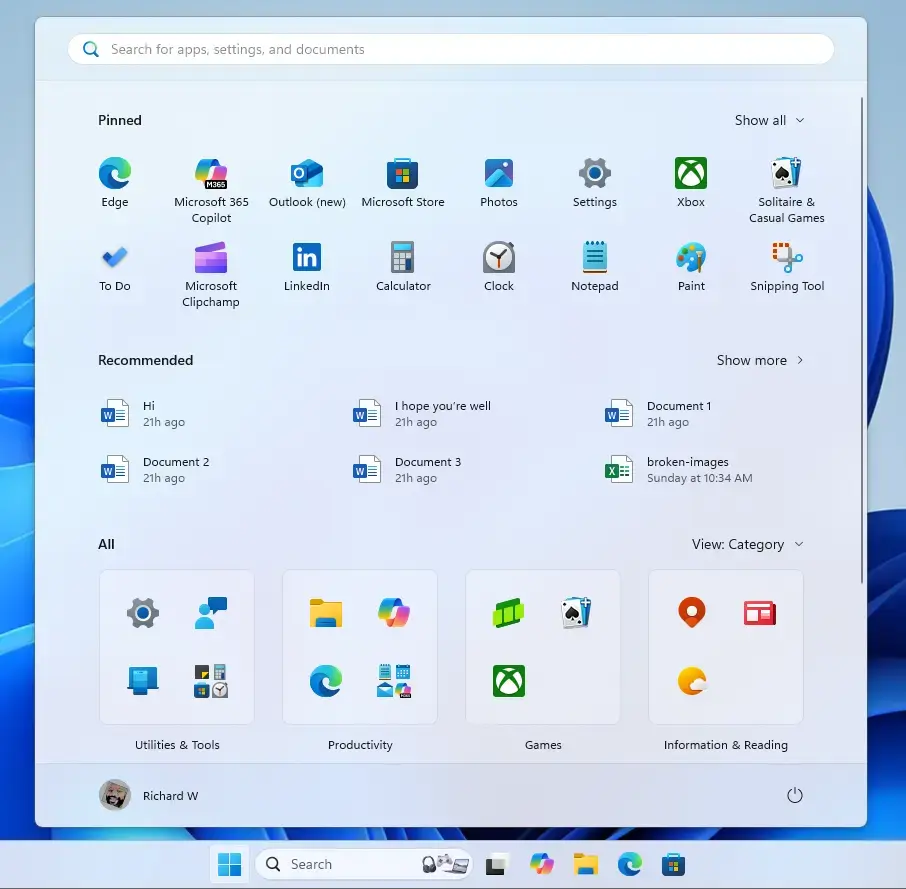
The expanded Start menu in Windows 11 turns the default app launcher into a wider grid that displays up to 6 rows of pinned shortcuts at once. This layout replaces the standard 3-row view so you can see all your favorite programs without scrolling down.
Microsoft includes this larger grid option natively in Windows 11 Build 22635 or newer, letting you fit twice as many icons on your main menu screen.
Enable the expanded Start menu by first using ViVeTool with the command vivetool /enable /id:49402389,49221331,47205210,48433719 and restarting your PC. Then, open Settings, go to Personalization Start Settings, and toggle on “Show all pins by default.
What is the Expanded Start Menu?
The Windows 11 expanded Start menu is a hidden layout option that shows all your pinned apps in one large grid instead of spreading them across multiple pages. This view lets you see and open your favorite programs instantly without needing to scroll through extra pages or dig through separate sections every time you open the menu.
All pinned items appear at once in this configuration. Eliminating the need to scroll through different sections makes navigation quicker.
How to Enable the Expanded Start Menu
Enabling the Windows 11 expanded Start menu requires using a free command-line utility called ViVeTool (a tool that unlocks hidden features in Windows). You download the tool, open Command Prompt or Windows Terminal, and run a specific command to turn on the hidden layout feature in your operating system.
Step 1: Get ViVeTool
Downloading and configuring ViVeTool requires obtaining the archive first. Instructions for this setup process live in a separate guide. Windows Settings
Step 2: Open Command Prompt or Terminal
Open Command Prompt or Windows Terminal.
Step 3: Run the Command
Execute the command below by pasting it into the window and pressing Enter:
vivetool /enable /id:49402389,49221331,47205210,48433719
Step 4: Restart Your Computer
Rebooting the machine applies the modifications.
Turning On "Show All Pins by Default"
Showing all pins by default on the Windows 11 expanded Start menu requires changing a setting in the Windows Settings app. You open Settings, go to Personalization, and select Start settings to find the toggle that keeps all your pinned apps visible at once without extra clicking.
Clicking the Start menu accesses Settings. Alternatively, pressing Windows key + I opens the Settings app directly.
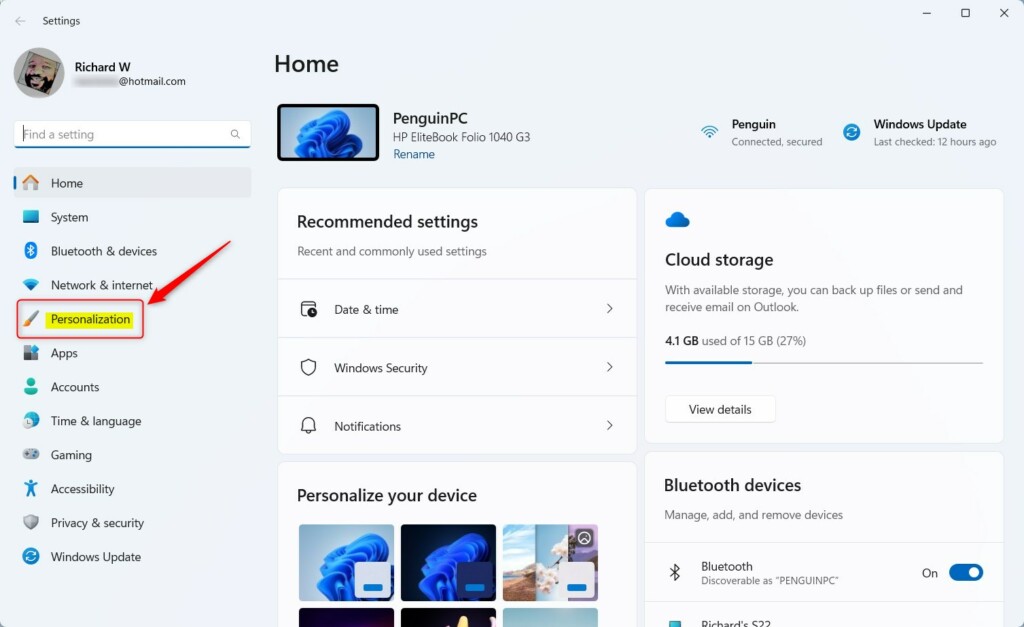
Step 2: Go to Personalization
Personalization appears on the left side of the Settings window.
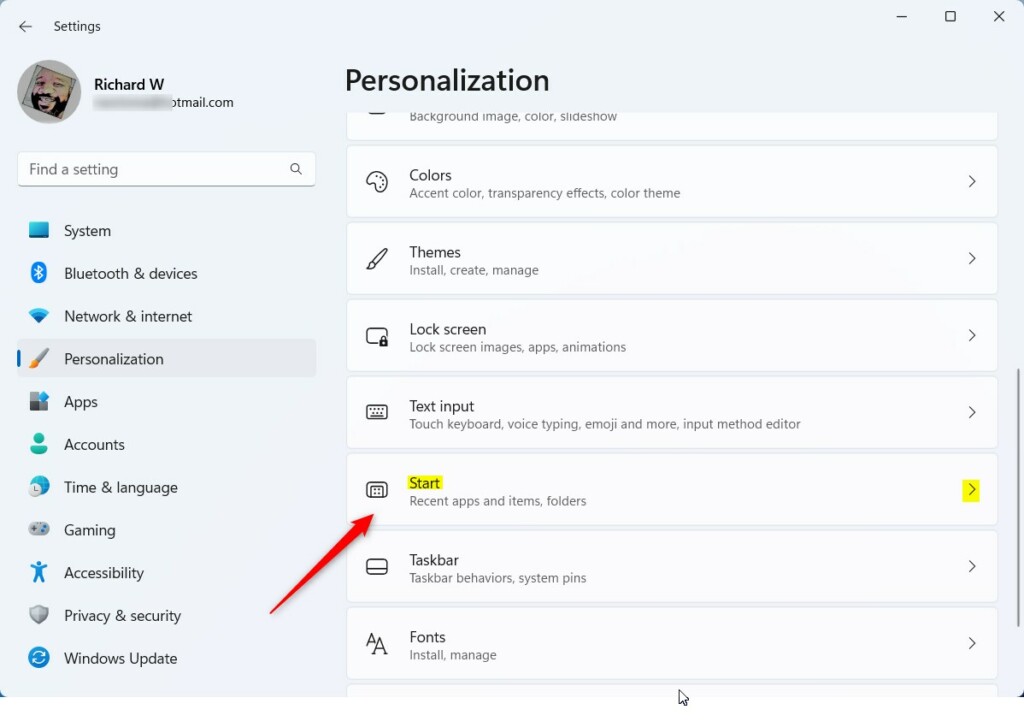
Step 3: Click Start Settings
The Start tile sits on the right side of the panel.
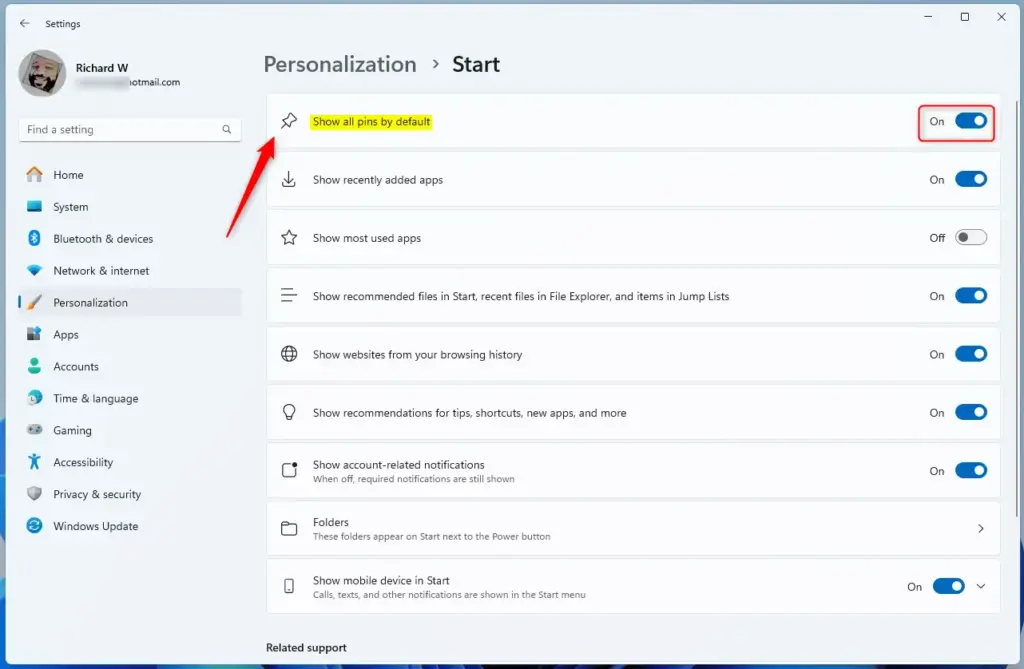
Step 4: Enable "Show All Pins by Default"
Toggling "Show all pins by default" activates the layout. Active states force the expanded menu to display every pinned application simultaneously.
Step 5: Close Settings
That is all it takes, and the Settings app can now be closed.
What Happens When You Enable It?
This expands the Start menu so it shows all your pinned applications at the same time. Eliminating scrolling streamlines navigation. Everything appears inside a single unified view.
Want to Switch Back?
Reverting to the original configuration involves returning to Settings and toggling "Show all pins by default" off. The Start menu restores the default layout immediately.
Summary
The Windows 11 expanded Start menu displays all pinned apps without requiring scroll actions. ViVeTool activates the capability, while the Windows Settings app handles subsequent configuration steps.
Was this guide helpful?

About the Author
Richard
Tech Writer, IT Professional
Richard is a writer at Geek Rewind who turns complex IT tasks into clear, step-by-step guides. He draws on years of hands-on experience in system administration and enterprise IT operations, focusing on Windows, Linux and WordPress: the problems people actually run into, and the fixes that work. His server and WordPress guides come from systems he runs himself. Richard builds and maintains the platform behind Geek Rewind, from its Ubuntu servers and Nginx configuration to its custom WordPress plugins. Many new tutorials start with readers' questions, and he's always glad to answer them in the comments.


No comments yet — be the first to share your thoughts!