How to Reset and Clear Pinned Items on Taskbar in Windows 11

Resetting the pinned items on the Windows 11 taskbar removes every app shortcut you added and gives you a fresh start. This fix uses the Registry Editor, a built-in Windows database that stores system settings, to make the taskbar forget its saved shortcuts. You then clear the shortcut files and restart Windows Explorer .
Back up the registry before you start, because wrong edits there can break Windows features. When you finish, the taskbar returns to its default layout with the standard system icons. Depending on your build or PC maker, a few default apps may also come back.
Open Registry Editor by pressing Win, typing regedit, and pressing Enter. Navigate to 🗝️HKEY_CURRENT_USER\
Step 1Open the Registry Editor
First, open the Registry Editor. You need an administrator account for this. If you are on a standard account, Windows asks for an administrator password. The steps are the same on Windows 11 Home and Pro.
- Click the Start button or press the Win on your keyboard.
- Type
regeditinto the search box. - Press Enter. A User Account Control prompt asks, “Do you want to allow this app to make changes to your device?”
- Click Yes. The Registry Editor window opens. It looks like a file manager, with folders (keys) in the left pane and their values in the right pane.
Set Export range to All, choose a location, name the file, and click Save. If something goes wrong later, double-click that .reg file and approve the prompts to merge the saved settings back in.
Step 2Go to the First Registry Location
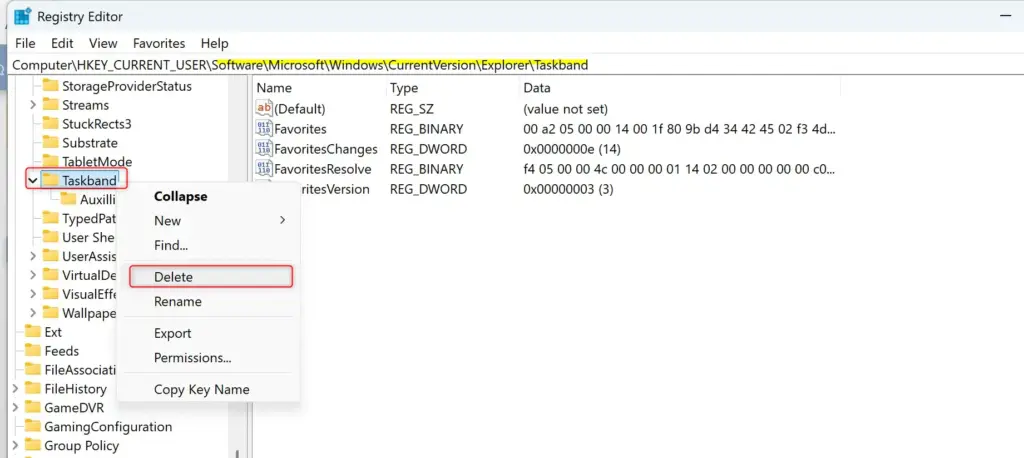
Next, find the key where Windows stores the pinned apps for your current user profile. The folder tree is deep, so go one level at a time.
- In the left pane of the Registry Editor, click the small arrow next to
HKEY_CURRENT_USERto expand it. - Click the arrow next to
Software. - Keep opening folders in this order:
Microsoft, thenWindows, thenCurrentVersion, and finallyExplorer. - Once the
Explorerfolder is expanded, look for a folder namedTaskband. Click it to select it. Its name is highlighted and the right pane shows its values.
If you cannot find the folder, you are probably in the wrong branch. Collapse the tree and retrace the path.
Step 3Delete the Taskband Key (If You Found It)
The delete is permanent and your pinned items are cleared right away, which is why you made the backup earlier.
- With the
Taskbandfolder selected in the left pane, right-click it. - Click Delete in the menu that appears.
- A confirmation box asks, "Are you sure you want to permanently delete this key and all of its subkeys?" Click Yes.
The key disappears from the left pane. The pinned-app configuration stored in this part of the registry is gone. Windows rebuilds a fresh default key the next time Explorer restarts.
Step 4Go to the Second Registry Location
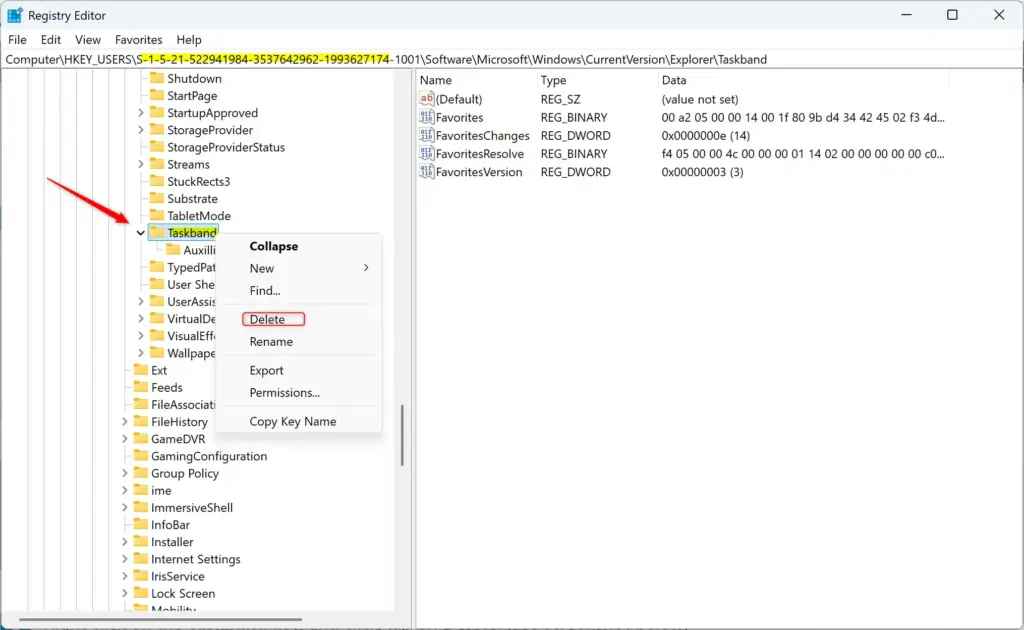
A second registry location, tied to your user account's Security Identifier (SID), can hold more taskbar settings. The SID is a unique code that identifies your account. Check it so the reset is complete.
- In the left pane of the Registry Editor, scroll back to the top and click the arrow next to
HKEY_CURRENT_USERto expand it. - Inside
Softwareyou will see several folders. Find the one that matches your user account. Its name is the SID, a long code of numbers. - If you need help finding your SID, search online for 'Find Security Identifier Windows 11'. For most users it is one of the first few SID-like codes listed under
Microsoft, thenWindows, thenCurrentVersion, thenExplorer. Folders ending in _Classes are a separate set of keys, so do not use those. - Click the arrow next to your SID folder to expand it. It holds the saved settings for your user account, including the taskbar pinned items.
- Expand these folders in order:
Software, thenMicrosoft, thenWindows, thenCurrentVersion, thenExplorer. - Look for a folder named
Taskbandinside your SID'sExplorerfolder. Click it to select it.
Helpful Tip: Your SID is unique to your account. If the computer has several user accounts, each has its own SID folder under Software\Microsoft\Windows\CurrentVersion\Explorer. Make sure you delete the Taskband folder from your account's SID only.
Your own account's registry branch can also be reached through the first location you edited. If you already deleted the key there, you may not find it here. That is normal. Skip the next section and carry on.
Step 5Delete the Taskband Key Again
Deleting the key a second time from your user-specific location clears any leftover pinned-item data.
- With your account's
Taskbandfolder highlighted in the left pane, right-click it. - Select Delete from the menu.
- When the confirmation box appears, click Yes.
The folder disappears from the left pane. This removes the link between each pinned shortcut and its app, so the old items should not come back after the restart.
Step 6Close Registry Editor
When you have deleted the folders, or skipped these steps because the folders were not there, close the Registry Editor window. The main registry work is done. Next you clear the shortcut files that Windows keeps on disk.
Step 7Open File Explorer
File Explorer gives you access to the folder where Windows stores the actual shortcut files for your pinned taskbar apps. Press the Windows key + E together. File Explorer opens straight away. You can use it to clear any stubborn shortcuts that are still there.
Step 8Go to the Pinned Items Folder
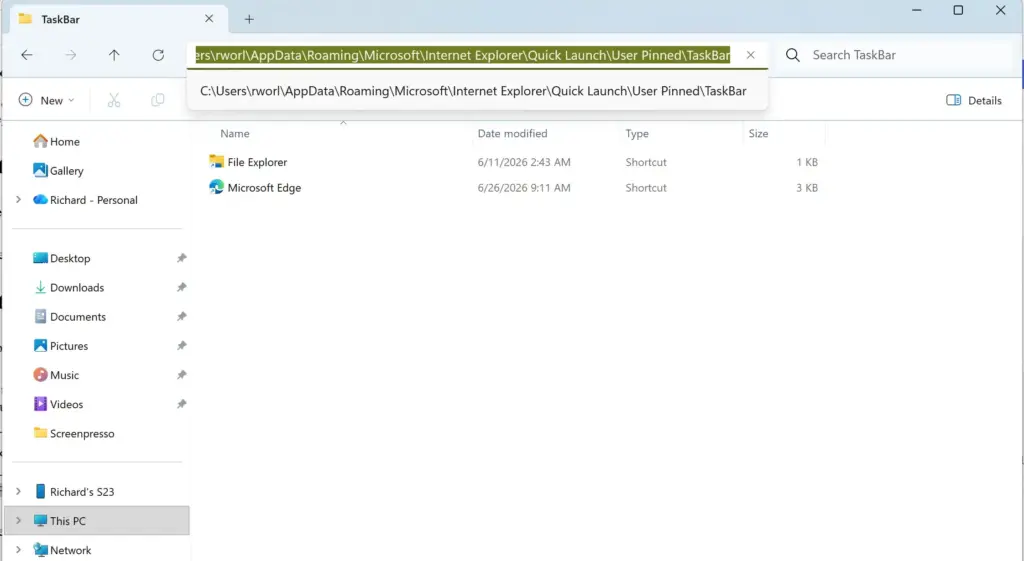
The folder that holds your pinned shortcuts is hidden, so it is quicker to go there by typing the path than by clicking through folders.
- Click in the address bar at the top of the File Explorer window. It usually shows "This PC" or the name of the current folder.
- Copy and paste the path shown below into the address bar. Copy it carefully, because a single wrong character leads to an error message.
%APPDATA%\Microsoft\Internet Explorer\Quick Launch\User Pinned\TaskBar- Press Enter on your keyboard.
You should now be inside a folder named "TaskBar". It contains the shortcuts for the applications you pinned to your taskbar.
Step 9Delete All Shortcuts
Deleting every shortcut inside the TaskBar folder removes all the pinned application icons in one go. These are shortcut files only. Your installed programs are not touched.
- Look at the "TaskBar" folder. You will see a shortcut for each pinned application.
- Press Ctrl + A to select all of them. They all turn highlighted.
- Press the Delete key.
- If a prompt asks you to confirm, click Yes or Continue.
The folder is now empty. If you deleted something by mistake, open the Recycle Bin and restore it, or re-pin the app later by right-clicking it and choosing the pin option.
Step 10Close File Explorer
Close the File Explorer window. The taskbar will not show the change until Windows Explorer restarts, which is the next step.
Step 11Apply the Changes
Restarting Windows Explorer applies the changes without a full reboot. Choose whichever method suits you. All three work, and the first is the fastest.
- Restart Windows Explorer: the fastest way.
- Press Ctrl + Shift + Esc to open Task Manager.
- Go to the Processes tab.
- Find Windows Explorer in the list.
- Right-click Windows Explorer and choose Restart.
Your taskbar and desktop icons briefly disappear and then reappear. The taskbar should come back with its default layout and no pinned apps from before.
- Sign Out and Sign In:
- Click the Start button.
- Click your user account picture or name.
- Choose Sign out.
- When you are back at the login screen, sign in to your account again.
- Restart Your Computer: the most thorough method, and it makes sure every change is applied.
- Click the Start button.
- Click the Power icon.
- Choose Restart.
If old icons still show after the restart, repeat the Windows Explorer restart once more. If the taskbar looks wrong, import your .reg backup and restart again.
Summary
To reset and clear pinned taskbar items in Windows 11, back up and then edit the registry, delete the Taskband keys, remove the shortcut files from the TaskBar folder, and restart Windows Explorer. After that you can pin your apps again from scratch.
Was this guide helpful?

About the Author
Richard
Tech Writer, IT Professional
Richard is a writer at Geek Rewind who turns complex IT tasks into clear, step-by-step guides. He draws on years of hands-on experience in system administration and enterprise IT operations, focusing on Windows, Linux and WordPress: the problems people actually run into, and the fixes that work. His server and WordPress guides come from systems he runs himself. Richard builds and maintains the platform behind Geek Rewind, from its Ubuntu servers and Nginx configuration to its custom WordPress plugins. Many new tutorials start with readers' questions, and he's always glad to answer them in the comments.




No comments yet — be the first to share your thoughts!