How to Enable or Disable Recommended Section in Windows 11

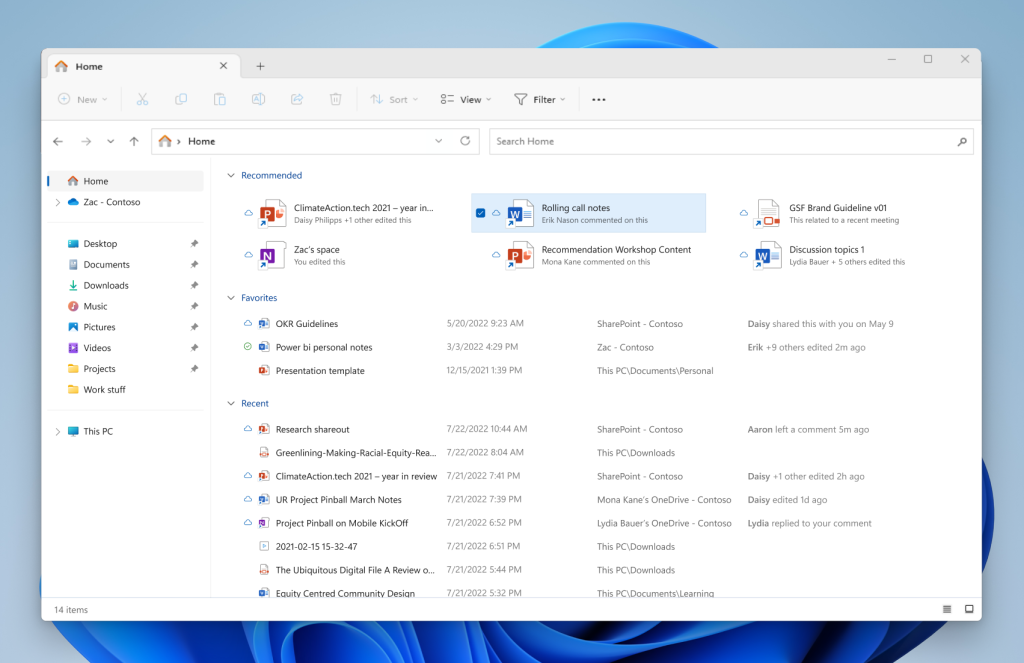
The “Recommended” section in File Explorer (the app you use to browse and manage files on your PC) displays cloud documents linked to your work or school account. This feature arrives starting with Windows 11 build 23403.1001 to surface recent spreadsheets, presentations, and files you own or share with others.
You can turn off this section if you prefer a clean home screen without clutter. Follow the steps below to enable or hide the Recommended files in Windows 11. There are two ways to do it: Folder Options, which is quicker, and Registry Editor, which gives the same result.
Keep in mind that the section is mainly tied to a work or school account. If you sign in with a personal Microsoft account or a local account, you may not see it at all. If the options below are missing on your PC, your Windows 11 build probably doesn’t include the feature yet.
Open File Explorer , click the three-dot menu, select Options, then go to the General tab. In the Privacy section, check or uncheck “Show recommended section” to enable or disable it. Apply the changes.
Turn on or off File recommendations in File Explorer
You can turn on or off file recommendations in File Explorer by changing a couple of privacy settings in Folder Options. This lets you hide the list of recent cloud and local files that Windows 11 shows you whenever you open File Explorer . Unchecking these boxes removes the entire section from your home screen immediately. Folder Options works the same on Windows 11 Home and Pro, and you don’t need administrator rights.
Here’s how to do it.
- Open the File Explorer Folder Options. You can also get there by opening File Explorer , selecting the three-dot See more button in the toolbar, then choosing Options. The Folder Options window should now be on screen.
- Stay on the General tab and look for the Privacy section near the bottom.
- Check or uncheck the two boxes below to enable or disable the “Recommended” section in File Explorer . Check both to show it, and uncheck both to hide it.
- Show recommended section
- Include account-based insights, recent, favorite, and recommended files
- Select Apply, then OK. Open a new File Explorer window and check the home screen. The Recommended section should now be gone, or back, depending on what you chose.
To undo the change, open the same window and set the boxes back the way they were.
If a box is greyed out or missing, your account or Windows build may not support it. A device managed by your organization can also lock these settings through policy. In that case, ask your IT administrator.
You can also use Registry Editor (the database for system settings) to show or hide the section. This is useful if the checkboxes are missing or if you want to script the change. Editing the registry incorrectly can cause problems, so export the key first. In Registry Editor, select the key, then choose File Export and save the .reg file somewhere safe. Double-click that file later to restore the original values.
- Open Windows Registry editor as administrator. Select Yes if User Account Control asks for permission.
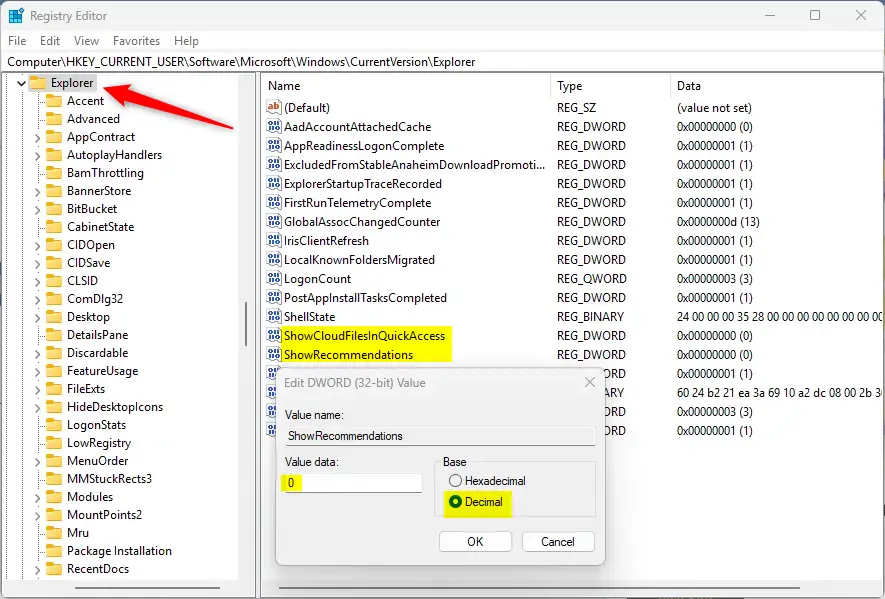
- Navigate to the registry key below. You can paste the path into the address bar at the top of Registry Editor.
ComputerHKEY_CURRENT_USERSoftwareMicrosoftWindowsCurrentVersionExplorer
- In the Explorer key's right pane, find the two (REG_DWORD) names shown below. Double-click each one to open it.
ShowCloudFilesInQuickAccess
ShowRecommendations
- In the Value data box, type
1to show the "Recommended" section in File Explorer. - To disable the "Recommended" section, type
0for the "ShowRecommendations" item name. - Select OK to save each value.
If you don't see these two items, right-click an empty space in the pane, then choose New DWORD (32-bit) Value. A new value appears with its name highlighted. Type the name for each item, press Enter, then double-click it and enter 1 to enable or 0 to disable the recommended section. Use a 32-bit DWORD even if your Windows is 64-bit.
You may have to reboot your computer for the changes to apply. Signing out and back in often works too, and so does restarting File Explorer from Task Manager. To go back, set the values to their old data or delete the ones you created.
That should do it!
If this didn't work: Restart your computer or sign out of your Windows account and back in to force File Explorer to refresh its view. Then check that you edited the right key and that both values are set the same way.
- Turning the "Recommended" section on or off in File Explorer on Windows 11 lets you decide what shows up on your home screen.
- There are two methods: the Folder Options checkboxes, or two values in Registry Editor.
- Folder Options is the easier route. Use the registry when the checkboxes are missing, and export the key first.
- Hiding the section also keeps your cloud files and recent activity off the File Explorer home screen, which helps if others can see your screen.
Was this guide helpful?

About the Author
Richard
Tech Writer, IT Professional
Richard is a writer at Geek Rewind who turns complex IT tasks into clear, step-by-step guides. He draws on years of hands-on experience in system administration and enterprise IT operations, focusing on Windows, Linux and WordPress: the problems people actually run into, and the fixes that work. His server and WordPress guides come from systems he runs himself. Richard builds and maintains the platform behind Geek Rewind, from its Ubuntu servers and Nginx configuration to its custom WordPress plugins. Many new tutorials start with readers' questions, and he's always glad to answer them in the comments.



No comments yet — be the first to share your thoughts!