How to Hide Recent Files in Windows 11 Start Menu

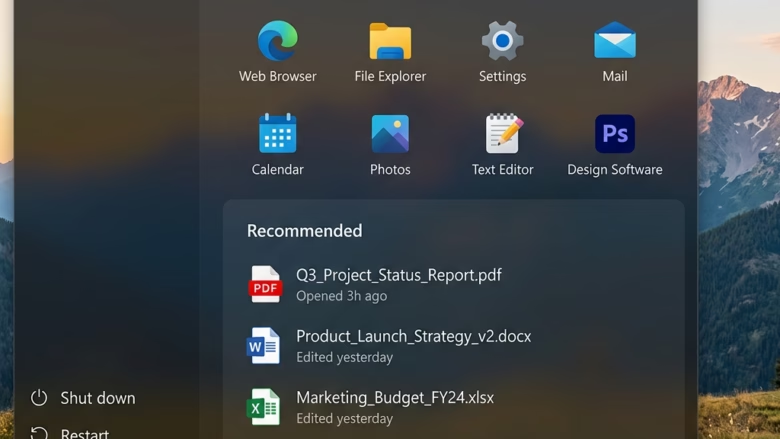
The “Recommended” section at the bottom of the Windows 11 Start menu shows your latest documents, pictures and files by default. Anyone standing behind you, or sharing your screen in a meeting, can see what you opened last. Hiding recent files stops that.
The quickest way is the Settings app , and it takes less than a minute. If you need more control, there are two other methods: the Registry Editor and the Local Group Policy Editor. This guide covers all three. Start with the Settings method unless you have a reason not to.
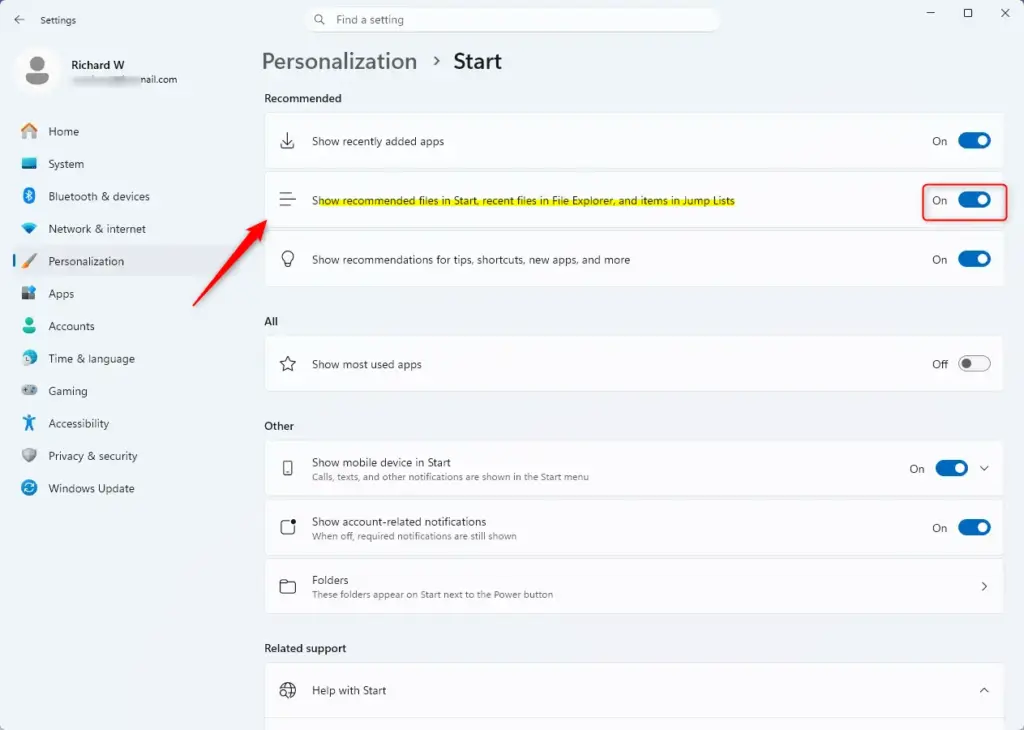
Open Settings Personalization Start, then turn off “Show recommended files in Start, recent files in File Explorer , and items in Jump Lists”. The Recommended section in your Start menu disappears immediately.
Option 1Managing Recent Files with Windows Settings
Use the Settings app to hide recent files on your Windows 11 Start menu. It works on every edition, Home and Pro included, and it needs no special permissions. It hides your recently opened documents so your personal files stay private when other people look at your screen.
- Open Settings . Press Win+I on your keyboard. Or click the Start button and then click the gear icon for Settings. The Settings window opens with a list of categories on the left.
- Go to Personalization. In the Settings window, click Personalization on the left side. Then, on the right side, click Start. You should now see a list of toggle switches that control what the Start menu displays.
- Adjust the settings . Look for these options:
- “Show recommended files in Start, recent files in File Explorer , and items in Jump Lists”: This is the main switch. When it is On, Windows shows recent files in the Start menu ’s “Recommended” section and in jump lists. This is the default. Turn it Off to hide recent files.
- “Show recent items in jump lists and File Explorer ”: This setting is similar. When it is On (the default), recent items appear. Turning it Off hides them and also clears your current list of recent items. So turning this off erases your history.
The exact wording of these toggles changes between Windows 11 builds. Some versions combine them into a single switch with a name along the lines of “Show recently opened items in Start, Jump Lists, and File Explorer ”. If you only see one switch like that, it does the same job. Turn it off.
To hide recent files completely, turn every option of this kind Off. To show them again, turn them On.
- Close Settings. Your changes should appear right away. Open the Start menu and check that the “Recommended” section no longer lists your files. If an old entry is still there, restart File Explorer or your computer and look again.
Option 2Using the Registry Editor to Control Recent Files
Use Registry Editor (a database for low-level system settings) to hide recent files by editing the value yourself. This advanced method requires you to create or edit a specific DWORD value in the 🗝️HKEY_CURRENT_USER\
Mistakes can cause unexpected Windows problems. Back up your Registry before making any changes. You can find guides on how to do this by searching for "back up Windows Registry" on GeekRewind.com. A quick backup is to select File, then Export, in Registry Editor and save a copy of the key you are about to change.
Here's how to proceed:
- Open Registry Editor. Press Windows key + R to open the Run box. Type
regeditand press Enter, or click OK. You might see a User Account Control (UAC) message. Click Yes. The Registry Editor window opens with a folder tree on the left. - Go to the correct location. In the Registry Editor, look at the left side. You need to go to this path:
HKEY_CURRENT_USER\Software\Microsoft\Windows\CurrentVersion\Explorer\AdvancedYou can copy and paste this path into the address bar at the top of the Registry Editor and press Enter. The editor jumps straight to that key. If a key along the way is missing (the Explorer key under Policies is the most likely one), right-click the parent key, select New, then Key, and give it the missing name.
📝NoteThe pathHKEY_CURRENT_USER\means these changes only affect the user who is currently logged in.For this specific setting, this is the path that controls recommendations.
- Find or create the "Start_TrackDocs" value. On the right side of the Registry Editor, look for a value named
Start_TrackDocs. It should be a DWORD (32-bit) Value.- If it exists: Double-click
Start_TrackDocsto change its data. An edit box opens. - If it doesn't exist: Right-click on an empty space on the right side, select New, then select DWORD (32-bit) Value. Name this new value exactly
Start_TrackDocs. Then double-click it to open the edit box.
- If it exists: Double-click
- Set the value data. This tells Windows whether to show or hide recent files:
- To show recent files (default): Set the "Value data" to
1. - To hide recent files: Set the "Value data" to
0.
Click OK after entering the value. The new data appears next to the value name in the right pane. To undo the change later, come back here and set the data back to the default value.
- To show recent files (default): Set the "Value data" to
- Close Registry Editor. The changes usually happen immediately. If the Start menu still shows your files, restart File Explorer or sign out and back in. To restart File Explorer, press Ctrl + Shift + Esc to open Task Manager, right-click Windows Explorer in the Processes list, and select Restart. The taskbar disappears for a second and comes back.
Option 3Controlling Recent Files for All Users (Pro/Enterprise Editions)
The Local Group Policy Editor lets you manage recent files with a system policy instead of individual settings. It is available if you have Windows Pro, Enterprise or Education. The policy tells Windows not to keep a history of recently opened documents, so they stay hidden for the people who use the machine.
Important: The Local Group Policy Editor isn't included in Windows 11 Home edition. If you have the Home edition, the program won't open when you try the steps below. Stick with the Settings app method or the Registry Editor method instead.
- Open Local Group Policy Editor. Press Windows key + R, type
gpedit.msc, and press Enter or click OK. The Local Group Policy Editor window opens with a tree of policy folders on the left. - Go to the policy. In the left pane of the Local Group Policy Editor, go to:
User Configuration > Administrative Templates > Start Menu and TaskbarClick each folder in turn to expand it. The policies in the selected folder are listed in the right pane.
- Find the policy. In the right pane, look for a policy named "Do not keep history of recently opened documents." Double-click it. A settings window for that policy opens.
- Configure the policy. You have three choices:
- Not Configured: The policy isn't active. Windows uses its default behavior or what individual users have set in Settings.
- Enabled: Windows will not keep a history of recently opened documents. This hides recent files from the Start menu, File Explorer and jump lists for all users.
- Disabled: Windows will keep a history of recently opened documents. This turns the feature on for all users.
To hide recent files for all users in Windows 11, select Enabled. To show recent files for all users, select Disabled or Not Configured. Not Configured is the way to undo your change and go back to managing the setting in Windows Settings.
Click OK after choosing.
- Close Local Group Policy Editor. Your changes should apply automatically. You might need to restart your computer, or sign out and back in, for all changes to take effect.
Summary
For most people, the standard Settings app is the quickest way to hide recent files from the Start menu. If you need more control, use the Registry Editor to change the value directly. On Windows Pro, Enterprise or Education, the Local Group Policy Editor can turn off recent items through a policy. Whichever method you choose, you can reverse it by switching the setting back on.
Have a question about this guide?
Answered by AI from this guide. Good questions may be added to this page — please don't include personal details.
Did this guide fix your problem?

About the Author
Richard
Tech Writer, IT Professional
Richard is a writer at Geek Rewind who turns complex IT tasks into clear, step-by-step guides. He draws on years of hands-on experience in system administration and enterprise IT operations, focusing on Windows, Linux and WordPress: the problems people actually run into, and the fixes that work. His server and WordPress guides come from systems he runs himself. Richard builds and maintains the platform behind Geek Rewind, from its Ubuntu servers and Nginx configuration to its custom WordPress plugins. Many new tutorials start with readers' questions, and he's always glad to answer them in the comments.
No comments yet — be the first to share your thoughts!