How to Change Your Start Menu Layout and Personalization in Windows 11

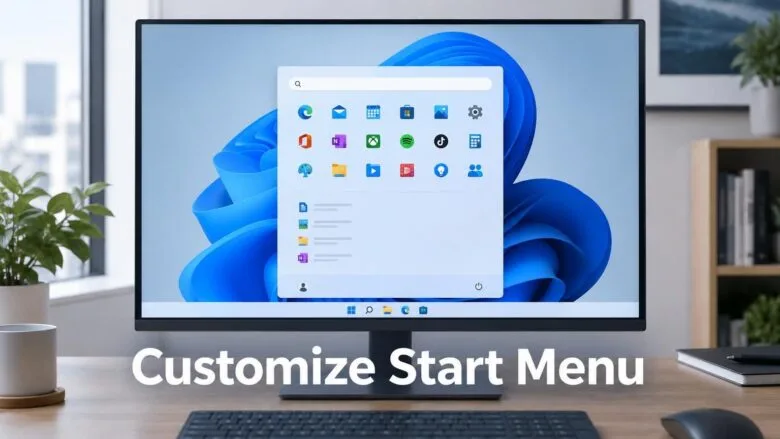
The Start menu in Windows 11 lets you control what appears and how it’s arranged in two ways: change what shows up using Settings, then rearrange the apps by dragging and pinning them directly on the menu itself.
Settings Personalization Start is where you make the big choices — how many apps you want pinned, what the Recommended section displays, and which folders appear next to the Power button. After that, you organize your pinned apps by hand, dragging them into the order you want.
Changes take effect right away, so you don’t need to restart your PC. If your PC is managed by an organization, some options may be locked — the troubleshooting section at the end covers what to do in that case.
Open Settings Personalization Start to access layout options, then drag and drop apps directly on the Start menu to reorder them. Use the Layout setting to adjust space between Pinned and Recommended sections, and right-click any app to pin or unpin it. Changes take effect immediately.
What You Can and Cannot Change in the Start Menu
The Windows 11 Start menu has three parts: the Pinned area at the top, the Recommended section below it, and the All apps list. You control each part differently.
- Pinned: You choose which apps appear, their order, and whether they sit in folders.
- Recommended: You choose what Windows lists here (recent files, recently added apps, and so on) and how much room it gets. In most editions you cannot delete the section itself.
- All apps: You choose how the list is displayed on recent builds of Windows 11.
- Power button area: You choose which folder shortcuts appear next to it.
- Position and colors: You move the Start button to the left and set the Start menu color from separate Settings pages.
Microsoft has redesigned Start several times, so a few options below are marked as appearing only on recent builds. If your PC does not show one, run Windows Update (Settings Windows Update Check for updates) and look again.
Open the Start Personalization Settings
This page holds most of the Start menu options, so open it first.
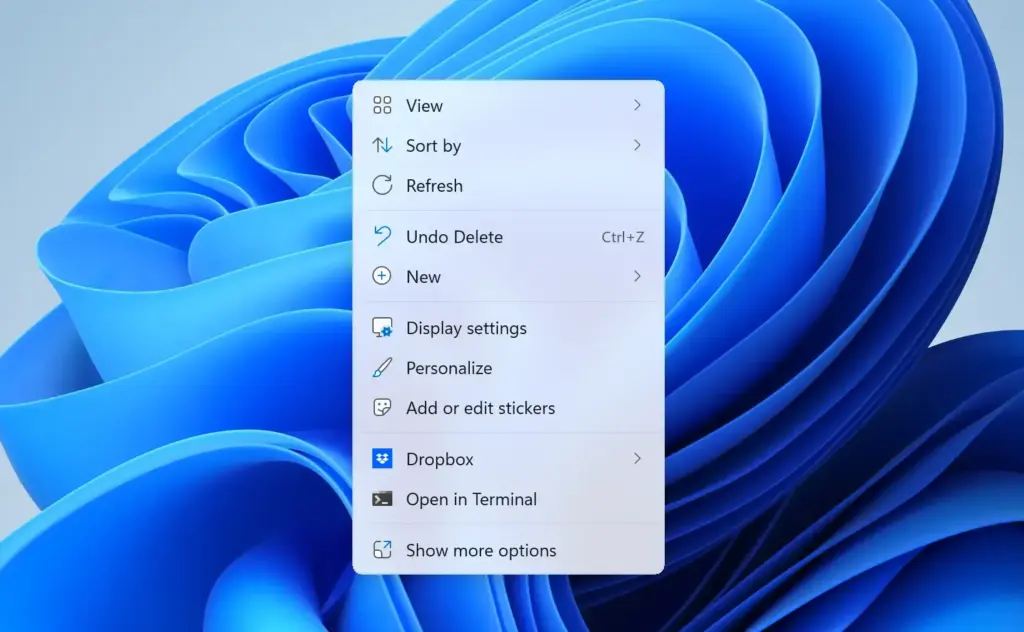
- Right-click an empty area of the desktop and select Personalize. You can also press Windows key + I to open Settings, then select Personalization.
- Select Start. You now see the Start settings page, with a Layout choice at the top and a list of switches below it.
If Start is missing from the Personalization page, your Windows 11 build is out of date or an organization has restricted the page. See the troubleshooting section below.
Change the Start Menu Layout
Choose How Much Space Pinned Apps Get
The layout setting decides how the Start menu splits its space between Pinned and Recommended. Pick the one that matches how you use Start.
- Open Settings Personalization Start
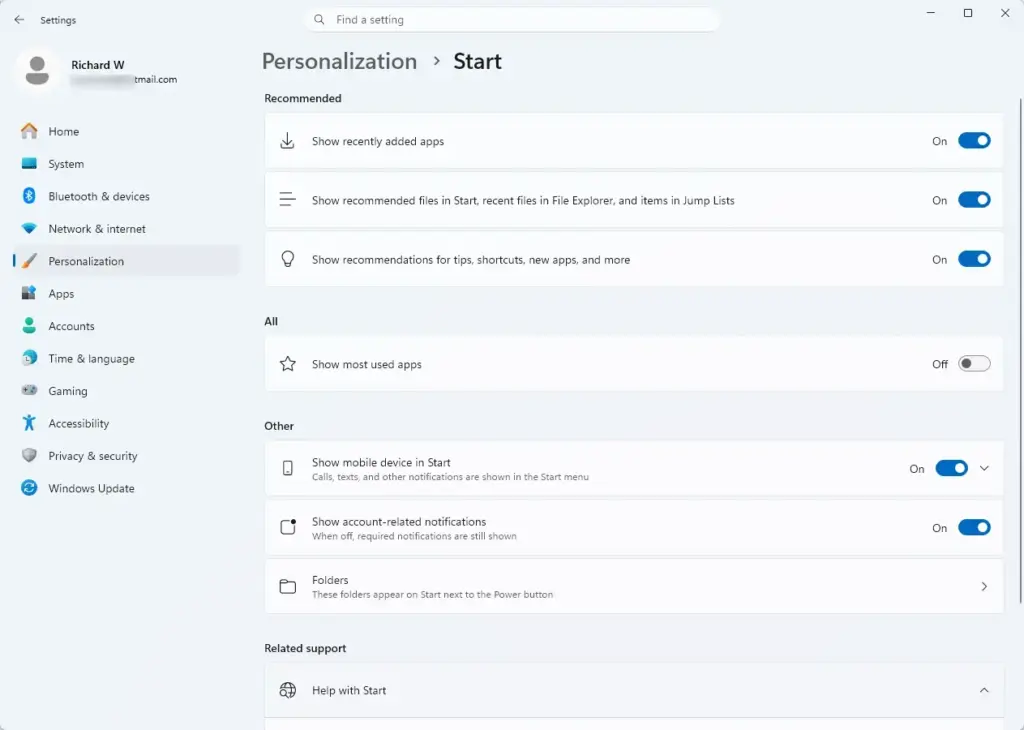
Windows 11 Settings Personalization Start menu options for recent files - Find the Layout setting at the top of the page.
- Select one of the three options:
- Default gives a balanced split between Pinned and Recommended.
- More pins gives Pinned more rows and shrinks Recommended.
- More recommendations does the opposite.
- Press the Windows key to open Start. The Pinned area now shows more or fewer rows depending on your choice.
To reverse the change, return to the same page and select Default.
If you do not see the Layout options, your PC is likely missing a recent cumulative update. Install pending updates from Settings Windows Update and check again.
Move the Start Button to the Left
Windows 11 centers the Start button by default. This step moves it to the left edge of the taskbar, like older Windows versions. The Start menu opens from the left as well.
- Open Settings Personalization Taskbar
- Select Taskbar behaviors to expand it.
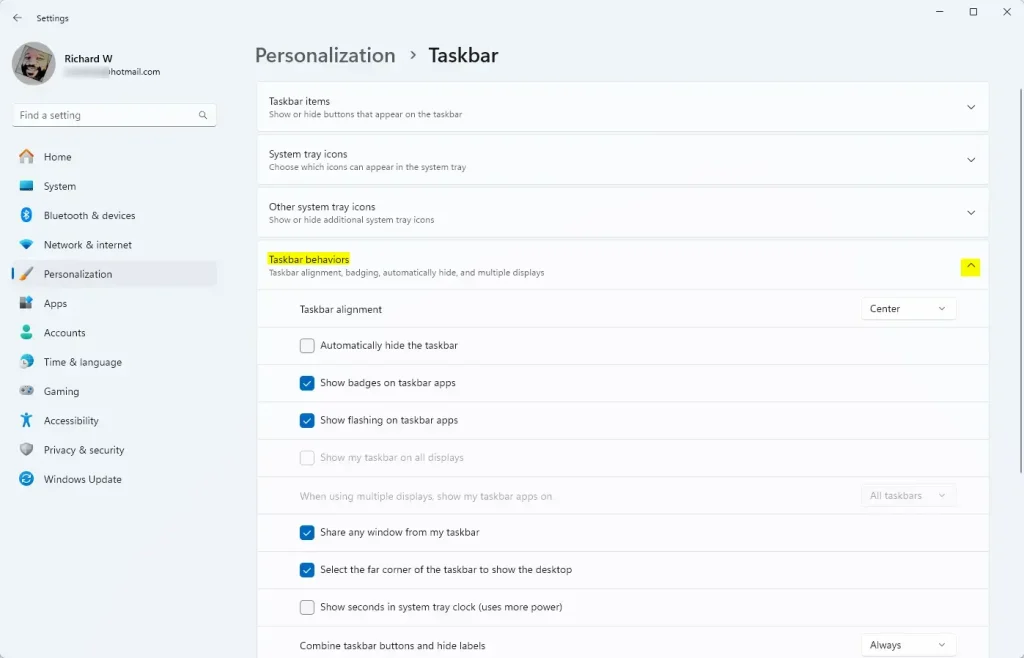
Expand Taskbar behaviors in Windows 11 Personalization settings. - Next to Taskbar alignment, open the drop-down and select Left. The Start button and the taskbar icons shift to the left side immediately.
To undo it, set Taskbar alignment back to Center.
Arrange Pinned Apps
Pinned apps are the shortcuts in the top part of Start. You add, remove and reorder them directly on the Start menu, not in Settings.
Pin an App to Start
- Select the Start button, then select All (the button at the top right of the Pinned area) to open the app list.
- Right-click the app you want.
- Select Pin to Start. The app now appears at the end of the Pinned area.
You can also pin from other places. Right-click an app in Start search results and select Pin to Start. In File Explorer, right-click a folder and select Pin to Start. For some file types and shortcuts, the option sits under Show more options in the right-click menu.
Unpin an App From Start
- Right-click the app in the Pinned area.
- Select Unpin from Start. The app disappears from Pinned but stays installed and stays in All apps.
To bring it back, pin it again from All apps.
Reorder Pinned Apps
- Click and hold an app icon in the Pinned area.
- Drag it to the position you want. The other icons move aside to make room.
- Release the mouse button to drop it.
To send one app straight to the first spot, right-click it and select Move to front.
Group Pinned Apps Into a Folder
Folders keep a crowded Pinned area manageable. A folder appears as a small tile displaying thumbnail icons of the apps stored inside.
- Drag one pinned app on top of another pinned app. Windows creates a folder containing both.
- Select the new folder to open it. The apps appear in a small panel.
- Select the folder name (it starts as Folder) and type your own name.
- Drag more pinned apps onto the folder to add them.
To take an app out, open the folder and drag the app out of the panel and onto the Pinned area. A folder with a single app left dissolves back into a normal icon.
Use Multiple Pinned Pages
When you pin more apps than fit, Pinned splits into pages. Small dots on the right side of the Pinned area switch between them. Scroll with the mouse wheel over the area, or select a dot. Choosing More pins as your layout fits more icons on the first page.
Control What Appears in Recommended
The Recommended section lists recent files, newly installed apps and sometimes suggestions. Each type has its own switch in Settings Personalization Start. Set each to On or Off. The exact wording varies slightly between builds, but the switches below are the ones you will see.
- Open Settings Personalization Start
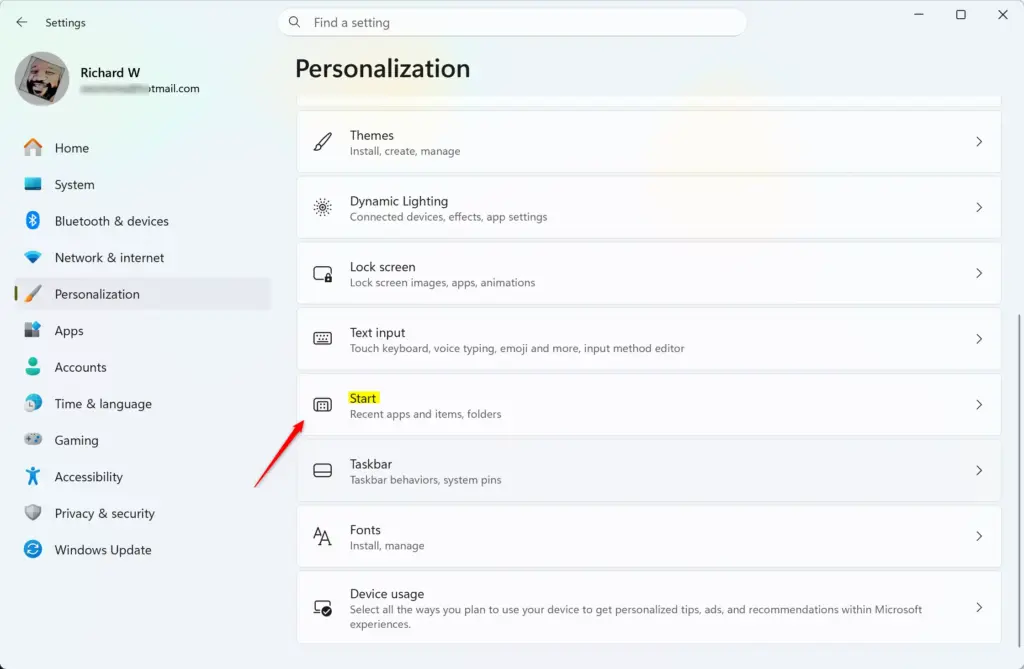
Settings › Personalization › Start - Set Show recently added apps to Off if you do not want newly installed apps listed.
- Set Show most used apps to Off if you do not want Windows listing apps based on how often you open them. On recent builds this switch may be labelled differently or sit with the other app list options.
- Set Show recommended files in Start, recent files in File Explorer, and jump lists to Off to stop recent files appearing. Jump Lists are the short menus showing recent files that pop up when you right-click an app icon. On some builds this switch is worded Show recently opened items in Start, Jump Lists, and File Explorer.
- Set Show recommendations for tips, shortcuts, new apps, and more to Off to remove Microsoft's suggestions. The label differs between builds, and on some builds it mentions app promotions.
- Set Show account-related notifications to Off if you want to stop prompts about your Microsoft account appearing in Start.
Open Start to check the result. The Recommended section now lists fewer items, or shows a short message that there is nothing to show yet.
On some recent builds you may also see Show websites from your browsing history. Turn it off if you do not want website suggestions from your browser to appear in Recommended.
Remove a Single Item From Recommended
You do not have to turn off an entire category to remove one entry.
- Right-click the item in the Recommended section.
- Select Remove from list. The entry disappears. The original file or app stays on your PC.
Why You Cannot Delete the Recommended Section
In standard Windows 11 Home and Pro, the Recommended section cannot be removed through the normal Settings options. If you want it as small and quiet as possible, set the layout to More pins and turn off every switch in the list above. Some recent builds add a switch that hides the section completely. If you see a switch named along the lines of Show recommended section on your Start page, use it. If not, your build does not offer it, and I cannot confirm a supported way to remove the section on Home or Pro.
Choose the Folders Beside the Power Button
The icons next to the Power button give one-click access to places such as Settings and File Explorer. This setting controls which ones appear.
- Open Settings Personalization Start
- Select Folders. A list of folder switches appears.
- Set each folder you want to On. The list includes Settings, File Explorer, Documents, Downloads, Music, Pictures, Videos, Network and Personal folder.
- Open Start and look at the bottom edge, next to the Power button. The icons you turned on appear there.
To remove an icon, return to the same page and set its switch to Off.
Change How the All Apps List Looks
Recent builds of Windows 11 with the redesigned Start menu let you change how the All apps list is displayed. The options are a category view (apps grouped automatically by type), a grid, and a list.
- Select the Start button.
- Select All to open the app list.
- Look for the view switcher near the top of the list and select the view you want: category, grid or list.
If you do not see a view switcher, your build uses the older single alphabetical list, which has no view options. Install the latest updates and check again.
Show or Hide Your Phone in Start
Recent builds can show a panel for a linked phone beside the Start menu if Phone Link is set up on your PC. If your Start settings page has a switch with a name like Show mobile device in Start, set it to Off to hide the panel and On to show it. If the switch is not on your page, your build does not include the panel.
Change the Start Menu Color and Transparency
The Start menu color follows your Windows mode and accent color. You set both in a different part of Settings.
- Open Settings Personalization Colors
- Next to Choose your mode, select Dark or Custom. The Start menu and taskbar shift to a dark background.
- Set Show accent color on Start and taskbar to On. Your accent color now tints the Start menu and the taskbar.
- Choose a color next to Accent color, or select Automatic to let Windows pick one from your wallpaper.
- Set Transparency effects to On or Off to control the frosted-glass look.
If Show accent color on Start and taskbar is greyed out, your mode is set to Light. Windows only allows the accent color on Start and the taskbar in dark mode. Change Choose your mode to Dark, or choose Custom with Windows mode set to Dark.
When Start Settings Are Missing, Greyed Out or Not Applying
The Settings Say "Some of These Settings Are Managed by Your Organization"
On a work or school PC, an administrator can control the Start menu layout and lock some options. Managed pins and Start settings come from your organization's configuration, and you cannot override them on the PC. Ask your IT department. On a personal PC, this message can mean a leftover policy from software you uninstalled, but I cannot confirm which setting is responsible without seeing the machine.
The Start Menu Does Not Reflect Your Changes
If you flip a switch and Start still shows the old layout, restart Windows Explorer (the process that draws the taskbar and Start menu). This does not close your open apps.
- Press Ctrl + Shift + Esc to open Task Manager.
- Select the Processes tab.
- Find Windows Explorer in the list and right-click it.
- Select Restart. The taskbar disappears for a moment and returns with the Start menu refreshed.
If Task Manager opens in its compact view, select More details first.
The Options Look Different From This Article
Microsoft changes Start labels and layouts between feature updates and sometimes rolls a change out to different PCs at different times. If a switch is named slightly differently, look for the one with the same meaning. If a whole option is missing, check Settings Windows Update for pending updates.
Pinned Apps Reset After an Update
There is no single reset button for the Start layout, so if your pins change, repeat the pin and reorder steps above.
What to Do Next
Open Start once more and check the three areas you changed: the Pinned rows, the Recommended section, and the icons beside the Power button. Next, look at Settings Personalization Taskbar to decide which icons and system tray items you want beside Start, and at Settings Personalization Themes if you want the wallpaper and colors to match your new layout. To undo everything here, set Layout to Default, turn the Recommended switches back on, and set Taskbar alignment to Center.
How do I change what opens on startup in 🪟 Windows 11?
Open Settings Apps Startup to see which apps run when Windows starts. Toggle off any you don't need. You can also pin apps to the Start menu instead — they'll open faster when you click them manually. Windows doesn't have a traditional startup folder like older versions did.
How do I make my taskbar look better?
Right-click the taskbar and choose Taskbar settings. Change the taskbar alignment, hide it when not in use, or resize it. Go to Settings Personalization Colors to switch between light and dark mode. Pin your most-used apps to the taskbar for quick access.
Why isn't my taskbar aligned to the left?
Open Settings Personalization Taskbar, scroll to Taskbar behaviors, and toggle on 'Align taskbar to the left'. If this option is grayed out, your system may be managed by an organization that locked this setting.
How to minimize Start menu 🪟 Windows 11?
Open Settings Personalization Start and toggle off 'Show recently added apps', 'Show recommended', or 'Show app suggestions'. You can also unpin individual apps by right-clicking them and selecting 'Unpin from Start'. This reduces the visible content without hiding the Start button.
Was this guide helpful?

About the Author
Richard
Tech Writer, IT Professional
Richard is a writer at Geek Rewind who turns complex IT tasks into clear, step-by-step guides. He draws on years of hands-on experience in system administration and enterprise IT operations, focusing on Windows, Linux and WordPress: the problems people actually run into, and the fixes that work. His server and WordPress guides come from systems he runs himself. Richard builds and maintains the platform behind Geek Rewind, from its Ubuntu servers and Nginx configuration to its custom WordPress plugins. Many new tutorials start with readers' questions, and he's always glad to answer them in the comments.


No comments yet — be the first to share your thoughts!