How to Change Start Menu Size in Windows 11

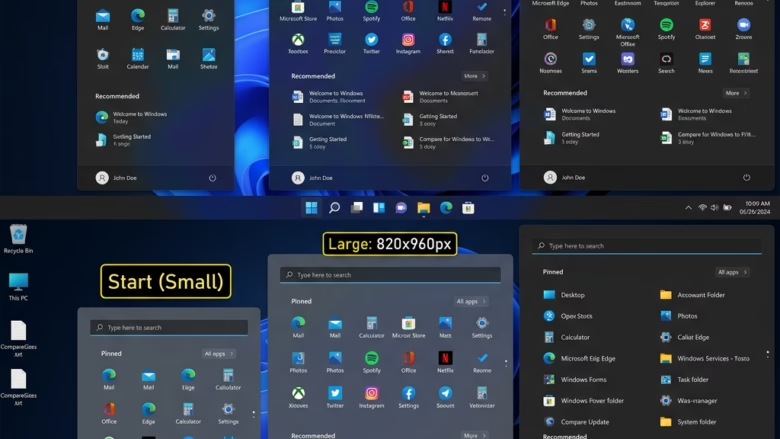
Changing the Start menu size in Windows 11 lets you fit more or fewer apps on your screen at once, depending on how you work. The Start menu is the main hub on your taskbar . It holds your pinned apps, the full app list, and recent files.
A recent update in Windows 11 build 26300.8553 Experimental 25H2 for Insiders adds options to pick a small or large Start menu size, or let Windows pick the best fit automatically. You can switch these settings through the main system options without any extra tools.
Before you start: this feature is in an Insider build. If you are on a regular release of Windows 11, you may not see the size option yet. That is normal, not a fault with your PC. The steps below work the same on Home and Pro.
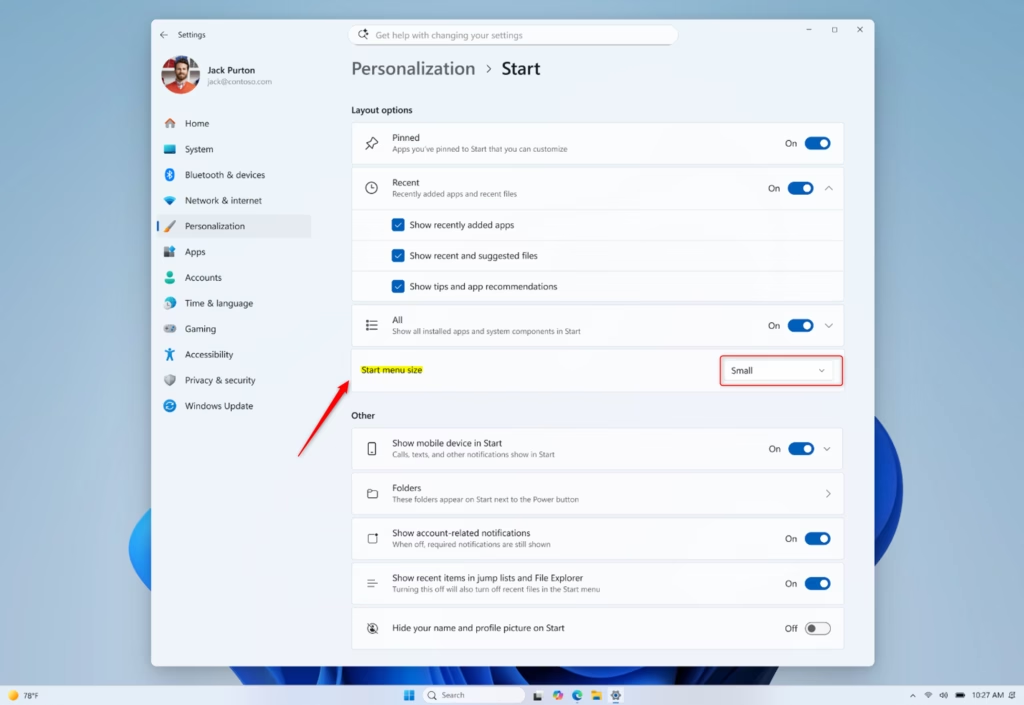
Open Settings , select Personalization Start, then click the Start menu size box and choose Automatic, Small, or Large. The change applies immediately. If you don’t see this option, your Windows 11 build doesn’t include the feature yet.
Option 1Change Start Menu Size in Settings
Changing the Windows 11 Start menu size in the Settings app is the quickest and safest method. You do not touch the Registry, and you can reverse the change in seconds.
- Open Settings by pressing the Win and the I key together. The Settings window opens.
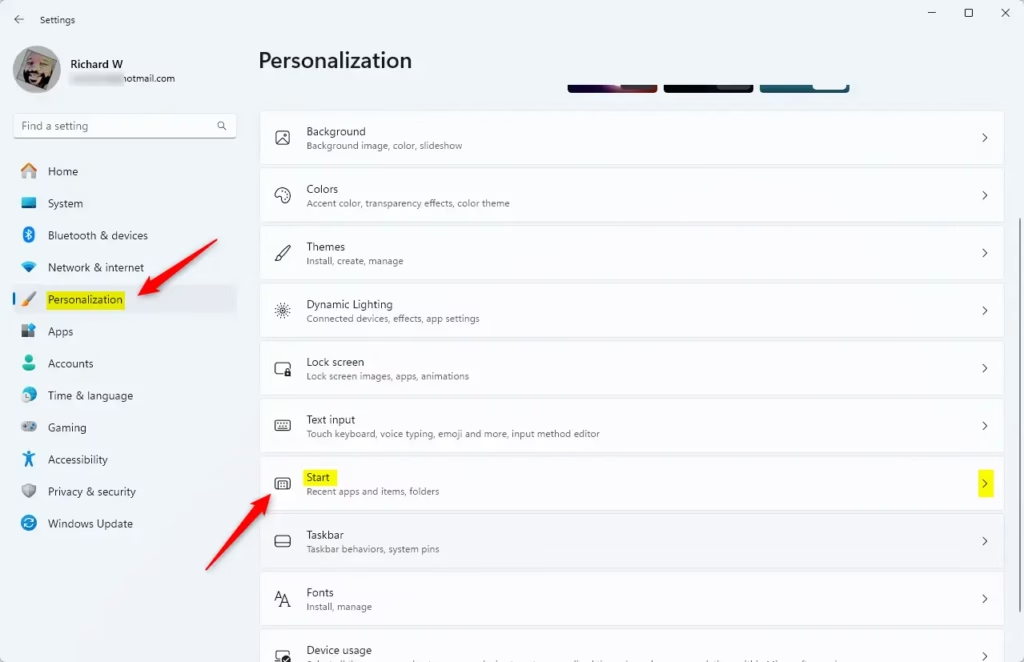
- On the left side, click Personalization. Then, on the right side, click Start. You should now see the Start menu options, such as layout and recommended content.
- Look for Start menu size and click the box next to it. A short list drops down.
- Pick Automatic (the default), Small, or Large. The choice applies straight away.
- Open the Start menu to check the result. If you like it, close the Settings window.
If you cannot find Start menu size, your build does not include the feature yet. Check the build number under Settings System About, or join the Windows Insider program if you want it early. To undo the change, return to the same box and choose Automatic.
Option 2Change Start Menu Size using the Registry
Adjusting the Windows 11 Start menu size through the Registry Editor lets you force a specific layout when the standard options do not work. The short version: open the Registry Editor by typing regedit in the taskbar search, go to 🗝️HKEY_CURRENT_USER\
Why do this? Changing the Registry lets you adjust settings that are missing from the Settings app. For example, the option may not show up on your PC, or you may want to set it by hand.
What happens when done? Your Start menu will change its size based on the setting you choose in the Registry. You might need to restart your computer for the changes to take full effect.
Even so, change only the value described here. A wrong edit in the Registry can cause problems, so consider creating a restore point first.
Step 1Open Registry Editor
Note: This step requires administrator privileges. If your account is a standard user, you will be asked for an administrator password.
- Press the Windows key and type
regedit. Registry Editor appears in the search results. - Right-click Registry Editor and select Run as administrator.
- Click Yes if a User Account Control prompt appears. The Registry Editor window opens.
Step 2Navigate to the correct Registry key
Now go to the right key. The path is:
HKEY_CURRENT_USER\Software\Microsoft\Windows\CurrentVersion\Explorer\Advanced
- Click the address bar at the top of the Registry Editor window.
- Paste the path above, then press Enter.
The left pane should now jump to the matching folder, and its existing values appear on the right. If nothing happens, check that you copied the whole path with no extra spaces.
Step 3Create or Modify the 'StartMenuSize' DWORD value
Next, create the new value in the Advanced folder.
- In the right-hand pane of the
Advancedfolder, right-click on an empty space. - Select New, then click DWORD (32-bit) Value. A new entry appears in the list with its name highlighted.
- Name the new value
StartMenuSize, then press Enter. - Double-click the newly created
StartMenuSizevalue to edit it.
Step 4Set the Value Data for your desired size
A new window pops up. In the Value data field, enter one of the following numbers:
- 0 for "Automatic" (default)
- 1 for "Small"
- 2 for "Large"
To undo the change later, open the same value again and set it back to 0.
Step 5Apply the changes
- Click OK to save the change. The new number appears in the Data column.
- Close the Registry Editor.
To see the changes, you might need to restart your computer or restart Windows Explorer. A full restart is the simplest option. To restart Windows Explorer instead:
- Press Ctrl + Shift + Esc to open Task Manager.
- Find Windows Explorer in the list and right-click it.
- Select Restart. The taskbar disappears for a moment and then comes back.
Open the Start menu to confirm the new size.
Summary
To change your Windows 11 Start menu size, go to Personalization Start in Settings and select your preferred layout option (Automatic, Small, or Large). This is the method to try first. If the option is missing or you want more control, you can edit the Windows Registry by hand. That method needs care and administrator privileges. Whichever you use, setting the size back to Automatic (or the Registry value to 0) undoes the change.
Frequently asked questions
Can I make 🪟 Windows 11 Start menu like 🪟 Windows 10?
Windows 11's Start menu has a different layout than Windows 10, and you can't fully restore the old design. However, you can resize the Start menu in newer builds to make it smaller or larger. You can also pin different apps to customize what appears when you open it.
Why is my Start menu so big now?
Windows 11 displays the Start menu larger by default to show more apps and recent files at once. If you updated to a newer build, you may now have size options available. Open Settings Personalization Start to check for a size toggle and adjust it to your preference.
How do I change to classic Start menu in 🪟 Windows 11?
Windows 11 doesn't offer a classic Start menu like Windows 10. You can customize the current Start menu by changing its size, removing pinned apps, and turning off recent files and suggestions in Settings Personalization Start, but the layout itself cannot be changed.
How to change GUI size in 🪟 Windows 11?
To change the GUI size in Windows 11, open Settings Accessibility Display. Use the Text size slider to adjust how large text appears across your system. For the overall interface scaling, go to Settings System Display and adjust the scale percentage under Scale.
Still have a question?
Answered by AI from this guide. Good questions may be added to this page — please don't include personal details.
Did this guide fix your problem?

About the Author
Richard
Tech Writer, IT Professional
Richard is a writer at Geek Rewind who turns complex IT tasks into clear, step-by-step guides. He draws on years of hands-on experience in system administration and enterprise IT operations, focusing on Windows, Linux and WordPress: the problems people actually run into, and the fixes that work. His server and WordPress guides come from systems he runs himself. Richard builds and maintains the platform behind Geek Rewind, from its Ubuntu servers and Nginx configuration to its custom WordPress plugins. Many new tutorials start with readers' questions, and he's always glad to answer them in the comments.
No comments yet — be the first to share your thoughts!