How to Set Windows Terminal to Open with Command Prompt on Windows 11
Setting Windows Terminal to open with Command Prompt on Windows 11 lets you start your command-line work in the familiar environment you prefer.
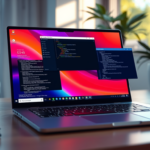
Windows Terminal is a modern app that brings together Command Prompt, PowerShell, and other command-line tools in one place. By default, it usually opens to PowerShell when you start it.
However, many people find it easier to jump straight into Command Prompt, especially if they’re used to it from older Windows versions. This small change saves you the extra click to switch shells every time you open the app.
Open Windows Terminal, click the dropdown arrow next to the plus icon, select Settings, and change the Default profile from Windows PowerShell to Command Prompt. Click Save to apply.
What happens when you are done?
Once complete, Windows Terminal will automatically start with your preferred Command Prompt environment, making your workflow faster and more convenient.
Installation and Environment Setup
If you don’t have Windows Terminal yet, grab it from the Microsoft Store or use the Windows Package Manager. Open your terminal and run the command: winget install --id Microsoft.WindowsTerminal. This ensures you have the latest version for your command-line interface needs.
How to Set Windows Terminal to Open with Command Prompt
You can set Windows Terminal to open with Command Prompt every time you start it, instead of the usual PowerShell. This guide shows you how to change that setting in a few steps so your preferred command-line tool is ready to go.
2. Once the app is open, click the downward-facing arrow located next to the ( + ) icon in the top bar. 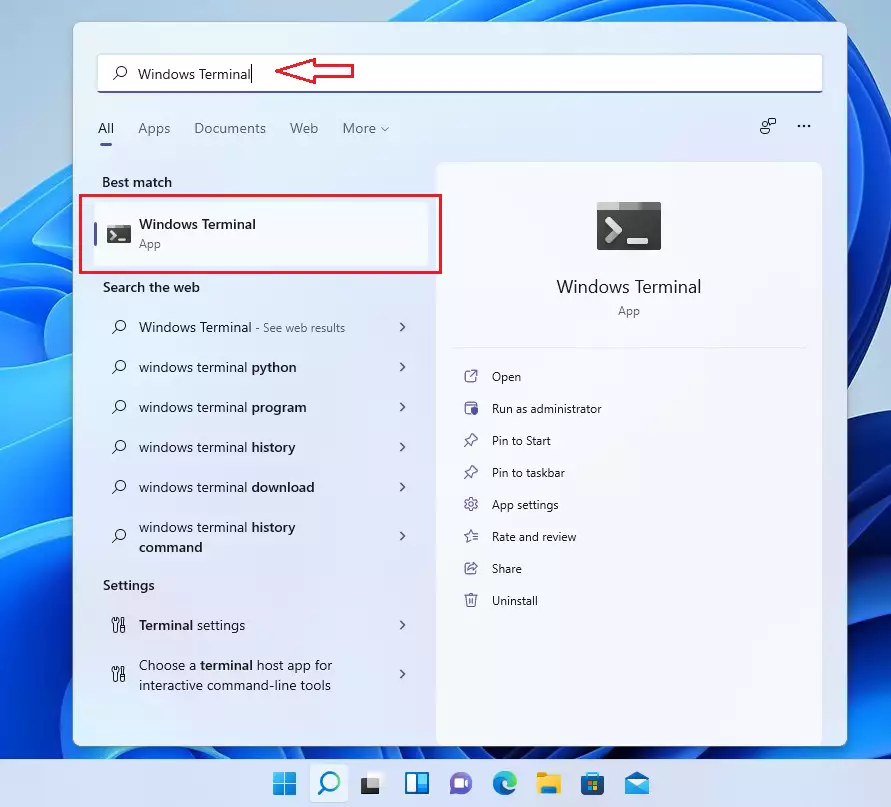
3. Select Settings from the drop-down menu that appears. 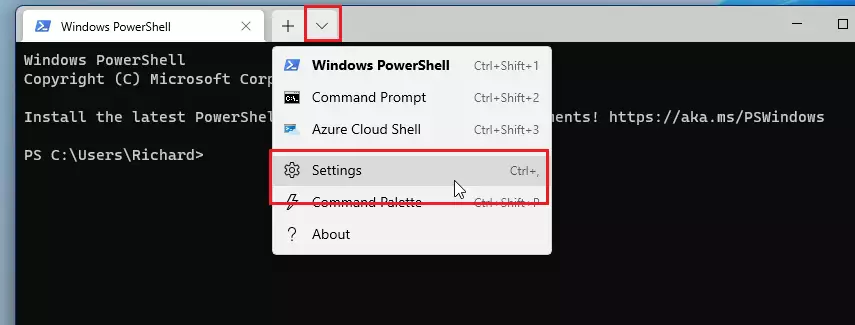
4. Look for the Default profile option. Click the box and change the selection from Windows PowerShell to Command Prompt.
5. Click the Save button located at the bottom right corner of the window to apply your changes. 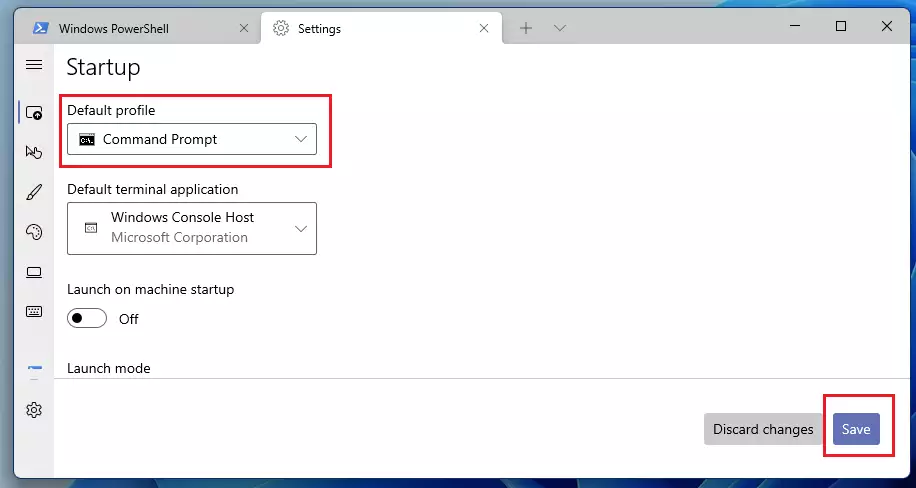
Advanced Configuration with settings.json
For more control over Windows Terminal, you can directly edit its settings.json file. Hold the Alt key while clicking the Settings menu. This opens the settings.json file in your default text editor, allowing you to customize profiles, colors, and key bindings.
Using the wt Command
You can launch the terminal using the wt command. Press ⊞ Win+R and type wt to open it. You can also use command-line arguments to open specific folders. For example, use wt -d C:\Users\GenericUser\Documents to start in a specific directory.
Summary
Switching Windows Terminal to open Command Prompt is a quick setting change that ensures your favorite command-line tool is ready instantly. You can do this through the settings menu or by editing the settings.json file for more advanced customization.
Can I open Command Prompt as Administrator by default in Windows Terminal?
Yes. In the Settings menu, select your Command Prompt profile. Toggle the switch labeled Run this profile as Administrator to the on position. Note that this requires admin privileges to execute successfully. Once saved, every new tab for this profile will launch with elevated permissions automatically.
What is the difference between Windows Console Host and Windows Terminal?
Windows Console Host (conhost.exe) is the older system that handled command-line apps. Windows Terminal is a modern, tabbed application that supports GPU acceleration, custom themes, and Unicode characters. It provides a much better user experience and is the recommended interface for all modern Windows command-line tasks.
How do I reset Windows Terminal settings to default?
To reset, navigate to the Settings menu. Click on Open JSON file while holding the Alt key. You can delete the configuration file or simply uninstall and reinstall the app via the Microsoft Store. This will clear your custom profiles and restore the original factory settings.
Was this guide helpful?

About the Author
Richard
Tech Writer, IT Professional
Richard, a writer for Geek Rewind, is a tech enthusiast who loves breaking down complex IT topics into simple, easy-to-understand ideas. With years of hands-on experience in system administration and enterprise IT operations, he’s developed a knack for offering practical tips and solutions. Richard aims to make technology more accessible and actionable. He's deeply committed to the Geek Rewind community, always ready to answer questions and engage in discussions.


[…] First, open Windows Terminal and select Command Prompt. […]
[…] enabling a feature, open the Windows Terminal app and select the Command Prompt tab. Then, paste the path to the ViVeTool.exe file into the […]
[…] open Windows Terminal, then select the Command Prompt […]
[…] Open Windows Terminal with the Command Prompt tab […]
[…] Windows Terminal with the Command Prompt […]
[…] can also create new files using the Windows Terminal (command line). To do that, use the steps […]
[…] open Windows Terminal as administrator and select either Windows PowerShell or Command […]
[…] sync the system clock using Windows Terminal, go and open Windows Terminal as administrator and select Windows PowerShell or Command […]
[…] open Windows Terminal as administrator. Then use either the Command Prompt or Windows […]
[…] you can use Windows Terminal with the Command Prompt tab to run the Command below to allow or disable a user changing their […]
[…] the Windows Terminal app and select the Command Prompt tab. Then, run the command below to hide the Taskbar in Windows 11 […]
[…] Yet another way to disable receiving updates for other Microsoft products is to use the Windows Terminal. […]
[…] Via Windows commands or PowerShell […]
[…] First, open the Windows Terminal app. […]
[…] open the Windows Terminal […]
[…] Windows Terminal with PowerShell, run the commands below to find your device’s memory […]
[…] do that, first open Windows Terminal as administrator and select either Windows PowerShell or Command […]
[…] open Windows Terminal as administrator, then run the commands […]
[…] select either the PowerShell or Command Prompt tab and run the command […]
[…] open the Windows Terminal […]
[…] Open Windows Terminal with the Command Prompt tab […]
[…] open the Windows Terminal app as administrator. Then, run the command below using either the Command Prompt or Windows PowerShell to check the current version of WSL installed on your […]
[…] do that, first, open the Windows Terminal app as […]
[…] To do that, first, open the Windows Terminal app. […]
[…] open the Windows Terminal app and select the Command Prompt […]
[…] Yet another way one can view the build number in Windows 11 is to use the Terminal app with Command Prompt. […]
[…] open Windows Terminal or the Command Prompt as […]
[…] Another way to install the JPEG XL image extension is to use the winget command on the Windows Terminal. […]
[…] BitLocker built-in commands can enable or disable auto-locking fixed drives in Windows 11. To do that, open the Windows Terminal app. […]
[…] First, open Windows Terminal and select either Windows PowerShell or Command Prompt. […]
[…] copy your SSH key to the server, open Windows Terminal, copy and paste the line below, and press […]
[…] There are other ways one can change one’s account password in Windows. For example, if you have a local account, you can use PowerShell or Windows commands to reset your account password from Command Prompt or Windows Terminal. […]
[…] 11 also has a command-line interface app called Windows Terminal. Windows Terminal is the default console for opening installed shells like PowerShell and the […]
[…] 11 also has a command-line interface app called Windows Terminal. Windows Terminal is the default console for opening installed shells like Command Prompt and […]
[…] do that, first, open Windows Terminal as administrator and select either Windows PowerShell or Command […]
[…] the Windows Terminal app as […]
[…] Windows Terminal as an administrator. To do this, search for “Windows Terminal” in the Start menu, […]
[…] can also open Settings from the PowerShell or Command Prompt by […]
[…] Click the Start button, type Windows Terminal, right-click it, and select Run as administrator. (Learn how to open Windows Terminal as admin) […]
[…] you want a step-by-step guide with screenshots on how to open Command Prompt in Windows Terminal or PowerShell in Windows 11, check out these helpful […]
[…] the Start button and choose Windows Terminal. You can also open Windows Terminal guide if you want […]
[…] Windows Terminal as Administrator. To do this, search for “Windows Terminal” in the Start menu, right-click it, and […]
[…] enable Compact OS, open Windows Terminal as […]
[…] Windows Terminal with Command Prompt, do […]
[…] another tool to list all user accounts in Windows is the Command Prompt. To do that, open the Command Prompt, then type the commands […]
[…] Or search for “Windows Terminal” in the Start menu and run it as administrator. Learn more about opening Windows Terminal. ⚠️ Admin privileges […]
[…] + X and select Windows Terminal (Admin) or Command Prompt (Admin). If you want, you can also open Windows Terminal and switch to the Command Prompt […]
[…] Windows Terminal with the Command Prompt […]
[…] the Windows Terminal app. Search for it in the Start […]
[…] Windows Terminal as an […]
[…] Windows Terminal as an […]
[…] open Windows Terminal and use the Command Prompt tab as administrator. Then use the command format […]
[…] can also learn more about your system settings by visiting the Windows Terminal Windows documentation […]
[…] users can use the Windows Terminal or Command Prompt or Windows […]