How to Sync Clock Time with Internet Time Server in Windows 11

Internet time sync in Windows 11 updates your PC clock automatically using an online time server, so your time stays accurate to the second. By default, Windows checks a time server such as time.windows.com about once every seven days to correct normal clock drift.
An accurate clock prevents odd sign-in errors, keeps security certificates valid, and keeps file timestamps in the right order. You can force an immediate sync whenever the clock drifts, or after you replace the CMOS battery on the motherboard. A dead CMOS battery is a common reason a PC loses time every time it is shut down.
Open Settings, navigate to Time & language, then Date & time, and click “Sync now” under Additional settings. Alternatively, open Control Panel , go to Date and Time, select the Internet Time tab, click “Change settings,” and then click “Update now.
Why Sync Your Clock?
An accurate clock matters for your files, your security, and overall system performance. Kerberos sign-ins, HTTPS websites, email and update services can all fail when the clock is off by more than a few minutes.
What You Need to Know
Admin privileges required: You need administrator privileges to sync the system clock. If you are on a standard account, you will be asked for an administrator password or approval.
Domain computers: Domain-joined PCs (computers connected to a corporate network) cannot use Options One and Two. They take their time from the domain, so use Option Three instead.
References
How the Windows Time Service Works – Learn more about how the Windows Time Service works
W32time settings fail when starting Windows Time Service - Windows Server - Information about NTP client synchronization
Option 1Sync Clock Using Settings
If your computer is not joined to a work network, the Settings app is the quickest way to sync the clock. You open the date and time page and click one button, and Windows updates the system clock from the internet right away.
- Press Win+I to open Settings.
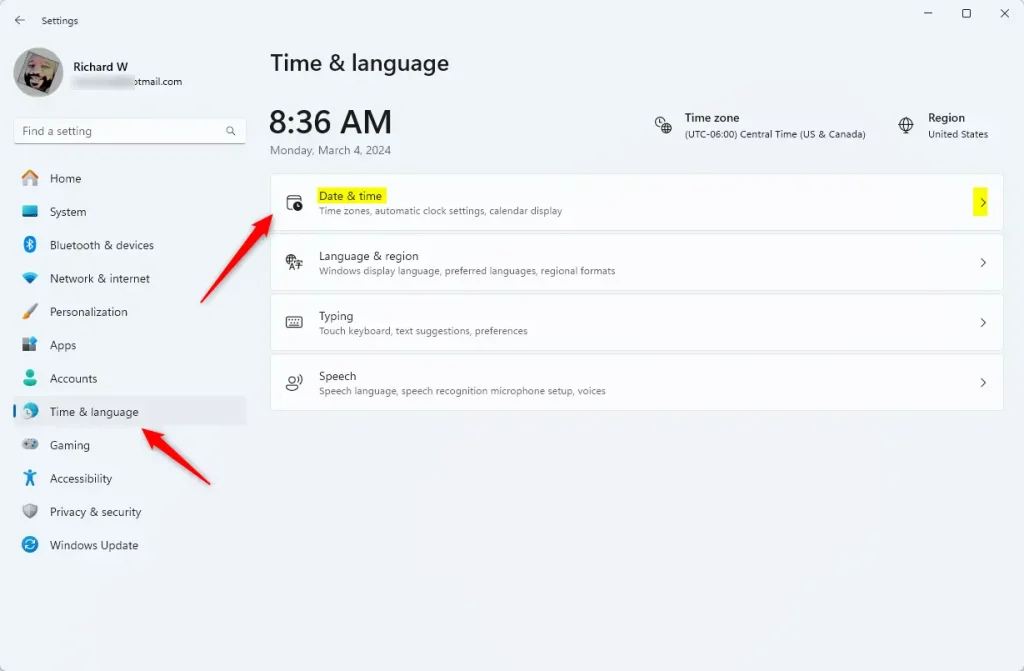
- Click Time & language on the left side. Then click Date & time on the right side. The page shows the current time, the time zone, and the Set time automatically option.
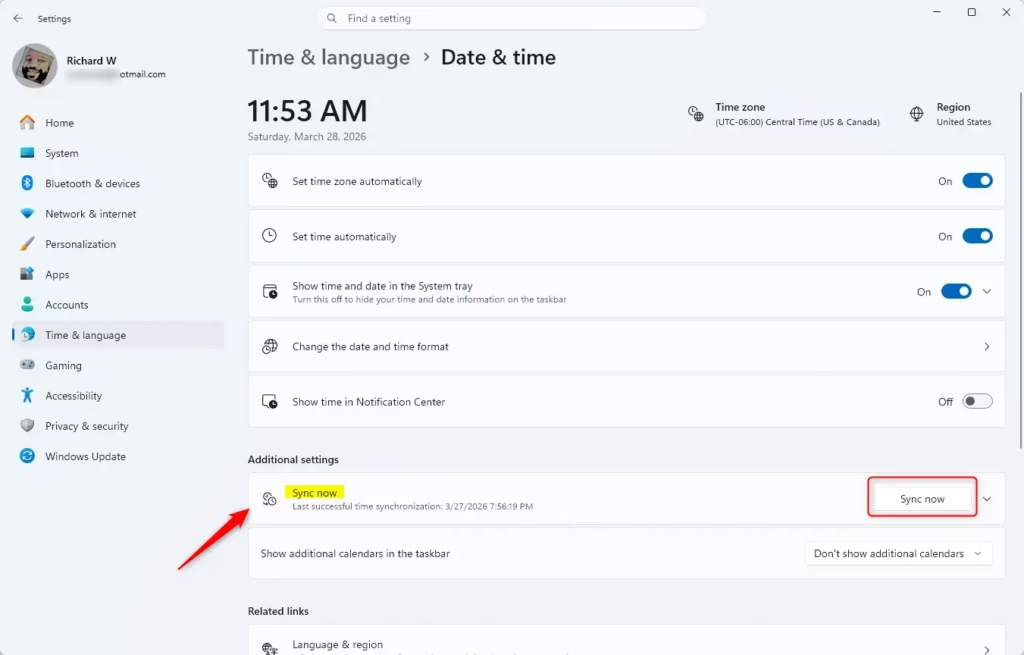
- Scroll down to Additional settings and click the Sync now button. Wait a few seconds while Windows contacts the time server.
When it finishes, Windows shows when the time was last synced and which time server it used. If the time is still wrong, check that the time zone is correct on the same page. A wrong time zone looks just like a wrong clock. If Sync now fails, try Option Two or Three.
Option 2Sync Clock Using Control Panel
The classic Control Panel also works if you prefer the traditional settings. This method lets you choose which time server to use and force an update manually. As in Option One, this does not work on a domain-joined PC.
- Open Control Panel in icon view. Click the Date and Time icon. The Date and Time window opens.
- You can close Control Panel now if you like. The Date and Time window stays open.
- Click the Internet Time tab. Then click Change settings. Approve the User Account Control prompt if it appears. The Internet Time Settings window opens.
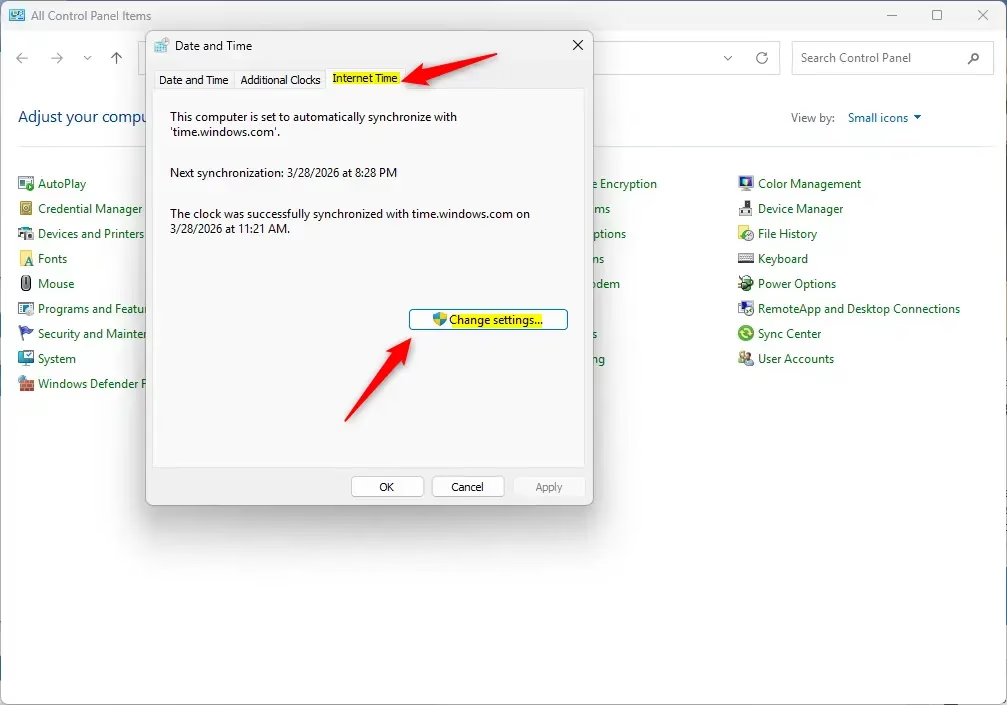
- Click Update now. A message tells you whether the clock was synchronized and with which server.
The Synchronize with an Internet time server box must be checked, or the Update now button is greyed out. If you prefer, pick or type a different Internet time server to sync with. If an error appears, click Update now again. Time servers are sometimes busy, and a second attempt often works. If the Internet Time tab is missing, the PC is probably joined to a domain.
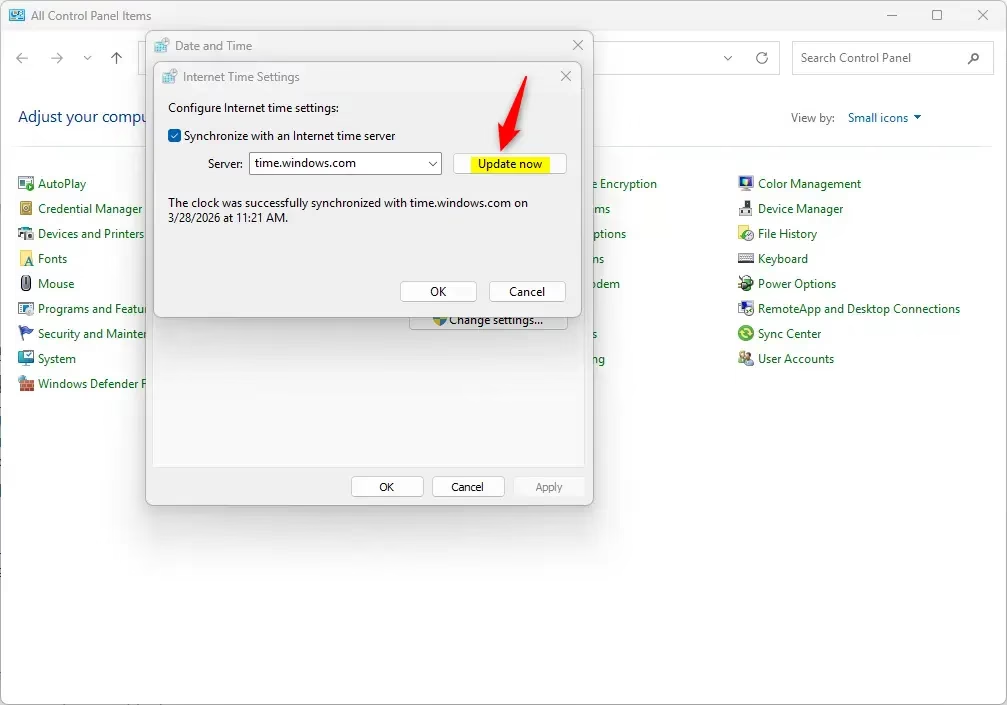
Click OK when you are done to close the window and save any server change. Then check the clock in the taskbar.
Option 3Sync Clock Using Command Line
You can also sync the clock from the command line, in PowerShell or Command Prompt. This is the fastest way to fix time sync errors, and it works on standalone computers and on work networks. Use the right command for your setup, as shown below.
- Open Windows Terminal as an admin. For example, right-click the Start button and choose Terminal (Admin). Select Windows PowerShell or Command Prompt. If the window title does not say Administrator, close it and reopen it as an admin, or the command will be refused.
- Copy and paste one of the commands below. Press Enter. The terminal reports whether the sync succeeded.
If your PC is NOT joined to a domain:
w32tm /resync
If your PC IS joined to a domain:
net time /domain
Error: "The service has not been started. (0x80070426)"
This means the Windows Time service is not running and needs to start. Run this command first:
net start w32time
Run the sync command again afterwards.
Error: "The computer did not resync because no time data was available"
Run the command again. It should succeed on the next attempt. If it keeps failing, check that the PC has internet access and that a firewall is not blocking time traffic.
- You can close Windows Terminal now.
Summary
How to synchronize server time with internet?
To sync a PC's clock with an internet time server, open Settings, go to Time & language, then Date & time. Turn on Set time automatically, then select Sync now. Windows contacts time.windows.com by default. You need administrator rights on a standard account, and domain-joined PCs get their time from the network domain instead.
How to synchronize clock in 🪟 Windows 11?
To sync the clock in Windows 11, open Settings and go to Time & language Date & time. Make sure Set time automatically is on, then click Sync now under Additional settings. The clock updates within a few seconds, and the time zone should be correct too.
Why isn't Windows time syncing with the time server?
Windows usually fails to sync because the time server cannot be reached. Check that Set time automatically is on, and that your internet connection works. A firewall or VPN can block the port used for time traffic, which is UDP 123. Also check that the Windows Time service is running, since it does the syncing.
How do I force my time to sync with an NTP server?
Open Command Prompt as administrator and type w32tm /resync, then press Enter. This forces Windows to contact its time server right away. If it still fails, point the Windows Time service at a specific NTP server (Network Time Protocol, a standard for syncing clocks) with w32tm /config /manualpeerlist:time.windows.com /syncfromflags:manual /update.
Did this guide fix your problem?

About the Author
Richard
Tech Writer, IT Professional
Richard is a writer at Geek Rewind who turns complex IT tasks into clear, step-by-step guides. He draws on years of hands-on experience in system administration and enterprise IT operations, focusing on Windows, Linux and WordPress: the problems people actually run into, and the fixes that work. His server and WordPress guides come from systems he runs himself. Richard builds and maintains the platform behind Geek Rewind, from its Ubuntu servers and Nginx configuration to its custom WordPress plugins. Many new tutorials start with readers' questions, and he's always glad to answer them in the comments.
No comments yet — be the first to share your thoughts!