How to Update WSL Kernel on Windows 11
Updating the Windows Subsystem for Linux (WSL) kernel on your Windows 11 computer ensures you have the latest security patches and performance improvements for your Linux distributions running within Windows.
Update your WSL kernel by opening Windows Terminal as an administrator and running the command wsl –update. This downloads and installs the latest kernel version from Microsoft. After the update, run wsl –shutdown to ensure the new kernel is loaded.
Why update the WSL kernel?
Keeping your Linux kernel updated is important for your computer. It gives you the latest security fixes and helps your Linux tools run faster. It also makes sure new software works correctly on your system.
What happens when you are done?
After you finish, your Windows Subsystem for Linux (WSL) will use the newest kernel version from Microsoft. This makes your Linux environment more stable and gives you access to the latest features and performance improvements.
How to verify your current WSL kernel version
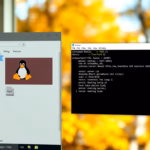
Checking your current WSL kernel version on Windows 11 is simple. Open the Windows Terminal as an administrator and run the `wsl –status` command. This will show you the exact kernel number currently in use by your Windows Subsystem for Linux.
- Open the Windows Terminal as an administrator. (Note: This step requires admin privileges.)
- Type the following command and press Enter:Code
wsl --status
- Look for the kernel version number in the output.
How to update WSL kernel on 🪟 Windows 11
To update your WSL kernel on Windows 11, you just need to run a quick command in the Windows Terminal. Open the terminal as an administrator and type `wsl –update`. This command will automatically find and install the newest Linux kernel for your WSL.
- Open the Windows Terminal as an administrator. (Note: This step requires admin privileges.)
- Type this command and press Enter:Code
wsl --update
- Wait for the process to finish. It will download the latest linux-msft-wsl package automatically.
How to update WSL kernel without Microsoft Store
You can update your WSL kernel on Windows 11 even without the Microsoft Store by using the ‘wsl –update’ command, which gets the latest files directly from Microsoft’s servers.
Is a system reboot required after updating?
wsl --shutdown in your terminal. This closes all running Linux distributions so the new kernel can load the next time you open them.Summary
Keeping your WSL kernel updated on Windows 11 is important for security and speed, and you can easily do this with the ‘wsl –update’ command in an administrator terminal.
Why does wsl –update not change my kernel version?
If running ‘wsl –update’ doesn’t change your kernel version on Windows 11, it usually means you’re already on the latest version Microsoft has released through the command line.
How do I roll back to a previous WSL kernel?
If your Linux tools crash after an update, you can easily roll back to a previous WSL kernel version on Windows 11 by opening an administrator terminal and running ‘wsl –update –rollback’.
Was this guide helpful?

About the Author
Richard
Tech Writer, IT Professional
Richard, a writer for Geek Rewind, is a tech enthusiast who loves breaking down complex IT topics into simple, easy-to-understand ideas. With years of hands-on experience in system administration and enterprise IT operations, he’s developed a knack for offering practical tips and solutions. Richard aims to make technology more accessible and actionable. He's deeply committed to the Geek Rewind community, always ready to answer questions and engage in discussions.


No comments yet — be the first to share your thoughts!