How to Enable or Disable Peek in Windows 11

Peek is a built-in Windows 11 feature that lets you view your desktop by hovering your mouse over the far right corner of the taskbar , without minimizing your open apps. This tutorial shows how to turn it on or off, and how to change it back later.
There are two ways to do it. The Performance Options dialog is the easy one and is what most people need. The Registry method is a fallback for when that dialog does not work. Either way, you can reverse the change at any time.
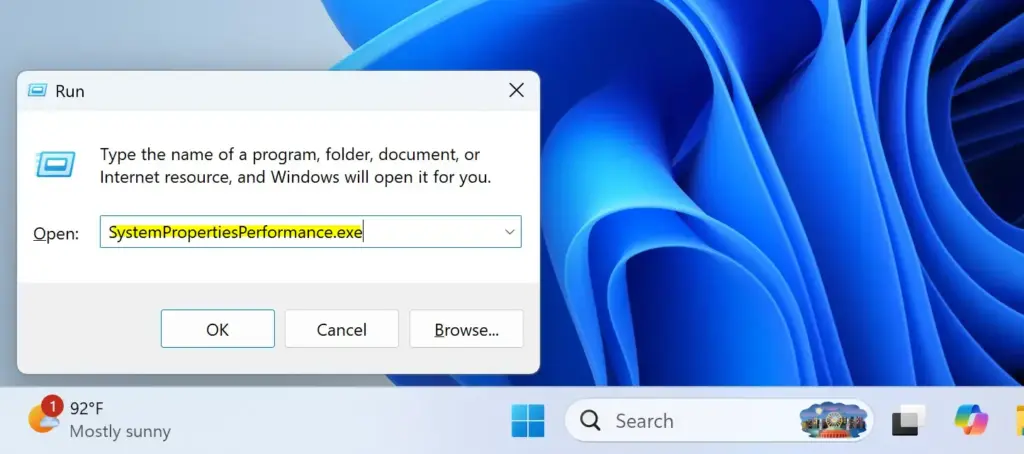
To enable or disable Peek, open Performance Options by pressing Win+R, typing SystemPropertiesPerformance.exe, and pressing Enter. On the Visual Effects tab, check or uncheck “Enable Peek” and click OK.
What is Peek?
Peek lets you see your desktop without minimizing anything. Move your mouse pointer to the far right edge of the taskbar and all open windows turn transparent. Move the pointer away and they come back, so nothing is closed or rearranged.
- When you move your mouse to the very right edge of the taskbar , your open windows become see-through. This lets you check the desktop quickly.
- You can also hover over an app’s icon on the taskbar . A small preview of that app appears. If you hover over that preview, it becomes a larger, live view of the window.
In both cases you get a quick look without switching to the window. Nothing changes until you click.
You can manage Peek through Windows settings or through the Registry. Start with the standard method. It is safer and works on both Home and Pro editions.
Option 1Use Visual Effects Settings
Windows has a settings area that controls system appearance and performance, and the Peek option lives there. You open it with a Run command, so there is no need to dig through menus.
Step 1Open Performance Options
The Run dialog is the fastest way to reach Performance Options. Follow these steps:
- Press Windows key + R on your keyboard. A small box called the Run dialog opens in the lower-left corner of the screen.
- In the box, type
SystemPropertiesPerformance.exeand then press Enter or click the OK button. - The Performance Options window opens. It should show the Visual Effects tab. If another tab is showing, click Visual Effects.
Windows 11 also has a Taskbar behaviors page in Settings Personalization Taskbar That page has a related option for the far corner of the taskbar. If hovering over the corner does nothing even though Peek is enabled, check that page too. Which option you see there can differ between Windows 11 versions.
The Peek checkbox itself is in the Performance Options window you just opened. This is the setting that controls whether Windows shows the desktop preview when you hover over the show desktop corner.
Step 2Find and Adjust the Peek Setting
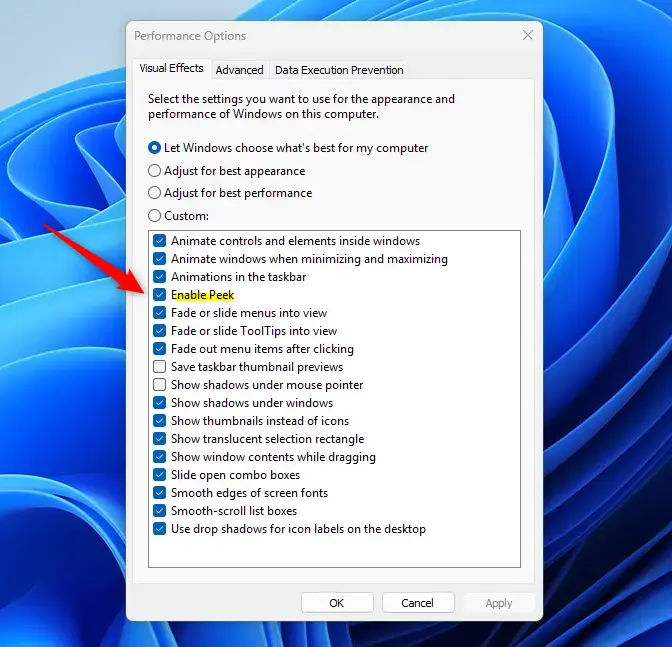
The Visual Effects tab is a list of checkboxes for interface animations and transparent display features. Scroll through the list until you find Enable Peek. Some builds may word it a little differently, such as "Allow transparent glass".
- To turn Peek on: Make sure the box next to "Enable Peek" (or a similar phrase) has a checkmark in it. This is usually the default setting.
- To turn Peek off: Remove the checkmark from the box next to "Enable Peek."
If the radio button at the top is set to Let Windows choose what's best for my computer, you can still change a single checkbox. Windows will then switch the selection to Custom. That is normal.
Step 3Apply Your Changes
Now save the change so Windows applies it. You do not need to restart for this method.
- Click the OK button at the bottom of the Performance Options window. The window closes.
Windows applies the setting right away. To test it, move your mouse to the far right corner of the taskbar. If Peek is on, open windows become see-through. If it is off, they stay as they were. To undo the change, reopen Performance Options and tick or untick the box again.
Option 2Manage Peek with Registry Editor
Registry Editor is a database of low-level operating system settings. It lets you change Windows 11 features when the standard menus do not work. Incorrect changes can cause system problems, so use this method only if the Visual Effects option fails or is not available to you.
Editing the Registry carries risks. If you are not comfortable with it, stick with the first method. Before you change anything, back up the Registry. In Registry Editor, choose File Export, pick a location, and save the file. If something goes wrong, double-click that file to restore the saved settings.
Step 1Open Registry Editor
Registry Editor is the built-in tool for viewing and changing system configuration keys. You start it from the Run dialog.
- Press Windows key + R on your keyboard to open the Run dialog box.
- Type
regeditand press Enter or click OK. - If a User Account Control (UAC) box appears asking for permission, click Yes to let the Registry Editor make changes. The Registry Editor window then opens, with a folder tree on the left.
Step 2Go to the Correct Registry Location
Registry Editor organizes settings in a folder tree. In the left panel, expand the folders one by one until you reach the DWM folder. The full path is:
HKEY_CURRENT_USER\Software\Microsoft\Windows\DWM
To get there, click the arrow next to HKEY_CURRENT_USER to expand it. Then expand Software, Microsoft, and Windows. Click Windows, then select the DWM folder in the list. The values stored in that folder appear in the right-hand panel.
Step 3Change the EnableAeroPeek Setting
The DWM folder holds keys that control Desktop Window Manager behavior, including the transparency used by the Peek preview. The value you need is named EnableAeroPeek. It is a number value that accepts only 0 or 1. A value of 1 turns Peek on and 0 turns it off. Use the steps below to set it.
To Turn Peek On (Set Value to 1):
First, check whether the value already exists and change it:
- In the right side of the window, look for a setting named
EnableAeroPeek. - If you see it, double-click on it.
- A window pops up. In the Value data box, change the number from
0to1. - Click OK. The new number now shows in the Data column.
If EnableAeroPeek does not exist, you need to create it:
- Right-click on an empty spot in the right side of the window.
- Choose New, then choose DWORD (32-bit) Value. A new entry appears with its name selected for editing.
- Name the new setting exactly
EnableAeroPeek. - Double-click the new
EnableAeroPeeksetting you just created. - Set its Value data to
1. - Click OK.
To Turn Peek Off (Set Value to 0):
To go the other way and change the value back, use these steps:
- In the right side of the window, look for a setting named
EnableAeroPeek. - If you see it, double-click on it.
- In the pop-up window, change the Value data from
1to0. - Click OK.
If EnableAeroPeek does not exist, create it as described above. Set its value to 0 if you need to confirm that Peek stays disabled.
A value of 1 enables Peek, while 0 disables it. Any other number is not valid for this setting.
Step 4Apply the Changes
Registry changes need a restart to take full effect. Save your work in any open apps first.
- Close the Registry Editor.
- Restart your computer.
- After you sign back in, move your mouse to the far right edge of the taskbar and see whether Peek responds.
Peek should now work according to the updated Registry setting. If the result is not what you wanted, go back to the DWM folder and change the value again, then restart once more.
Summary
If Peek fails to work after you change these settings, restart your computer again and check that your graphics drivers are up to date. Feature updates occasionally reset taskbar behaviors, so after a big update, open Performance Options and recheck the Visual Effects option.
Have a question about this guide?
Answered by AI from this guide. Good questions may be added to this page — please don't include personal details.
Did this guide fix your problem?

About the Author
Richard
Tech Writer, IT Professional
Richard is a writer at Geek Rewind who turns complex IT tasks into clear, step-by-step guides. He draws on years of hands-on experience in system administration and enterprise IT operations, focusing on Windows, Linux and WordPress: the problems people actually run into, and the fixes that work. His server and WordPress guides come from systems he runs himself. Richard builds and maintains the platform behind Geek Rewind, from its Ubuntu servers and Nginx configuration to its custom WordPress plugins. Many new tutorials start with readers' questions, and he's always glad to answer them in the comments.
No comments yet — be the first to share your thoughts!