How to Turn On or off Animation Effects in Windows 11

Animation effects are the small bits of motion in Windows 11: menus that fade in, windows that slide or shrink when you minimize them, and controls that ease into place. They look polished, but each one adds a short delay and a little extra work for the graphics hardware. Turning them off can make an older or low-powered PC feel quicker, and it also helps if you find the motion distracting.
You can turn the effects on or off at any time. This guide covers three ways to do it: the Settings app (Windows 11 version 21H2 or later), the classic Control Panel , and the Performance Options window. All three work on Home and Pro, and none needs a restart.
You can enable or disable animation effects in Windows 11 by going to Settings Accessibility Visual effects. Toggle the “Animation effects” switch to your desired setting to immediately change how windows and menus transition.
Method 1Using the Settings App
The Settings app is the fastest way to change this, because the main switch for animations sits in one place. It is a single on/off toggle, so there is little to get wrong. If you want to pick individual effects, use the Performance Options method further down.
Step 1Open Windows Settings
- Press Win+I.
The Settings app opens. If nothing happens, right-click the Start button and choose Settings instead.
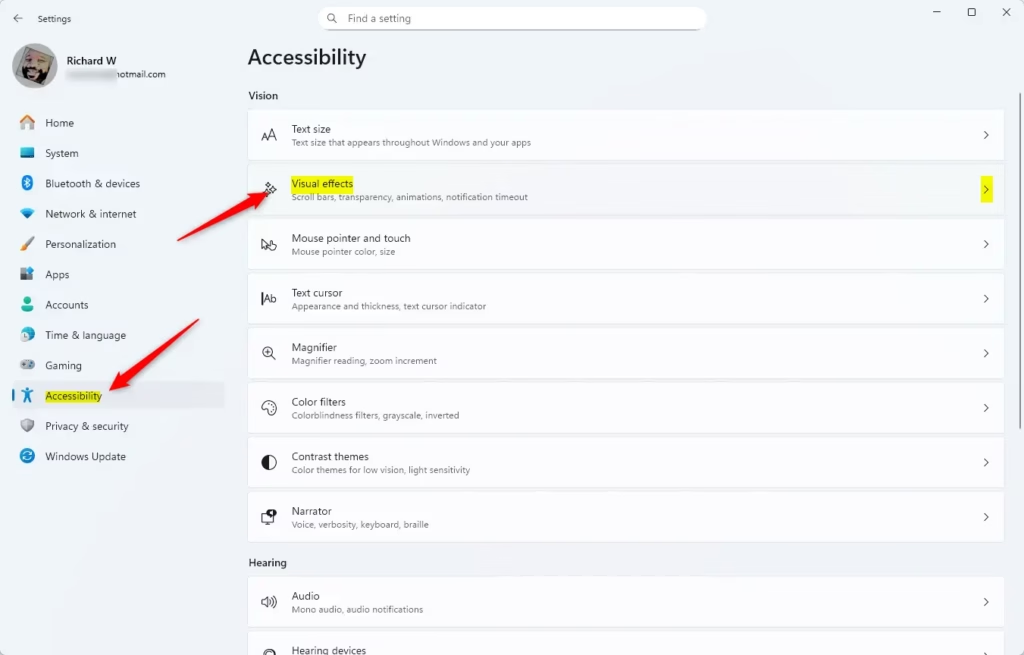
Step 2Go to Accessibility
- Look at the list of categories on the left side of the Settings window.
- Click Accessibility.
The Accessibility options now appear on the right side of the window.
Step 3Find Visual Effects
- Scroll down on the right side until you see the Visual effects section.
- Click Visual effects to open its options.
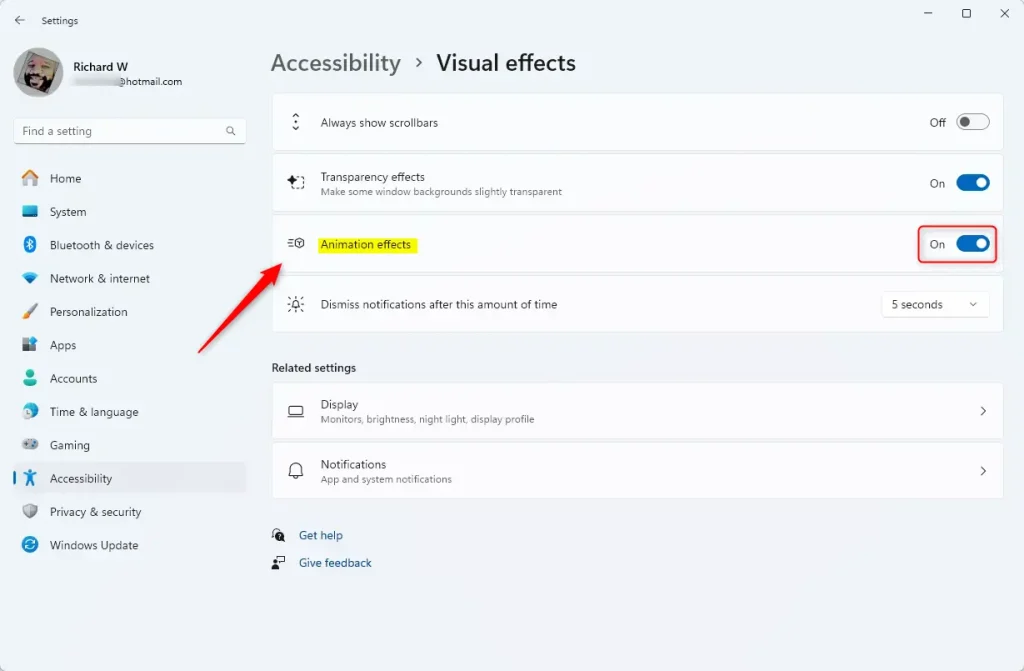
You should now see a short list of switches, including Transparency effects and Animation effects.
Step 4Change Animation Effects
- Find the Animation effects switch.
- Click it to turn it Off to stop the animations, or On to bring them back.
The switch changes position and its label changes to match.
Transparency effects is one example. For now, focus on the main Animation effects switch. If you ever want the animations back, return to this page and switch it on again.
Step 5Close Settings
Close the Settings window. The change applies immediately, with no sign-out or restart. Open a menu, or minimize and restore a window, and you will see the difference straight away: with animations off, things appear and disappear instantly.
Method 2Using the Control Panel
The Control Panel is the older settings tool in Windows, and it still contains some options that Settings does not. This method uses a classic interface, but it works well and it is available on every edition of Windows 11. The checkbox you will use is part of the Ease of Access options.
Step 1Open the Control Panel
- Click the search box on your taskbar and type Control Panel.
- Select Control Panel from the results.
- If the window shows Category next to View by in the top right, change it to Large icons or Small icons.
With one of the icon views selected, every item is listed in a single page, so nothing is hidden inside a category.
Step 2Go to Ease of Access Center
- In the Control Panel, find Ease of Access Center.
- Click it to open.
The Ease of Access Center opens, with a set of options for changing how Windows looks and responds.
Step 3Choose an Option
This page groups its display options by purpose. Each one adjusts how things appear on your screen: making text easier to read, simplifying tasks, or reducing visual movement. You will see these links:
- Use the computer without a display
- Make the computer easier to see
- Make it easier to focus on tasks
Any of these takes you to the right settings. We use Make the computer easier to see for this example.
Step 4Turn Off Unnecessary Animations
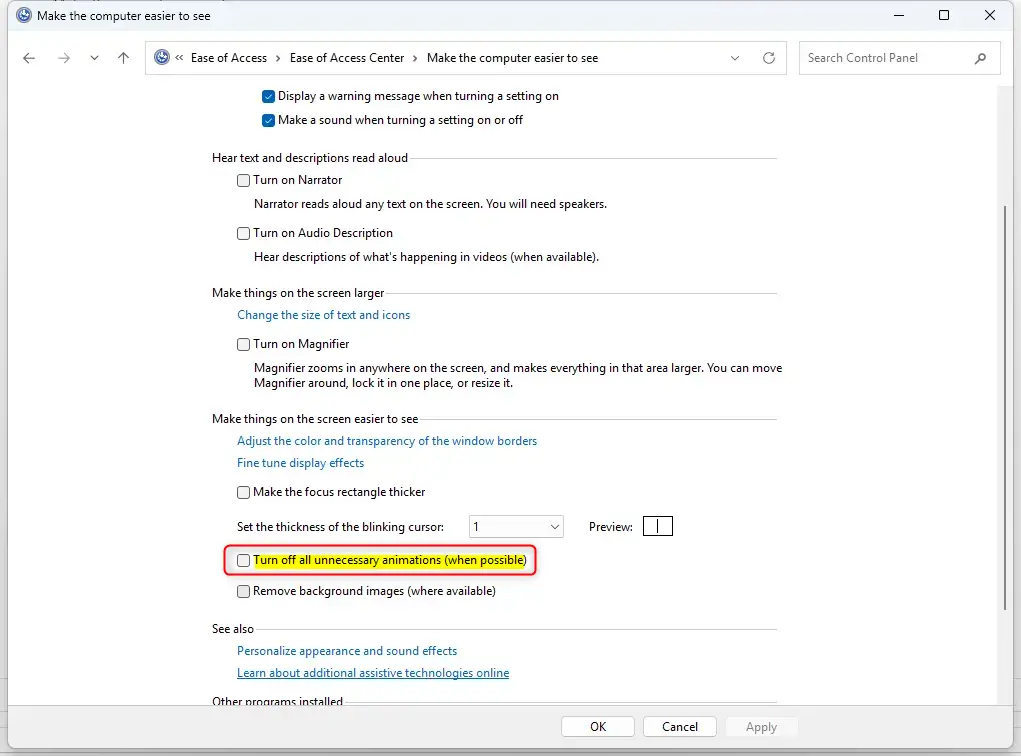
On the next page, scroll down to the visual effects options and find the checkbox for removing extra motion. It is labeled Turn off all unnecessary animations (when possible). When it is checked, windows stop fading and sliding as you open and close them. That helps the PC feel a bit smoother and cuts down on visual distraction.
- Scroll down to Turn off all unnecessary animations (when possible).
- Check the box to turn animations off, or clear the box to turn them back on.
If you only want to turn off certain animations, Method 1 (Settings app) or Method 3 (Performance Options) might give you more control.
Step 5Save Your Changes
- Click the OK button at the bottom of the page to save your choice.
- Close the Control Panel.
If you click Apply instead, the change is also saved and the window stays open. Either way, the setting takes effect without a restart.
Method 3Using Performance Options
Performance Options is the most detailed of the three methods. Instead of a single switch, it lists each visual effect separately, so you can keep the ones you like and drop the ones that slow you down. It gives you the most control over individual animations.
Step 1Open Performance Options
- Press Windows key + R to open the Run dialog box.
- Type SystemPropertiesPerformance.exe and press Enter.
Alternatively, click the search box on the taskbar, type "Adjust the appearance and performance of Windows" and select the result. Either way, the Performance Options window opens.
Step 2Select the Visual Effects Tab
The "Performance Options" window opens on the Visual Effects tab. This tab lists the graphical elements that make Windows look the way it does, such as animations, shadows and font smoothing. If another tab is showing, click Visual Effects at the top.
Step 3Adjust Animation Settings
At the top of the tab are four options. They control how visual effects behave across the whole system. You can let Windows pick a balance, turn everything on for a polished look, or turn everything off to make the PC feel faster.
- Let Windows choose what's best for my computer: This is the default. Windows tries to balance how things look with how fast they run.
- Adjust for best appearance: This setting turns on all visual effects and animations to make Windows look its best.
- Adjust for best performance: This setting turns off most visual effects and animations to make your computer run as fast as possible.
- Custom: This lets you choose exactly which animations you want on or off.
To turn off all animations in one go, select Adjust for best performance. Be aware that this also turns off other effects in the list, such as thumbnails and font smoothing, so text and previews can look plainer afterward. If you would rather keep those, use the Custom option and uncheck only the animation items. As soon as you change a single checkbox, Windows switches the selection to Custom for you. These are the animation items you can control:
- Animate controls and elements inside windows
- Animate windows when minimizing and maximizing
- Fade or slide menus into view
- Fade or slide ToolTips into view
- Fade out menu items after clicking
- Slide open combo boxes
- Smooth-scroll list boxes
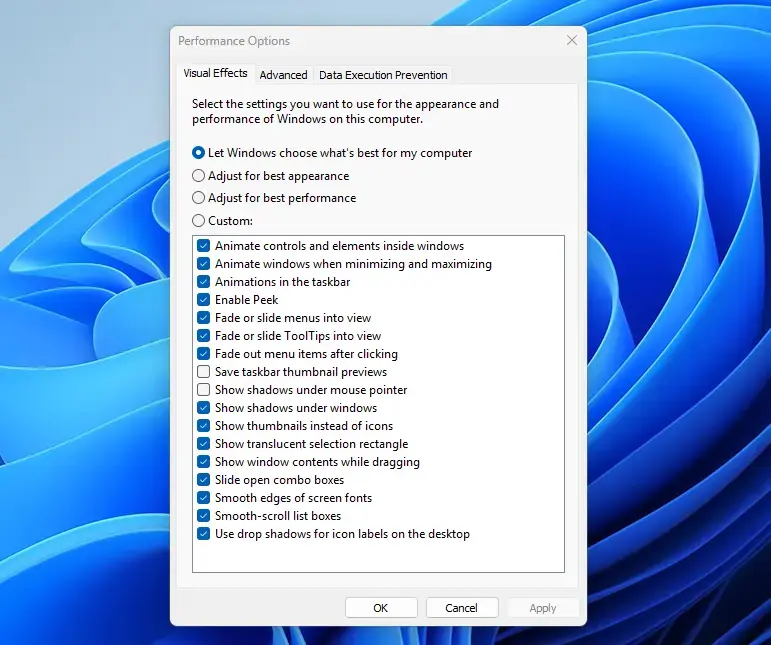
Tip: If you are not sure which animations to turn off, try unchecking "Animate windows when minimizing and maximizing" and "Fade or slide menus into view" first. These are often the most noticeable effects. Change a couple at a time so you can tell which ones make a difference on your PC.
Step 4Apply Your Settings
- Click the Apply button. This lets you see the changes without closing the window.
- Open a menu or minimize a window to check the result.
- If you like it, click OK to close the Performance Options window.
To undo your changes, reopen the window and select Let Windows choose what's best for my computer, then click OK.
Summary
You can manage Windows 11 animation effects with the Settings app, the classic Control Panel, or the Performance Options window. Settings gives you a quick on/off switch, Control Panel offers a single checkbox that removes most extra motion, and Performance Options lets you choose effect by effect. Each one is reversible at any time, so you can try a setting and switch back if you don't like it.
Have a question about this guide?
Answered by AI from this guide. Good questions may be added to this page — please don't include personal details.
Did this guide fix your problem?

About the Author
Richard
Tech Writer, IT Professional
Richard is a writer at Geek Rewind who turns complex IT tasks into clear, step-by-step guides. He draws on years of hands-on experience in system administration and enterprise IT operations, focusing on Windows, Linux and WordPress: the problems people actually run into, and the fixes that work. His server and WordPress guides come from systems he runs himself. Richard builds and maintains the platform behind Geek Rewind, from its Ubuntu servers and Nginx configuration to its custom WordPress plugins. Many new tutorials start with readers' questions, and he's always glad to answer them in the comments.
No comments yet — be the first to share your thoughts!