How to Add a PIN to Your Account in Windows 11

A PIN (Personal Identification Number) lets you sign in to Windows 11 in seconds instead of typing a long password. It works through Windows Hello, a built-in security system that ties your PIN to your specific computer, so it does not work anywhere else.
Setting up a PIN takes less than two minutes in Settings. The steps are the same on Windows 11 Home and Pro. You do not need to restart afterwards. The PIN works the next time you sign in or unlock the PC.
Open Settings with Win+I, go to Accounts Sign-in options, expand PIN (Windows Hello), click Set up, verify your password, create a four-digit PIN, and click OK. Your PIN is ready to use at the next sign-in.
How to Add a PIN to Your Account
Option 1Add a PIN through Settings
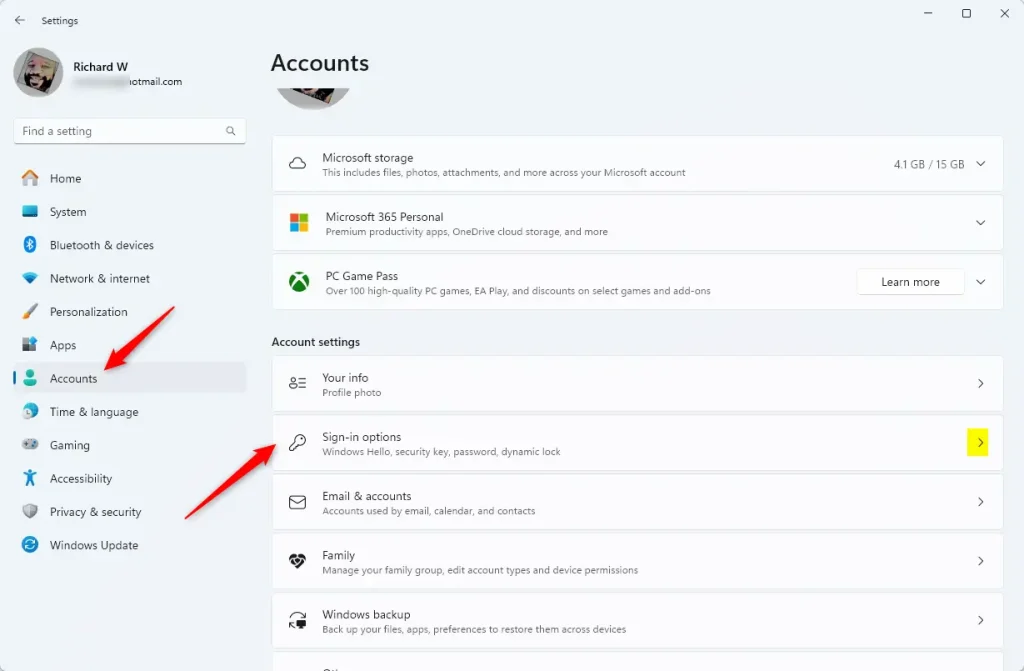
- Open Settings by pressing Win + I on your keyboard. The Settings window opens.
- Click Accounts in the left menu, then select Sign-in options on the right. You will see a list of ways to sign in, such as facial recognition, fingerprint, PIN and password.
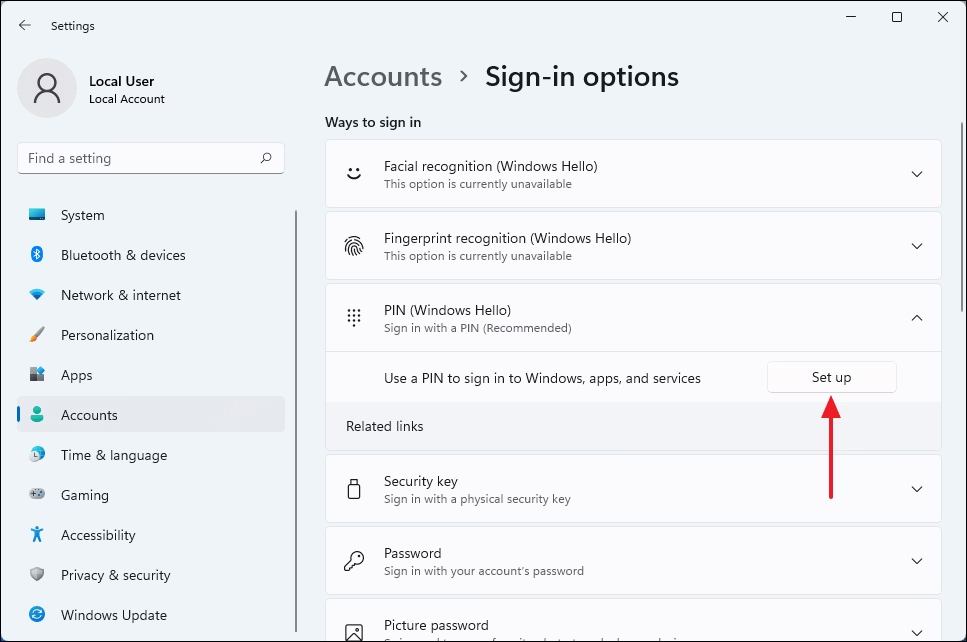
- Scroll down to ‘PIN (Windows Hello)‘ and click the header to expand it. Which options you see depends on your hardware, so you may not see every sign-in method on the list.
- Click the Set up button next to “Use a PIN to sign in to Windows, apps, and services”. A verification window appears.
- Click Next if you are using a Microsoft account. Skip this step if you use a local account.
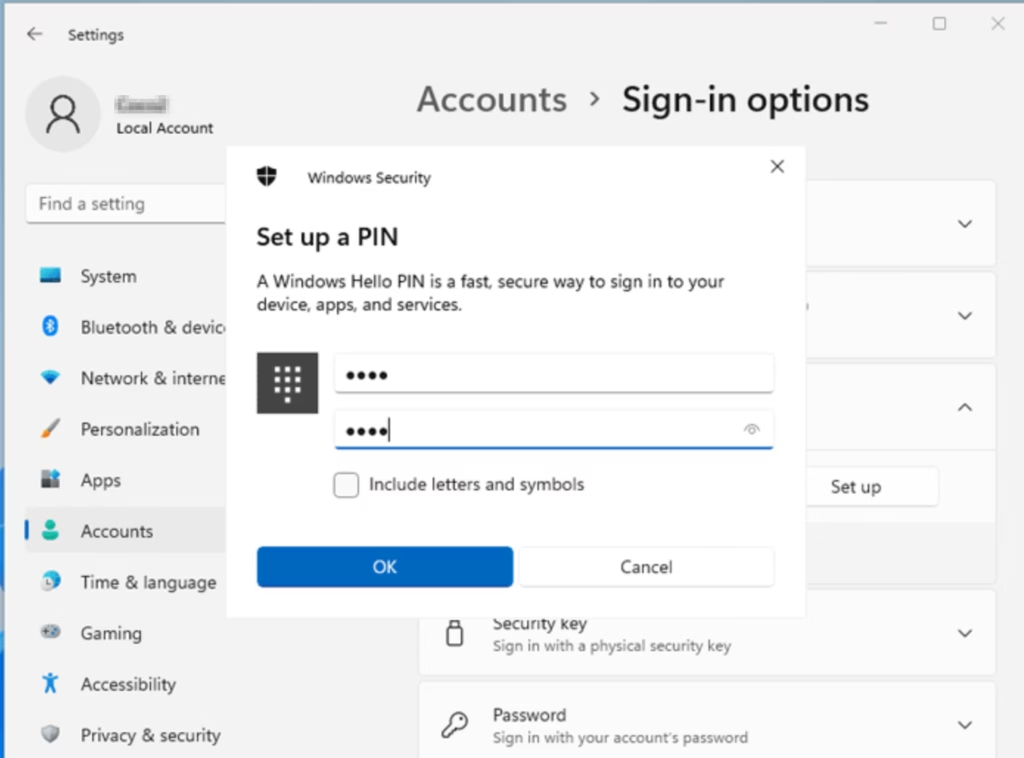
- Type your current account password to confirm it’s you, then click Sign in or OK. The window then asks you to create a PIN.
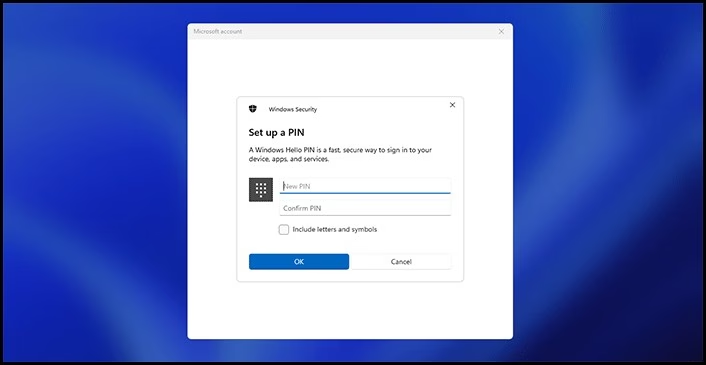
- Type the PIN you want to use, then type it again in the confirmation box. It must be at least 4 digits. Check Include letters and symbols if you want a more complex PIN.
- Click OK to finish. The PIN (Windows Hello) section now shows Change PIN and Remove options instead of Set up.
Setting up a PIN through the Settings app takes just a few clicks and lets you sign in faster than with a traditional password. You can do it while you are already signed in, so you can secure the computer without logging out.
Ask your IT administrator in that case. To undo the change later, return to the same section and click Remove. Windows will ask for your password to confirm.
Option 2Add a PIN from the Sign-in Screen
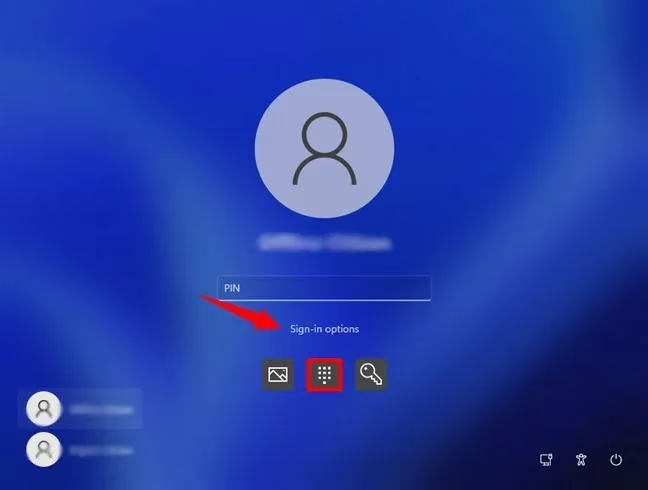
- On the sign-in screen, click Sign-in options below the password box. A row of icons appears, one for each sign-in method available on this PC.
- Choose the PIN option.
- Enter your account password (not a PIN) and press Enter.
- Click Next if you’re using a Microsoft account.
- Create your new PIN and click OK.
- Windows signs you in using your PIN. From now on, use the PIN at the sign-in screen.
This method lets you add a PIN while you are signed out of your desktop. It works well if you skipped the PIN during the initial computer setup and want one before your next login.
If you don’t see a PIN option on the sign-in screen, sign in with your password and use the Settings method above instead. Whichever method you use, you can change or remove the PIN later under Accounts Sign-in options.
Wrapping Up
A Trusted Platform Module (TPM, a dedicated security chip on your motherboard) protects this data. Windows 11 requires TPM 2.0, so most PCs that run it have this chip. That means someone who learns your PIN still can't use it on another computer, and your online password is not exposed.
- More secureYour PIN works only on your device and is not sent online.
- Protected by special hardwareYour device keeps your PIN safe and stops hackers.
- Easy to useSigning in with a PIN is faster than typing a long password.
- Works with biometricsUse the PIN as a backup if fingerprint or face sign-in isn't available.
- FlexibleYou can create a simple or complex PIN.
Skipping the full password saves a little time every day. If you ever forget your PIN, look for the I forgot my PIN link on the sign-in screen. It lets you reset the PIN after you verify your account.
Helpful Links
Have a question about this guide?
Answered by AI from this guide. Good questions may be added to this page — please don't include personal details.
Did this guide fix your problem?

About the Author
Richard
Tech Writer, IT Professional
Richard is a writer at Geek Rewind who turns complex IT tasks into clear, step-by-step guides. He draws on years of hands-on experience in system administration and enterprise IT operations, focusing on Windows, Linux and WordPress: the problems people actually run into, and the fixes that work. His server and WordPress guides come from systems he runs himself. Richard builds and maintains the platform behind Geek Rewind, from its Ubuntu servers and Nginx configuration to its custom WordPress plugins. Many new tutorials start with readers' questions, and he's always glad to answer them in the comments.
No comments yet — be the first to share your thoughts!