How to Change Maximum PIN Length in Windows 11

Maximum PIN length in Windows 11 sets the upper limit for how many characters your sign-in PIN can be, with the default cap sitting at 127 characters. Windows Hello manages these login credentials to keep your PC secure against unauthorized access.
You can adjust this limit to make your login credentials longer or shorter by changing a rule in the Local Group Policy Editor (a tool for managing advanced system settings), which is available on Pro and Enterprise editions of Windows 11.
Open the Local Group Policy Editor and navigate to Computer Configuration Administrative Templates System PIN Complexity. Double-click “Maximum PIN length” and set your desired number between 4 and 127. Apply the changes to enforce the new maximum length.
Change Maximum PIN Length in Windows
Windows admins can change the maximum PIN length for users on Windows 11.
The following steps outline the procedure.
Method 1Using Local Group Policy Editor
- ⚙️ Admin Required – Open the Local Group Policy Editor. Search for “Edit group policy” on the Start menu .
- Navigate to these folders:
You can change your Windows 11 PIN length using the Local Group Policy Editor (a built-in tool for managing system settings). Open the Start menu , search for Edit group policy, and open the tool to get started. You must be signed in as an administrator to make these changes.
- In the PIN Complexity details pane on the right, find and double-click “Maximum PIN length” settings.
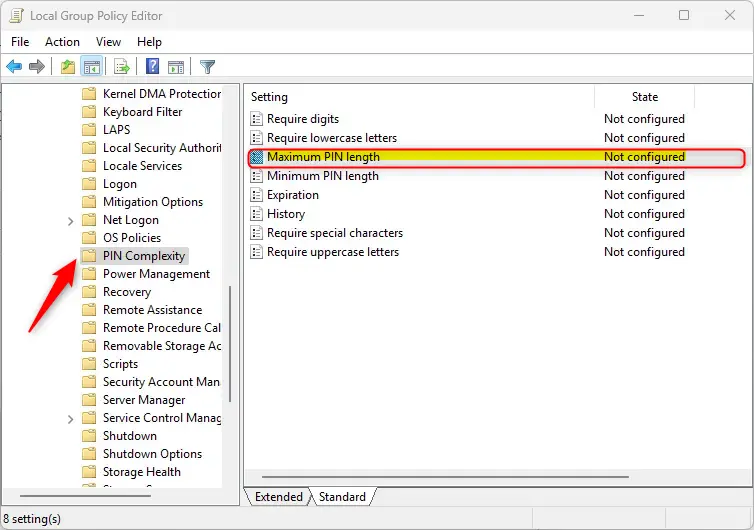
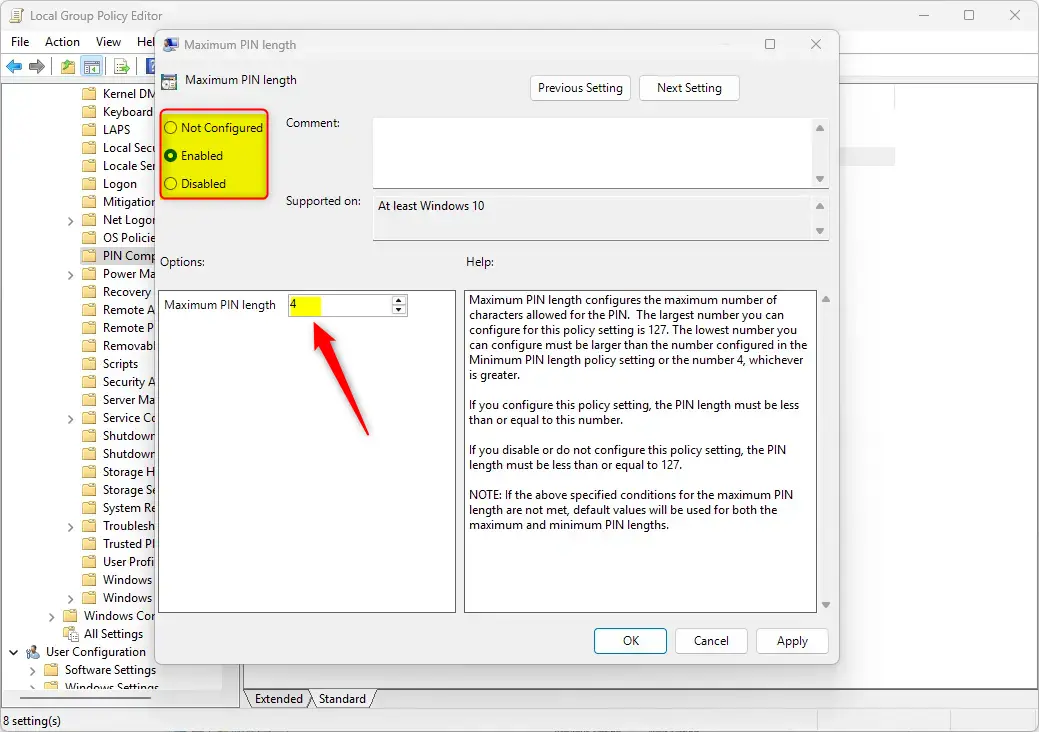
- In the “PIN Complexity” window, choose one of these options:
- Not Configured (default) – Same as Disabled.
- Enabled – You set the maximum PIN length. The largest number you can use is 127. The smallest number must be larger than the Minimum PIN length setting or 4, whichever is greater.
- Disabled – PIN length must be 127 or less.
- Click OK to save your changes.
Method 2Using the Registry
You can adjust your Windows 11 PIN length using the Registry Editor (a database for system and app settings) if you do not have the Group Policy tool. Press Win+R, type regedit, and press Enter. Make sure to back up your registry before you change anything.
Or create a System Restore point as a backup.
- ⚙️ Admin Required - Open the Registry Editor and navigate to this folder path:📝Good to Know
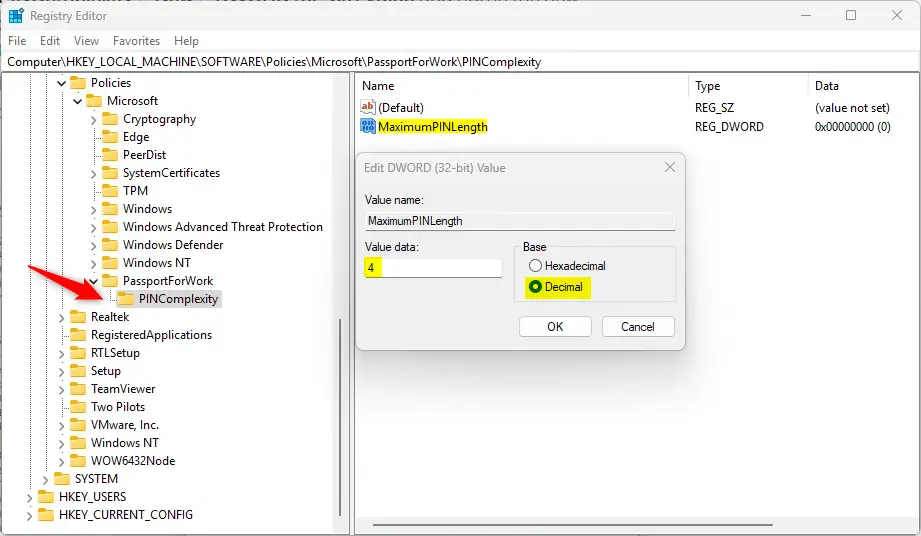
HKEY_LOCAL_MACHINE\SOFTWARE\Policies\Microsoft\PassportForWork\PINComplexity - If you do not have the PassportForWork and/or PINComplexity keys in the registry path, create new keys to match the path above.
- Right-click PINComplexity New DWORD (32-bit) Value and name the new DWORD
MaximumPINLength. - Double-click
MaximumPINLengthand select Decimal under Based. Then type a number between 4 and 127 for the PIN length you want.
- To restore the default behavior, delete the
MaximumPINLengthvalue you created. - You may need to restart your computer to apply the changes.
Configuration finishes here.
Reference
Summary
Windows 11 supports a maximum Windows 11 PIN length of up to 127 characters instead of the standard four digits. You can change this limit using either the Local Group Policy Editor or the Registry Editor to make your device more secure.
- Windows 11 supports a maximum PIN length of up to 127 characters. The default is 4 digits.
- You can modify the maximum PIN length using the Local Group Policy Editor or the Windows Registry Editor.
- A longer PIN helps protect your device from unauthorized access by making it harder to guess.
- Back up your registry or create a restore point before making changes to avoid problems.
- Users may need to update their existing PINs if they don't meet the new length requirements after the change.
- These steps ensure a more secure user experience on your Windows 11 device.
Was this guide helpful?

About the Author
Richard
Tech Writer, IT Professional
Richard is a writer at Geek Rewind who turns complex IT tasks into clear, step-by-step guides. He draws on years of hands-on experience in system administration and enterprise IT operations, focusing on Windows, Linux and WordPress: the problems people actually run into, and the fixes that work. His server and WordPress guides come from systems he runs himself. Richard builds and maintains the platform behind Geek Rewind, from its Ubuntu servers and Nginx configuration to its custom WordPress plugins. Many new tutorials start with readers' questions, and he's always glad to answer them in the comments.




No comments yet — be the first to share your thoughts!