How to Set Up Windows 11 Fingerprint Sign-in

Fingerprint sign-in in Windows 11 lets you unlock your PC with a touch of your finger instead of typing a password. It relies on Windows Hello, the built-in feature that handles biometric sign-ins such as fingerprint and face recognition.
Open Settings Accounts Sign-in options and select Fingerprint recognition (Windows Hello), then select Set up. You need a fingerprint reader and a PIN on your account first. Windows asks for your PIN, then has you touch the reader repeatedly to capture your fingertip. Your fingerprint then signs you in on the lock screen.
It works the same on Home and Pro editions of a currently supported Windows 11 version (25H2 or 26H2), so you don’t need a particular edition.
Before you start, you need a fingerprint reader and a working PIN on your account. Windows Hello requires the PIN as a backup. If the reader fails or a scan isn’t recognized, you sign in with the PIN instead.
These steps check your hardware and then set up fingerprint sign-in on your Windows 11 PC, from start to finish.
- Look for a fingerprint reader on your PC. Many laptops have one built into the power button, the keyboard, or the palm rest. A desktop usually needs a USB reader.
- Plug in your external reader, if you use one. Let Windows install its driver. Choose a reader that supports Windows Hello, because cheap readers without that support won’t show up as a sign-in option.
- Right-click the Start button and select Device Manager. This tool lists the hardware Windows has detected.
- Look for the Biometric devices category. If your reader is listed there, Windows recognizes it. If the category is missing, install the driver from your PC or reader manufacturer, then check again.
- Open Settings Accounts Sign-in options. You should see the ways Windows lets you sign in to this PC.
- Confirm your account has a PIN. If it doesn’t, create one from the same sign-in options page. Windows asks you to set up the PIN before the fingerprint step.
- Select Fingerprint recognition (Windows Hello). If it is greyed out or says it’s unavailable, go back to the reader and driver checks above.
- Select Set up. The Windows Hello setup window opens.
- Select Get started. Windows asks you to prove it’s you before it saves any biometric data.
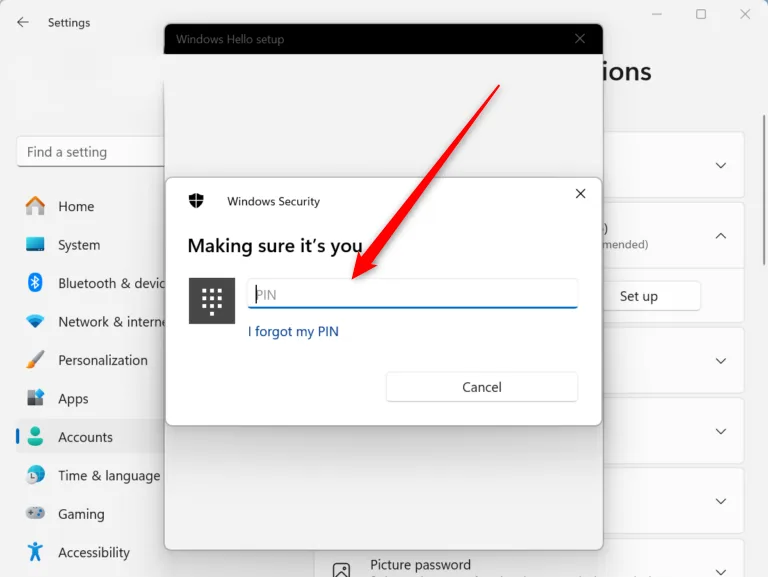
- Enter your PIN. The window then asks you to touch the reader.
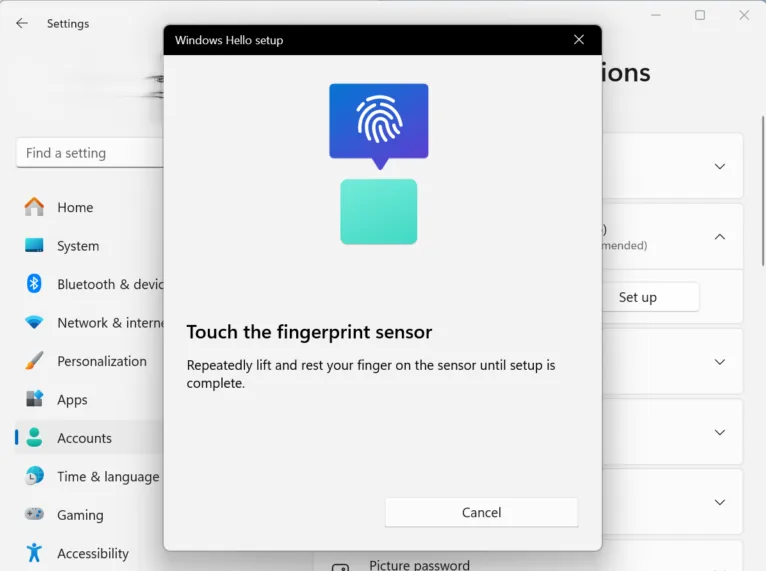
- Touch your finger to the reader again and again as prompted. Lift and rest it slightly differently each time so Windows captures the whole fingertip. The window shows your progress.
- Select Close when Windows says the fingerprint is added. Select Add another first if you want to save a second finger.
- Lock your PC and touch the reader to test it. The sign-in screen should accept your fingerprint.
That’s it. Your fingerprint now signs you in to Windows 11, and your PIN and password still work as backups.
If fingerprint sign-in stops working after a cold boot (starting the PC from a full shutdown), install update KB5127648 first. Microsoft says it fixes an issue where fingerprint sign-in might not work after a cold boot on some devices. Open Settings Windows Update, select Check for updates, and install it.
If you can’t install that update yet, try the other fixes. If the fingerprint option is greyed out or says it’s unavailable, the cause is almost always a missing reader or a missing driver. Fix that first. A restart is not normally needed to set up a fingerprint, but it’s worth trying if a freshly installed driver doesn’t show up. Until the problem is fixed, sign in with your PIN.
You can remove a saved fingerprint at any time from the same sign-in options page, under Fingerprint recognition (Windows Hello). Your password and PIN keep working either way.
Here’s How:
Setting up windows 11 fingerprint sign-in lets you log into your computer quickly using just your finger instead of typing a password every time. You start by opening the Settings app and going to your account options. From there, Windows walks you through scanning your finger on your laptop or keyboard reader so the system can recognize it.- Open Settings. You can do this by pressing the Win+I on your keyboard.
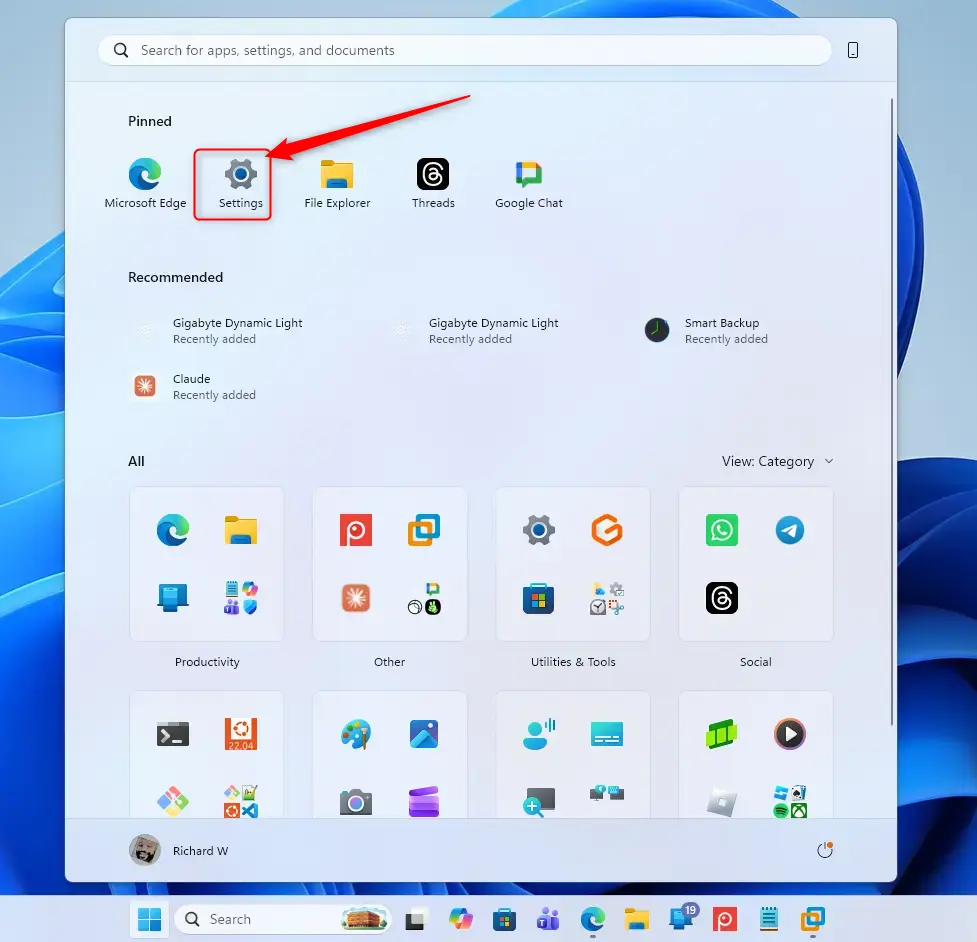
Windows 11 Start menu with Settings gear icon highlighted. - On the left side, click Accounts. Then, on the right side, click Sign-in options.
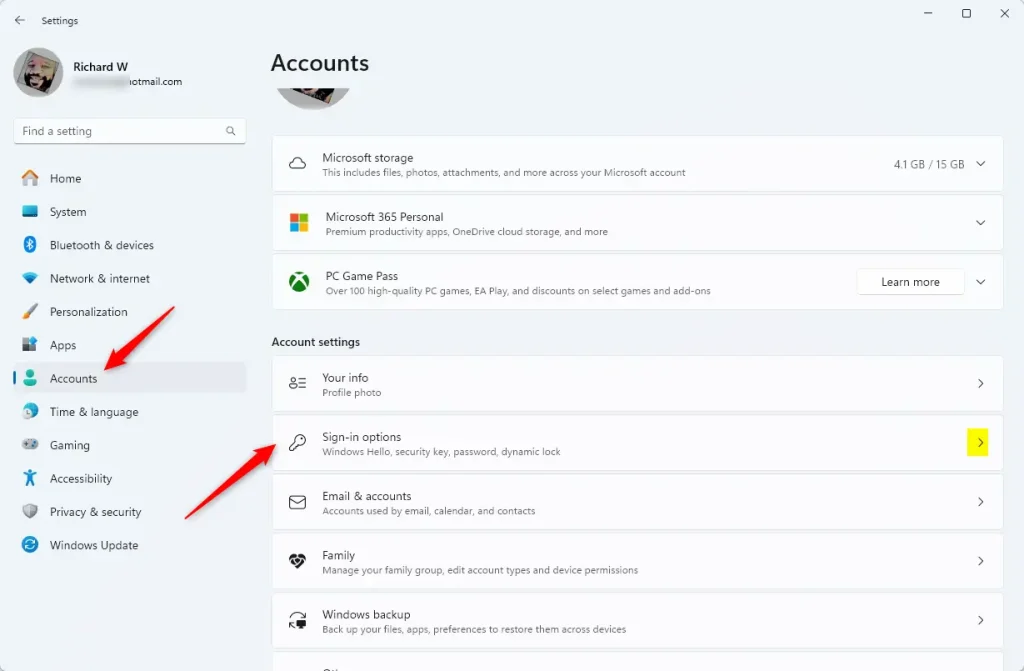
Windows 11 account sign-in options tile for wake settings. - Under the section titled Ways to sign in, click on Fingerprint recognition (Windows Hello) to see more options.
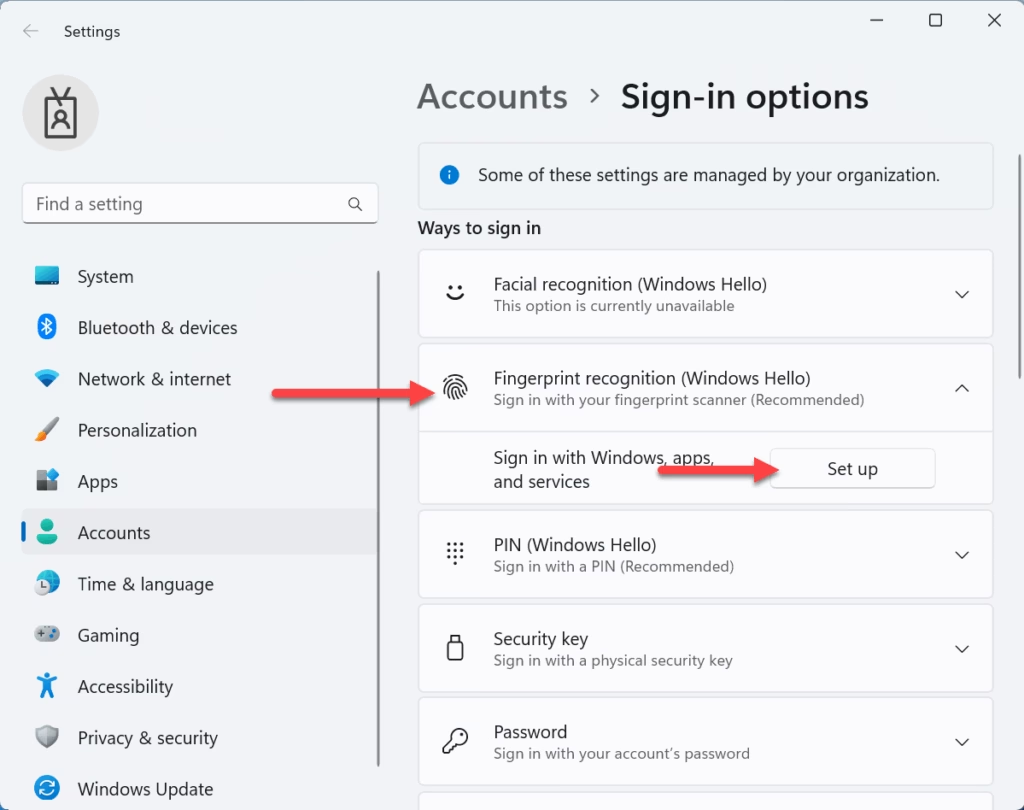
Windows 11 fingerprint recognition setup button for Windows Hello. - Click the Set up button next to Sign in with Windows, apps, and services.
- Click Get started.
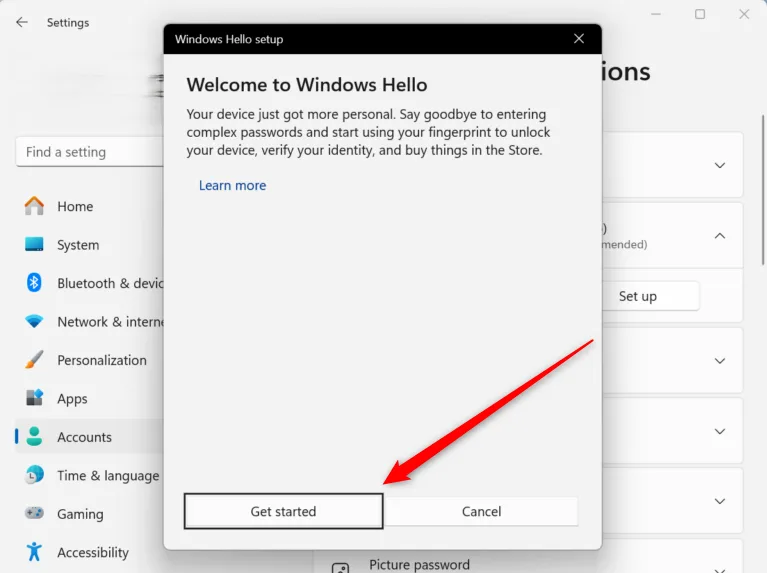
Settings > Accounts > Sign-in options - Enter your account’s PIN to confirm it’s you.
Settings > Accounts > Sign-in options - Place the finger you want to use on the fingerprint sensor. Follow the on-screen instructions until it’s finished.
Settings > Accounts > Sign-in options - When you are ready, click Next.
- Place the finger you want to use on the fingerprint sensor again. Follow the on-screen instructions until it’s finished.
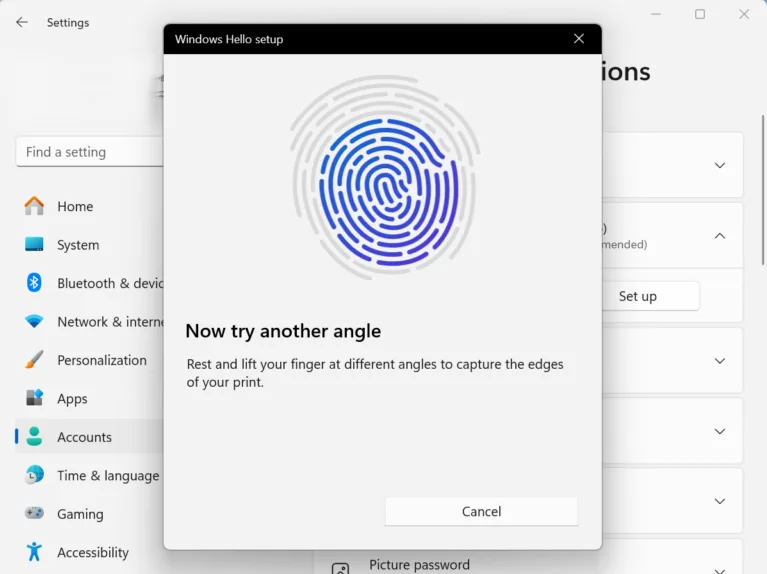
Settings > Accounts > Sign-in options - When you see the message “All set”, click Close.
- You can now close the Settings window if you wish.
Summary
Windows 11 fingerprint sign-in is a secure and fast way to access your device using biometric security. You set it up through your account settings by locating the Windows Hello security menu, entering your backup PIN, and pressing your finger against the reader multiple times until the scan is finished and saved.
Frequently asked questions
How to set fingerprint for lenovo laptop?
Start by checking that your Lenovo has a fingerprint reader. Many models have one on the power button, keyboard, or palm rest. Next, right-click Start and open Device Manager to look for Biometric devices. Then open Settings Accounts Sign-in options, select Fingerprint recognition (Windows Hello), and select Set up. Make sure your account has a PIN first.
How to add finger print to lenova laptop?
Your Lenovo laptop needs a fingerprint reader before you can add a finger. Look for it on the power button, keyboard, or palm rest. Then open Settings Accounts Sign-in options, select Fingerprint recognition (Windows Hello), and select Set up. Enter your PIN, then touch the reader as prompted until Windows says the fingerprint is added.
How to add my fingerprint in this laptop?
To add your fingerprint, first confirm your laptop has a reader and your account has a PIN. Open Settings Accounts Sign-in options, select Fingerprint recognition (Windows Hello), then select Set up and Get started. Enter your PIN, touch the reader again and again as prompted, and select Close when Windows confirms.
How to set up Windows 11 to sing me in via my fingerprint?
Open Settings Accounts Sign-in options and select Fingerprint recognition (Windows Hello). Select Set up, then Get started, and confirm with your PIN. Touch your finger to the reader repeatedly, shifting its position slightly each time, until Windows says it's added. Lock your PC and touch the reader to test sign-in.
Still have a question?
Answered by AI from this guide. Good questions may be added to this page — please don't include personal details.
Did this guide fix your problem?

About the Author
Richard
Tech Writer, IT Professional
Richard is a writer at Geek Rewind who turns complex IT tasks into clear, step-by-step guides. He draws on years of hands-on experience in system administration and enterprise IT operations, focusing on Windows, Linux and WordPress: the problems people actually run into, and the fixes that work. His server and WordPress guides come from systems he runs himself. Richard builds and maintains the platform behind Geek Rewind, from its Ubuntu servers and Nginx configuration to its custom WordPress plugins. Many new tutorials start with readers' questions, and he's always glad to answer them in the comments.
No comments yet — be the first to share your thoughts!