How to Enable Enhanced Sign-in Security on Windows 11

This guide shows everyday Windows 11 users how to turn Enhanced Sign-in Security on or off. The feature keeps your fingerprint and face data safer from hackers. Both methods below take a few minutes.
Open Settings Accounts Sign-in options, scroll to Additional settings, and toggle Sign in with an external camera or fingerprint reader to On. Your PC needs TPM 2.0, Virtualization-Based Security enabled, and a compatible biometric sensor for this feature to appear.
What is Enhanced Sign-in Security?
Enhanced Sign-in Security (ESS) puts a stronger lock on your Windows 11 login. It adds extra protection to the sign-in information stored on your PC.
ESS uses special hardware and software built into your PC. It keeps your fingerprint and facial recognition data isolated, so malware and attackers cannot easily steal it. Only parts of the system that are protected can handle that data.
ESS is not available on every PC. It depends on the hardware listed in the next section.
What Does Your PC Need to Support ESS?
Your device should have all of the following:
- Virtualization-Based Security (VBS) turned on
- Trusted Platform Module 2.0 (TPM 2.0) chip installed
- A biometric sensor (camera or fingerprint reader) that supports ESS
- Device software (firmware) that supports secure biometric hardware
Look for the TPM version and the model of the camera or fingerprint reader. Some newer PCs ship with ESS already available. Older PCs often lack a compatible sensor, and you cannot fix that with a setting.
How to Turn On Enhanced Sign-in Security (ESS)
The Settings app is the easiest way to turn ESS on or off. It works the same on Windows 11 Home and Pro.
- Click the Start menu button at the bottom of your screen, then choose Settings. Or press Windows key + I to open Settings directly. You should see the Settings window open.
- In Settings, click Accounts on the left menu.
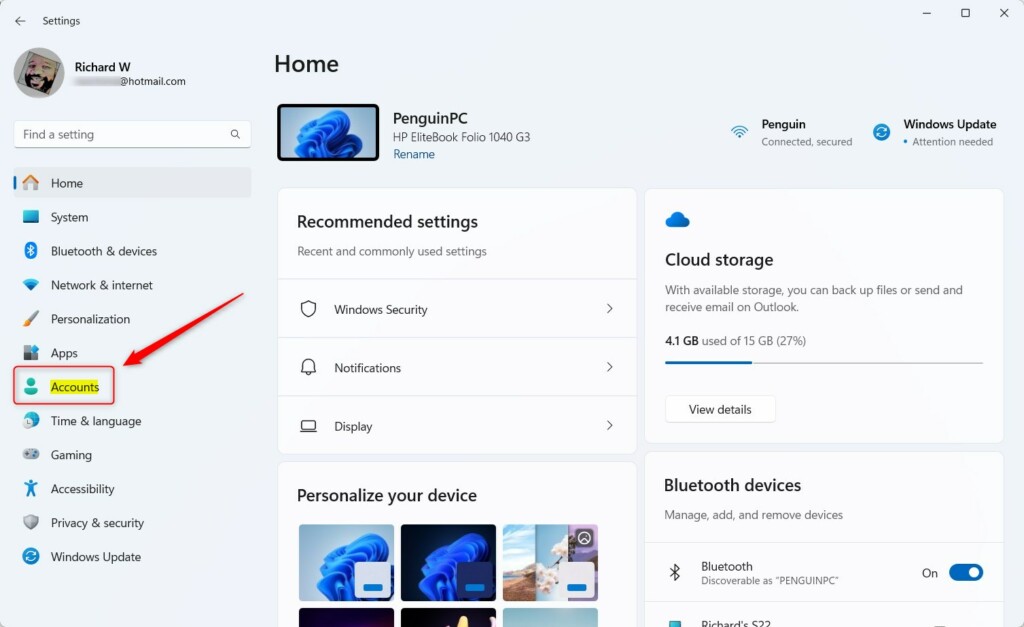
Windows 11 Accounts settings button highlighted on the Start menu. - On the right side, click Sign-in options. You should now see the ways you can sign in, such as face, fingerprint, PIN and password.
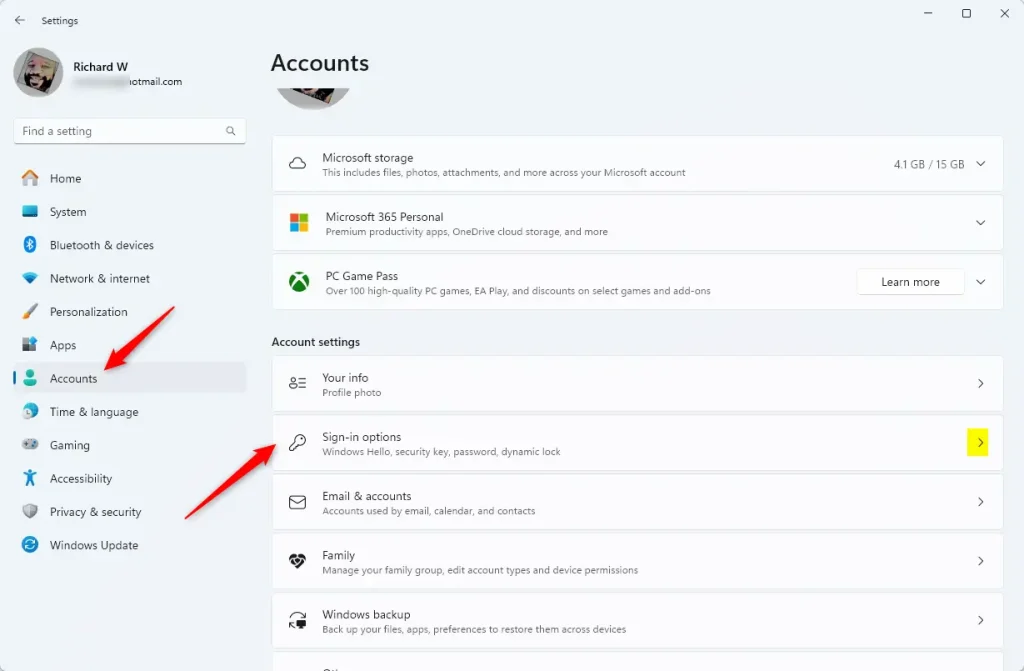
Windows 11 account sign-in options tile for wake settings. - Scroll down to Additional settings and find Sign in with an external camera or fingerprint reader. Set the switch to On to enable ESS, or Off to disable it.
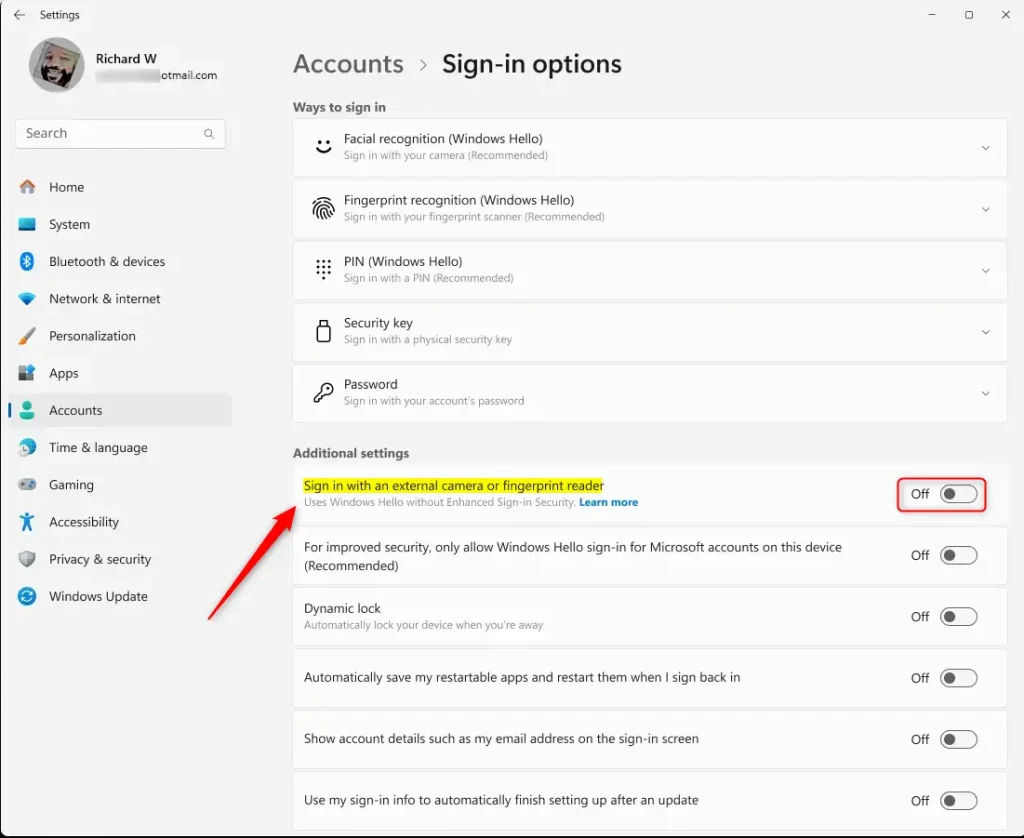
Windows 11 prompt for external camera or fingerprint reader login. - Close the Settings app when you are done.
That usually means the hardware in the requirements list is missing or turned off. To undo the change, come back to the same screen and flip the switch the other way.
How to Enable ESS Using Registry Editor (Advanced)
If you are comfortable with advanced settings, you can also turn ESS on or off in the Windows Registry Editor. This works on both Home and Pro, but you need an administrator account. A wrong registry edit can cause problems, so take your time. You can make a backup first: in Registry Editor, choose File Export and save a copy.
- Press Windows key + R, type
regedit, and press Enter. Click Yes if Windows asks for permission. Registry Editor should open. (If you want help opening it, see this guide.) - In Registry Editor, go to this path:
Computer\HKEY_LOCAL_MACHINE\SOFTWARE\Microsoft\Windows\CurrentVersion\WinBio - Look for a value named
SupportPeripheralsWithEnhancedSignInSecurityin the right pane. - Double-click the value to open it. In the Value data box:
- Enter
0to turn ON Enhanced Sign-in Security. - Enter
0to turn OFF Enhanced Sign-in Security.
- Enter
- If the value is missing, right-click an empty area in the right pane and choose New DWORD (32-bit) Value. Name it
SupportPeripheralsWithEnhancedSignInSecurity, then double-click it and set the value data as in the previous step. - Close Registry Editor and restart your computer to apply the change.
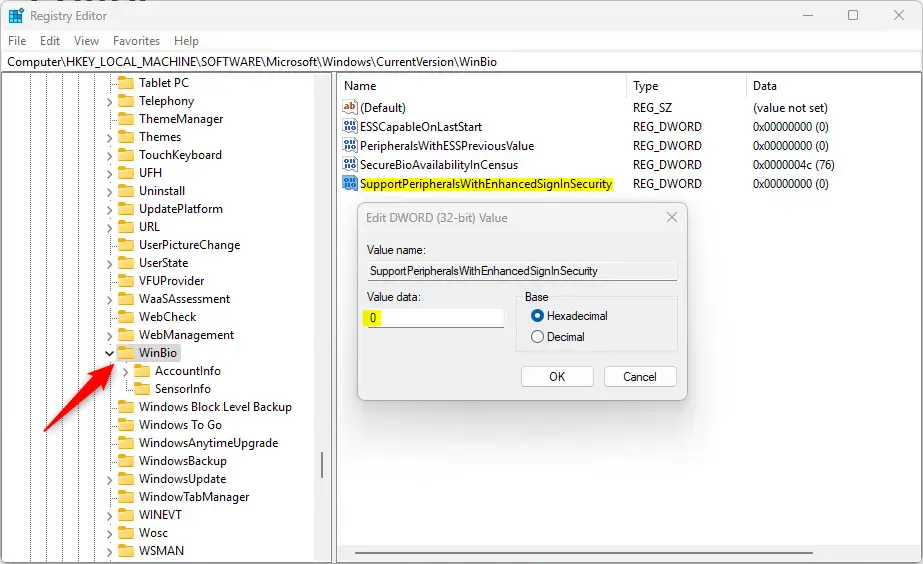
Registry Editor setting for Enhanced Sign-in Security
To undo the change, repeat these steps and enter the opposite value, then restart again.
What Happens After You Turn On ESS?
After you turn ESS on, Windows asks for your password or PIN at the next sign-in. Enter it as usual. This re-authentication step protects your biometric data.
After that, you must register your face and fingerprint again. Open Settings Accounts Sign-in options and set up each one under its own entry. Until you do, you will have to sign in with your PIN or password.
Summary
- Extra Protection: ESS makes your sign-in safer by using modern hardware and software.
- Check Your Device: Make sure your PC supports ESS before trying to enable it. If the Settings option is missing, it probably does not.
- Easy to Change: You can turn ESS on or off in Settings or Registry Editor. The Registry method needs a restart.
- Setup Again: After enabling ESS, you will need to set up your face and fingerprint sign-ins again.
- Keep Hackers Away: ESS helps stop attackers from stealing your biometric info.
Enhanced Sign-in Security makes your sign-in safer by using modern hardware and software, helping keep hackers away.
Reference: Microsoft - Enhanced Sign-in Security
Was this guide helpful?

About the Author
Richard
Tech Writer, IT Professional
Richard is a writer at Geek Rewind who turns complex IT tasks into clear, step-by-step guides. He draws on years of hands-on experience in system administration and enterprise IT operations, focusing on Windows, Linux and WordPress: the problems people actually run into, and the fixes that work. His server and WordPress guides come from systems he runs himself. Richard builds and maintains the platform behind Geek Rewind, from its Ubuntu servers and Nginx configuration to its custom WordPress plugins. Many new tutorials start with readers' questions, and he's always glad to answer them in the comments.
No comments yet — be the first to share your thoughts!