How to Open and Configure Camera Settings in Windows 11

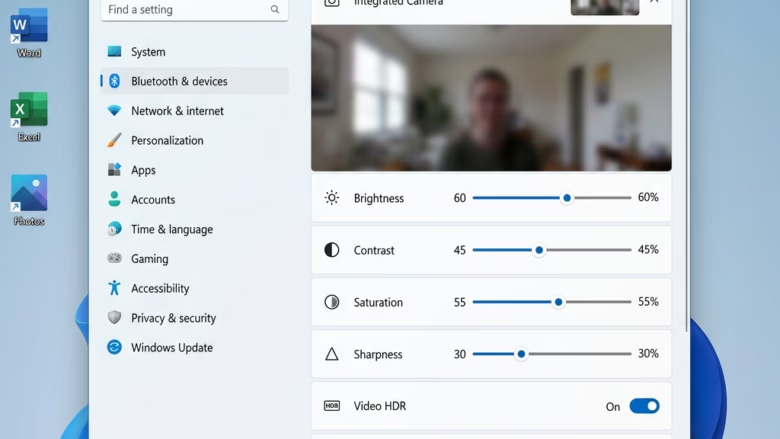
Camera settings in Windows 11 let you fix video quality, change privacy permissions, and turn your webcam on or off without downloading extra software. You can open these controls in the main Settings app by going to Bluetooth & devices and choosing Cameras.
Every connected webcam and built-in laptop camera appears in this menu. Wireless models show their battery status, and there are direct links to troubleshoot video feed problems. The steps are the same on Windows 11 Home and Pro, and you don’t need to restart the PC after changing anything here.
Open Settings by pressing Win+I, click Bluetooth & devices in the left sidebar, then select Cameras. Choose your camera from the connected list and use the sliders to adjust brightness, contrast, saturation, and sharpness. Changes apply in the preview window.
Step 1Finding Your Camera Settings
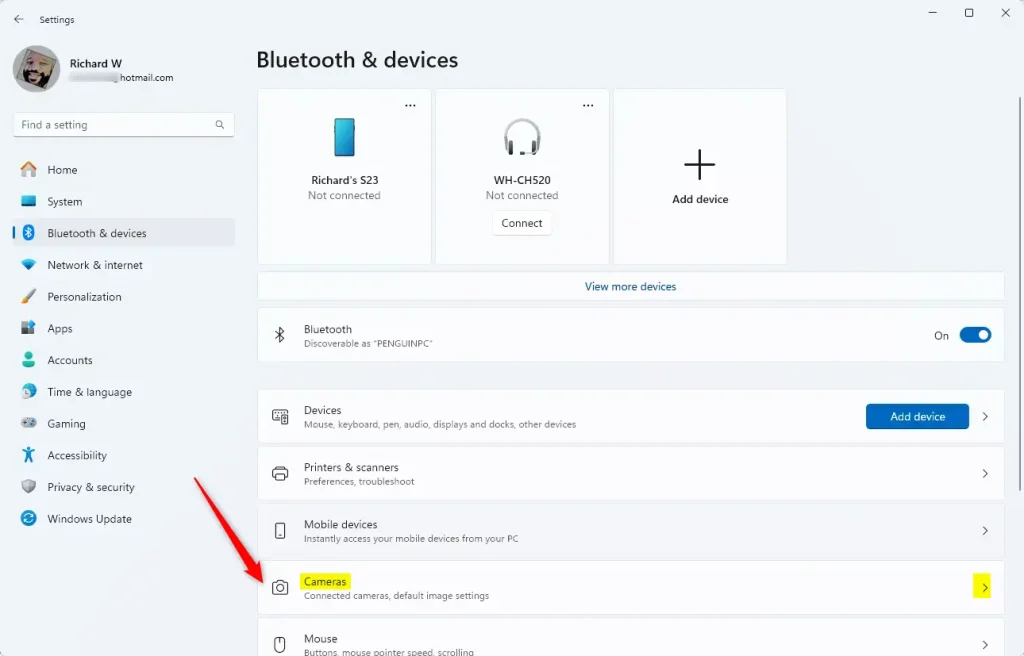
The camera settings live inside the main Settings app . The quickest route is the keyboard shortcut, then Bluetooth & devices and Cameras.
- Open the Settings app. Press the Win or click the Start button on the taskbar , then select the gear icon labeled Settings. Or press
Windows key + Ion your keyboard at the same time. The Settings window opens with a list of categories on the left. - Click Bluetooth & devices. It is in the left-hand list. This is where Windows keeps information about your computer’s hardware, such as Bluetooth devices, printers, and cameras.
- Click Cameras. Scroll down the Bluetooth & devices page until you see Cameras, then click it. You should now see a list of every camera Windows has detected.
This takes you straight to the same page.
If the list is empty, check that the webcam is plugged in firmly. If it is, try a different USB port. Laptops can also have a physical privacy shutter or a keyboard key that switches the camera off, so check for those too.
Step 2Changing Individual Camera Settings
Windows 11 lets you adjust video quality for each webcam you have plugged in. Select your device from the connected cameras list to change brightness, contrast, and other hardware features. Which options you see depends on the camera and its driver.
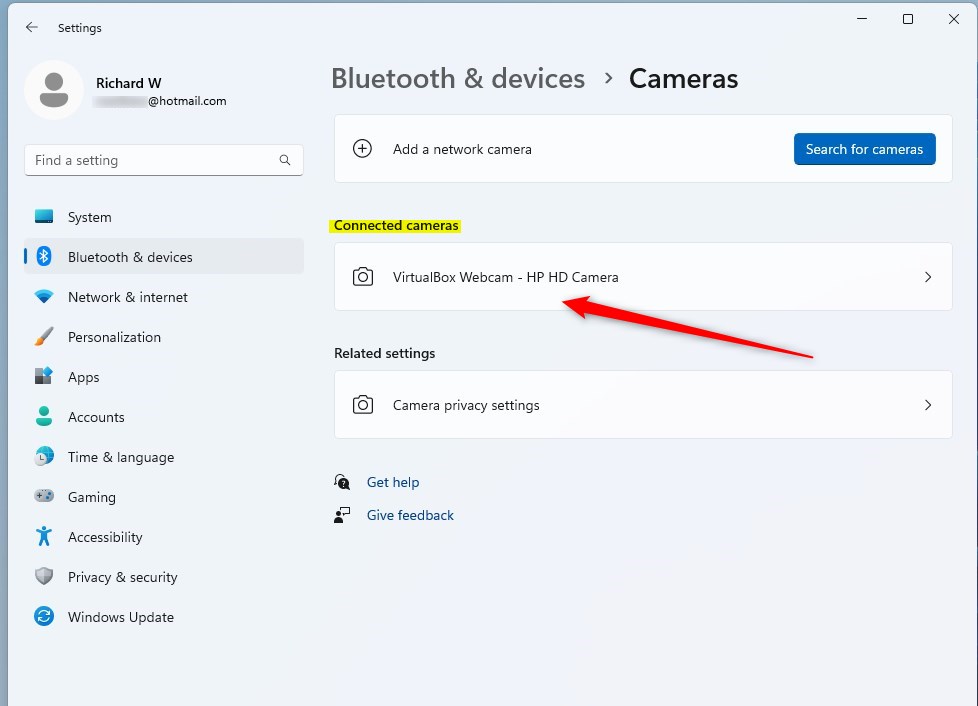
- Choose your camera. Under the Connected cameras heading, review the hardware Windows detects. Click the name of the camera you want to change. This could be your laptop's built-in camera or an external webcam plugged into a port.
- Look at the preview. Windows shows a live feed of what the lens captures in real time. The configuration controls appear below it.
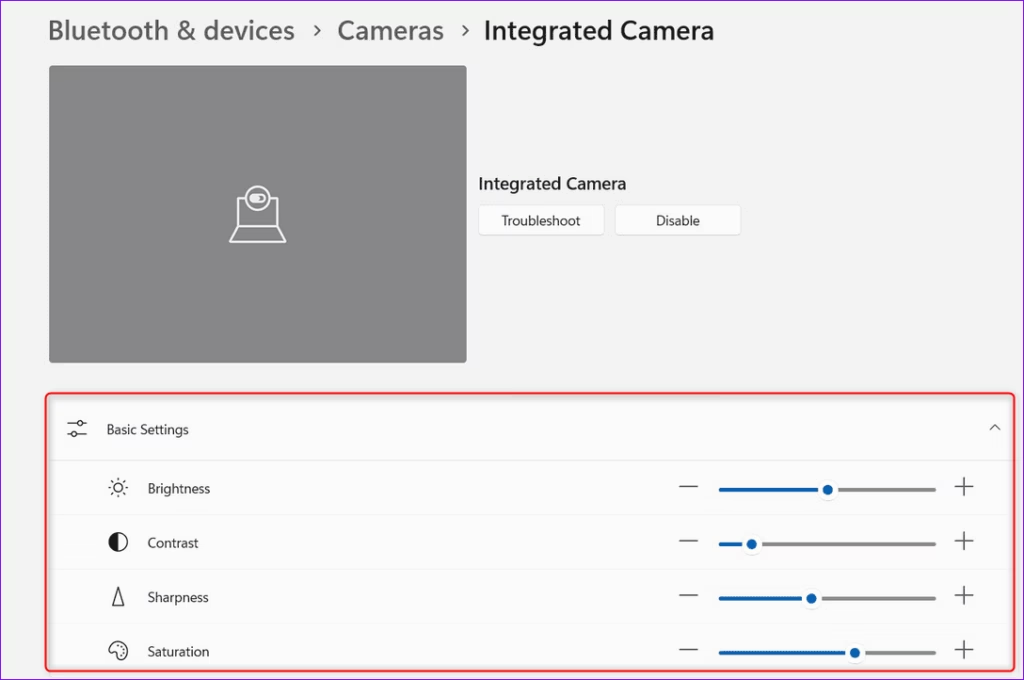
- Adjust the basic settings. Drag the sliders that are available for your camera.
- Brightness: Makes the picture lighter or darker.
- Contrast: Changes the difference between the brightest and darkest parts of the picture.
- Saturation: Controls how strong the colors are.
- Sharpness: Makes the edges in the picture clearer or softer.
The preview changes as you move each slider. Test different levels until the picture looks balanced. Change one slider at a time so you can tell which one made the difference. If you go too far, a Reset settings button, where your build shows one, puts the camera back to its defaults.
Cameras used for Windows Hello facial recognition, and professional hardware that runs its own software, often need to be managed another way.
Depending on the hardware and installed drivers, additional options might appear:
- Windows Studio Effects: These can include blurring the background, keeping you centered in the frame, and adjusting your eye contact. They are made to make you look good during video calls. They normally appear only on PCs with a supported processor that includes an NPU (neural processing unit), so their absence on an older PC is normal.
- Rotation: For some external cameras, you can turn the image if the camera is mounted upside down or sideways.
- Video HDR (High Dynamic Range): This helps show more detail in both very bright and very dark areas of your picture, which makes it look more natural.
If an option you expect is missing, it usually means the camera or its driver doesn't support it. Updating the driver through Windows Update or from the manufacturer's website sometimes adds options.
Tip: Hardware manufacturers often bundle their own control software with their devices. When one is installed, a button under Related settings launches the manufacturer's application.
Saving your changes: Changes save automatically. They become the new default settings for that specific camera, so apps you open afterward start with your preferred configuration. There is no Save button and no restart is needed.
To turn a camera off entirely, open its page and use the Disable button if one is shown. The same page lets you enable it again later. For app permissions, look under the privacy settings for the camera.
Important note: Windows keeps these defaults, but individual apps can override them. If a video call app shows unexpected video, check the video options inside that app as well.
Conclusion
Managing camera settings inside Windows keeps hardware control and privacy management in one place. Once you know where the menus are, how to adjust the picture, and how to handle app permissions, you can get a good picture for work meetings or casual snapshots. Small adjustments often make a noticeable difference.
Summary
Managing your Windows 11 camera settings helps you fix video quality issues for video calls and recording apps. You can open the main Settings menu at any time to adjust brightness, contrast, and advanced features like HDR.
Frequently asked questions
How do I get to camera settings on my laptop?
Open Settings by pressing Windows key + I. Click Bluetooth & devices on the left, then scroll down and click Cameras. Every connected camera shows up in this list, including your laptop's built-in one. From here you can adjust video quality, permissions, and other camera options.
Can anyone see me through my computer camera?
Only apps with camera permission can access your webcam, and Windows blocks them by default. An app must ask permission first, and you choose to allow or deny it. You can revoke access anytime in Settings Privacy & security Camera Your camera has a physical lens—someone can't remotely turn it on without software running on your PC.
Which F key turns on the camera?
There is no single F key that turns on all cameras—it varies by laptop model. Some laptops use Fn + F2 or Fn + a camera icon key. Check your keyboard or laptop manual for the exact combination. If no hardware key exists, use Settings Privacy & security Camera to control permissions.
Does Windows have a built-in camera app?
Yes, Windows 11 includes the Camera app. Search for "Camera" in the Start menu and open it. The app lets you take photos and videos using your webcam or connected camera. It's a simple built-in tool—you don't need to download anything else unless you want advanced editing features.
Still have a question?
Answered by AI from this guide. Good questions may be added to this page — please don't include personal details.
Did this guide fix your problem?

About the Author
Richard
Tech Writer, IT Professional
Richard is a writer at Geek Rewind who turns complex IT tasks into clear, step-by-step guides. He draws on years of hands-on experience in system administration and enterprise IT operations, focusing on Windows, Linux and WordPress: the problems people actually run into, and the fixes that work. His server and WordPress guides come from systems he runs himself. Richard builds and maintains the platform behind Geek Rewind, from its Ubuntu servers and Nginx configuration to its custom WordPress plugins. Many new tutorials start with readers' questions, and he's always glad to answer them in the comments.
No comments yet — be the first to share your thoughts!