How to Turn On or off Adaptive Brightness in Windows 11

Adaptive brightness in Windows 11 changes your screen brightness automatically based on the lighting around you. It uses the ambient light sensor on your PC to dim the display in dark rooms and brighten it in sunlight.
Turning it on cuts glare and can save laptop battery as you move between rooms. The option depends on your hardware, not your Windows edition. Home and Pro behave the same. If your device has no light sensor, which is common on desktops and external monitors, the setting won’t appear. You can turn adaptive brightness on or off in Settings System Display.
Open Settings System Display, find the Brightness section, and check the box next to “Change brightness automatically when lighting changes” to turn adaptive brightness on. Uncheck it to turn it off. The change takes effect immediately without restart.
How to Turn On or Off Adaptive Brightness
Option 1Using Windows Settings
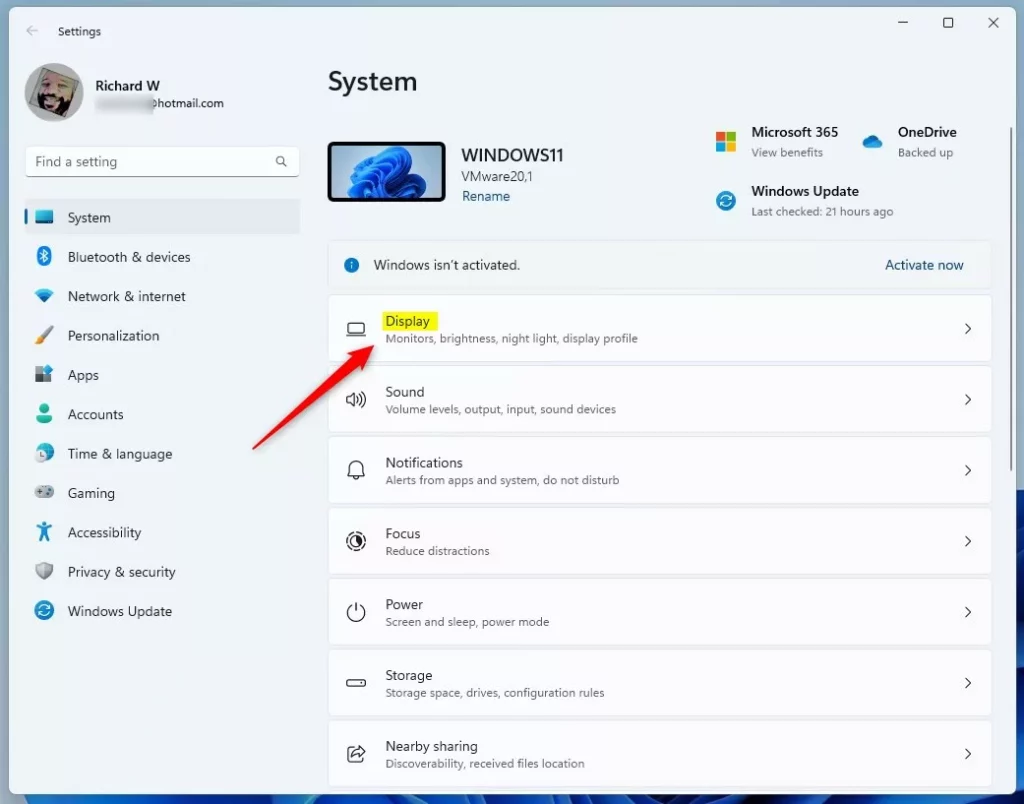
- Press Win+I to open the Settings app. The Settings window opens with the system categories listed on the left.
- Click System on the left side.
- Click Display on the right side. You should now see your screen options, including brightness, scale and resolution.
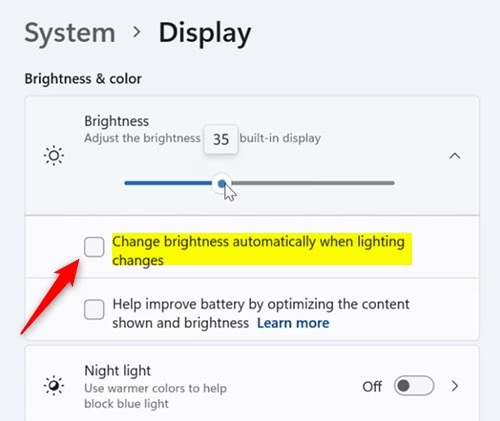
- Find the Brightness section and click to expand it. The brightness slider and any related options appear underneath.
- Look for the option “Change brightness automatically when lighting changes”. If it isn’t there, your PC probably has no ambient light sensor, or the sensor driver is missing. Installing the latest driver from your PC maker, or running Windows Update , sometimes brings it back.
- Check the box to turn Adaptive Brightness On, or uncheck it to turn it Off. The change takes effect straight away, and you don’t need to restart.
- Close the Settings window when done.
This is the simplest method and needs no command tools. Open Settings , go to System, and click Display to find the brightness controls. From there you can check or uncheck the automatic lighting option to suit how you work. To undo the change, come back to the same place and flip the box again.
You may also see a separate option that lets Windows adjust brightness and contrast based on the content on screen, mainly to save battery. It is a different feature from the light-sensor setting, so check which one you are changing.
Option 2Using Windows Terminal
Windows Terminal lets you change adaptive brightness from the command line instead of clicking through menus. This method applies the change directly to your active power plan. A power plan is a preset collection of hardware and system settings that manages power consumption. Your screen then adjusts automatically based on your environment, or stops doing so, depending on the value you set.
Use the commands below as given. If a command is refused with an access error, close Terminal and reopen it as administrator, then run the command again.
Turn On Adaptive Brightness
powercfg -setacvalueindex SCHEME_CURRENT 7516b95f-f776-4464-8c53-06167f40cc99 FBD9AA66-9553-4097-BA44-ED6E9D65EAB8 1
powercfg -SetActive SCHEME_CURRENT

powercfg -setdcvalueindex SCHEME_CURRENT 7516b95f-f776-4464-8c53-06167f40cc99 FBD9AA66-9553-4097-BA44-ED6E9D65EAB8 1
powercfg -SetActive SCHEME_CURRENT
Turn Off Adaptive Brightness
powercfg -setacvalueindex SCHEME_CURRENT 7516b95f-f776-4464-8c53-06167f40cc99 FBD9AA66-9553-4097-BA44-ED6E9D65EAB8 0
powercfg -SetActive SCHEME_CURRENT

powercfg -setdcvalueindex SCHEME_CURRENT 7516b95f-f776-4464-8c53-06167f40cc99 FBD9AA66-9553-4097-BA44-ED6E9D65EAB8 0
powercfg -SetActive SCHEME_CURRENT
If you want the same behavior in both, run the matching command for each state. To undo a change, run the same command again with the opposite value.
Repeat the commands for that plan. If the screen doesn't react right away, sign out and back in, or restart, and test again.
Option 3Using Intel Graphics Control Panel
On PCs with Intel graphics, you can control this behavior in the Intel Graphics Control Panel. Open the utility, go to the power options, and turn off the display power saving feature that dims your screen based on ambient light levels. Not every Intel system has this panel or this option. It depends on the hardware and the driver your PC maker supplied.
- Open the Intel Graphics Control Panel.
- Click the Power icon. The power settings page opens.
- Select either On Battery or Plugged in mode. Each mode has its own settings, so repeat the steps for the other mode if you want both changed.
- Check or uncheck Enable Display Power Saving Technology to turn Adaptive Brightness on or off.
- Adjust the slider to set how much brightness change you want.
- Click Apply. A confirmation prompt appears, and the screen may flicker briefly.
- Confirm by clicking Yes within 15 seconds to keep your changes. If you don't, the panel reverts to the previous settings, which is a handy way to back out.
Option 4Using AMD Radeon Settings
On systems with an AMD graphics card, you use AMD Radeon Settings to control a feature called Vari-Bright. Open the display configuration for your monitor and turn Vari-Bright on or off to stop your screen from dimming automatically. Vari-Bright is mostly found on laptops with AMD graphics. If you don't see it, your hardware or driver version doesn't support it.
- Open AMD Radeon Settings.
- Click Display. The display options for your screen appear.
- If you have multiple screens, pick the display you want to change. Vari-Bright applies to the built-in laptop panel, not usually to external monitors.
- Turn Vari-Bright on or off. This is AMD's version of adaptive brightness.
- If you turn it on, adjust the Vari-Bright Level slider to your liking. A lower level gives you less dimming.
- Close AMD Radeon Settings when finished. To undo the change, reopen the same page and set Vari-Bright back.
Summary
- Adaptive Brightness helps your screen adjust brightness automatically based on light around you.
- You can turn it on or off through:
- Windows Settings
- Command scripts (BAT files)
- Intel Graphics Control Panel (if you have Intel graphics)
- AMD Radeon Settings (if you have AMD graphics)
- Modifications typically target the active power plan.
- Battery saver mode forces display dimming to preserve remaining charge.
- Testing various configurations identifies optimal visual comfort levels.
Adaptive brightness controls how your screen changes its light output based on your surroundings. You can turn it on or off in Windows Settings, from the command line, or in your graphics control panel, depending on your hardware and power preferences. Start with Settings. If the option is missing there, check whether your PC has a light sensor, then look at the Intel or AMD tools.
Helpful Links
- Microsoft Support: Change display brightness and color in Windows
- Learn about Adaptive Brightness - Microsoft Docs
- Intel Graphics Drivers Support
- AMD Radeon Settings FAQ
How do I stop adaptive brightness in 🪟 Windows 11?
Open Settings with Windows key + I, then go to System Display. Expand the Brightness section and toggle off "Change brightness automatically when lighting changes". This disables adaptive brightness while leaving manual brightness control available.
How do I use F2 and F3 for brightness?
F2 and F3 are brightness keys on many keyboards. F2 usually lowers brightness, F3 raises it. They work only if your keyboard has these functions and your laptop drivers support them. Some laptops use Fn + F2/F3 instead.
Why is my brightness automatically changing?
Your brightness is probably changing because adaptive brightness is enabled. Go to Settings System Display, expand Brightness, and turn off "Change brightness automatically when lighting changes". If it's already off, check your monitor's built-in settings.
How do I enable adaptive brightness in 🪟 Windows 10?
Open Settings with Windows key + I, go to System Display, then expand Brightness. Toggle on "Change brightness automatically when lighting changes". This option only appears if your device has an ambient light sensor.
Did this guide fix your problem?

About the Author
Richard
Tech Writer, IT Professional
Richard is a writer at Geek Rewind who turns complex IT tasks into clear, step-by-step guides. He draws on years of hands-on experience in system administration and enterprise IT operations, focusing on Windows, Linux and WordPress: the problems people actually run into, and the fixes that work. His server and WordPress guides come from systems he runs himself. Richard builds and maintains the platform behind Geek Rewind, from its Ubuntu servers and Nginx configuration to its custom WordPress plugins. Many new tutorials start with readers' questions, and he's always glad to answer them in the comments.
No comments yet — be the first to share your thoughts!