How to Adjust Display Brightness Automatically Using Windows 11 Ambient Light Sensors

Automatic brightness in Windows 11 changes your screen’s light level on its own, based on the room around you. It relies on a built-in ambient light sensor, found in most modern laptops, tablets and all-in-one PCs. It saves battery power and reduces eye strain.
To check whether your computer supports it, press Win+I to open Settings , go to System and select Display. Desktop monitors rarely include this hardware. If your device has no physical sensor, Windows hides the automatic brightness options entirely. That is normal behaviour, not a fault.
If you do see a Brightness slider but no automatic option underneath it, the sensor is probably missing or its driver is not loaded. The troubleshooting section below covers the driver case.
Open Settings System Display, expand the Brightness section, and tick the box labelled Change brightness automatically when lighting changes. Windows then reads your ambient light sensor continuously and adjusts screen brightness to match your room’s lighting.
Configuring Automatic Brightness in Settings
Turning on automatic brightness lets the screen adjust its light output to match your room. It takes about a minute and needs no restart. These steps are for Windows 11 on a device with an ambient light sensor.
- Press Win+I to open Settings .

Windows 11 Start menu with Settings gear icon highlighted. - Select System from the left-hand navigation menu. The System pages open on the right.
- Click Display to open your monitor and brightness preferences.
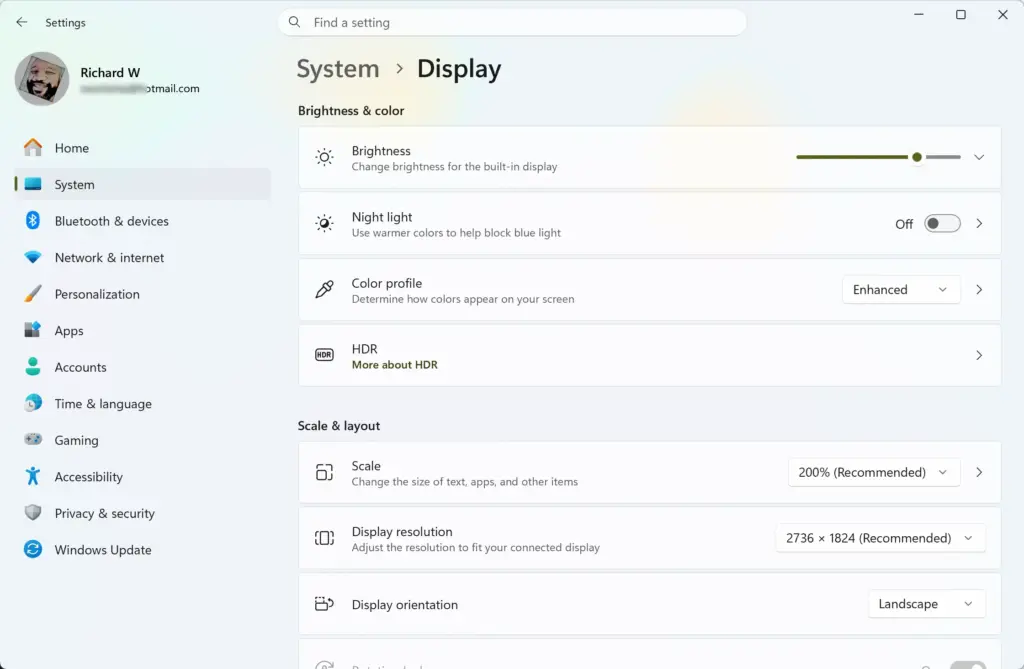
Settings › System › Display - Expand the Brightness section if the sub-options are hidden. Click the arrow at the right of the section. You should see the brightness slider and the checkboxes below it.
- Tick the box labelled Change brightness automatically when lighting changes. This is the setting that uses the ambient light sensor.
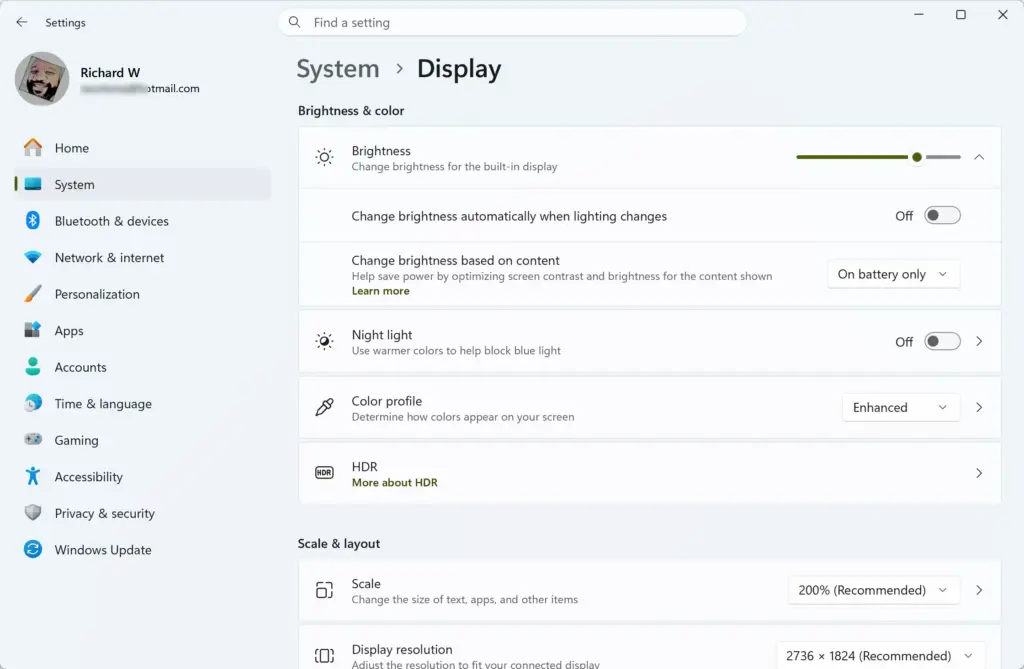
- Optionally, look for Help improve battery by optimizing the content shown and brightness. This is a separate feature. It adjusts brightness based on what is on screen, not on room light. Some devices offer it as a dropdown with choices such as always or only on battery. Others do not offer it at all. Set it to suit your battery needs.
Once enabled, Windows reads the ambient light sensor continuously. The display brightness shifts gradually rather than jumping, so sudden lighting changes do not strain your eyes.
Your brightness will then stay at whatever level the slider is set to. If the checkbox is missing, the device has no usable sensor, or the sensor driver is not working.
Troubleshooting Ambient Light Sensor Failure After System Reboots
A common complaint is that automatic brightness works at first, then stops after a restart and the screen stays at one level. Work through the fixes below in order, starting with the least disruptive. The first checks for updates, the second restarts the sensor service, and the third reinstalls the driver.
First, install any pending Windows patches. Updates often include fixes for sensor communication bugs and newer drivers.
- Press Windows key + I to open Settings.
- Select Windows Update from the sidebar.
- Click Check for updates. Windows downloads and installs the latest system packages and device driver revisions.
- If a restart is requested, restart and test the brightness setting again.
- If nothing changes, open Advanced options and then Optional updates. Look under Driver updates for a sensor or chipset driver and install it if one is listed.
This step requires administrator privileges. You may be prompted to approve it.
- Press Ctrl + Shift + Esc to open Task Manager.
- If Task Manager opens in its compact view, click More details at the bottom.
- Switch to the Services tab. Background services are listed there rather than under Processes.
- Locate the sensor monitoring service, which appears as SensrSvc or a name like Sensor Monitoring Service. Right-click it and select Restart.
If the service is not listed, or restarting it changes nothing, the device itself is probably at fault. Reinstalling the driver is the next step.
- Right-click the Start button and select Device Manager.
- Expand the Sensors category.
- Right-click your ambient light sensor device and select Uninstall device. The entry name varies by manufacturer, so look for one that mentions light or a sensor collection.
- Restart your computer. Windows detects the hardware at startup and reinstalls the sensor driver automatically.
If the Sensors category is missing from Device Manager altogether, your device may have no ambient light sensor. It may also need a driver from the manufacturer's support page.
What to do next
To test your setup, shine a flashlight near the top bezel of your screen, where the sensor usually sits beside the webcam. You can also move to a darker room. The brightness should change smoothly, and it may take a few seconds to respond. If it does not move at all, go back and confirm the checkbox is still ticked.
From here, you can tune your battery saver thresholds or look at how to configure HDR (High Dynamic Range) settings for your display.
Have a question about this guide?
Answered by AI from this guide. Good questions may be added to this page — please don't include personal details.
Did this guide fix your problem?

About the Author
Richard
Tech Writer, IT Professional
Richard is a writer at Geek Rewind who turns complex IT tasks into clear, step-by-step guides. He draws on years of hands-on experience in system administration and enterprise IT operations, focusing on Windows, Linux and WordPress: the problems people actually run into, and the fixes that work. His server and WordPress guides come from systems he runs himself. Richard builds and maintains the platform behind Geek Rewind, from its Ubuntu servers and Nginx configuration to its custom WordPress plugins. Many new tutorials start with readers' questions, and he's always glad to answer them in the comments.
No comments yet — be the first to share your thoughts!