How to Change Brightness When Battery Saver Is on in Windows 11

Windows 11 dims the screen when Battery Saver is active. You can change how much it dims, or stop it dimming at all. This tutorial covers both.
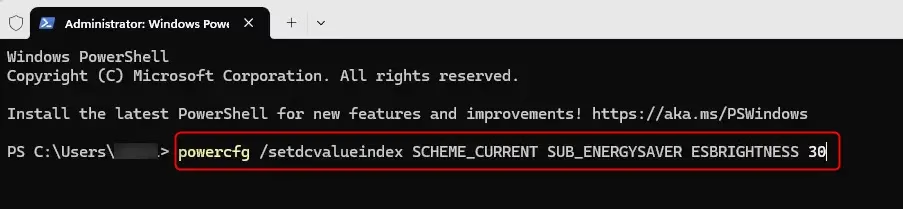
Open Windows Terminal, select PowerShell or Command Prompt, then enter a command to set your preferred brightness percentage for Battery Saver. The screen dims to that level when Battery Saver activates on battery power, with no restart required.
What is Battery Saver?
Battery Saver is a Windows feature that helps your device conserve power while it runs on battery. It disables or slows down certain features so the battery lasts longer. Dimming the screen is one of the biggest savings, because the display is usually one of the largest power drains on a laptop or tablet.
By default, Battery Saver turns on automatically when your battery drops below 20%. You can change that threshold in Settings under System Power & battery Battery saver. Turning it on manually from the same page or from the Quick Settings panel also works.
How Does Brightness Change?
When Battery Saver is active, Windows typically reduces your screen brightness by roughly 30%. You can make it brighter or dimmer to suit your preference. You can also disable the automatic brightness reduction entirely.
If you only want to switch the dimming off, look in Settings System Power & battery Battery saver for the Lower screen brightness when using battery saver option. Which options appear there can vary a little between Windows 11 versions. This setting is also missing on desktop PCs that have no battery. The command in the steps below is the way to choose a specific brightness level.
Important Notes:
- Battery Saver only works when your device is running on battery power, not when it is plugged in.
- When you plug your device in to charge, Battery Saver automatically turns off and your brightness goes back to normal.
- Because of this, you will only see the effect of your change while unplugged. If you test it with the charger connected, nothing will look different.
How to Change the Brightness Percentage for Battery Saver
- Open Windows Terminal. Either of these works:
- Click the Start button, type Windows Terminal, and press Enter.
- Right-click the Start button and choose the Terminal entry from the menu.
- Select either PowerShell or Command Prompt within Windows Terminal. You can open either one in a new tab from the drop-down arrow next to the + button. If one is already open, you can use that tab as it is.
- Enter the command from the code block shown just below this list, then press Enter. The command sets the brightness percentage the screen uses when Battery Saver is active. Pick a level that suits your needs, so the computer stays usable while it conserves power. A higher percentage means a brighter screen and a shorter battery life.
- Check the result by unplugging your device and turning on Battery Saver, or by waiting for it to switch on at the threshold. The screen should now dim to the level you chose.
To undo or adjust the change, run the command again with a different percentage.
You're done!
Summary
- Battery Saver helps save power and makes your battery last longer.
- You can change how much your screen brightness lowers when Battery Saver is active.
- Use the command above to pick the brightness level that feels right for you.
- Remember, when you plug your device back in, Battery Saver turns off and brightness returns to normal.
Battery Saver in Windows 11 helps your battery last longer by saving power. Adjusting your screen's brightness while it is active lets you find a comfortable level. Your device stays usable and still conserves power.
Was this guide helpful?

About the Author
Richard
Tech Writer, IT Professional
Richard is a writer at Geek Rewind who turns complex IT tasks into clear, step-by-step guides. He draws on years of hands-on experience in system administration and enterprise IT operations, focusing on Windows, Linux and WordPress: the problems people actually run into, and the fixes that work. His server and WordPress guides come from systems he runs himself. Richard builds and maintains the platform behind Geek Rewind, from its Ubuntu servers and Nginx configuration to its custom WordPress plugins. Many new tutorials start with readers' questions, and he's always glad to answer them in the comments.



No comments yet — be the first to share your thoughts!