Change Screen Brightness with Keyboard Keys in Windows 11

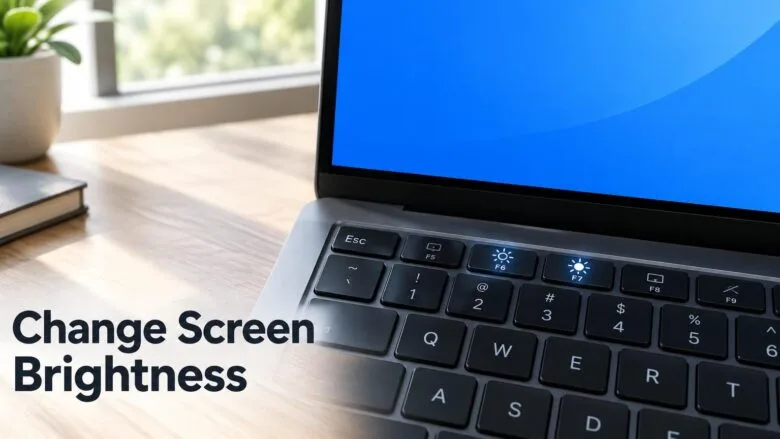
Screen brightness on a Windows 11 laptop is changed with the sun-icon key on the top row of the keyboard, called the function row. Press it to make the screen brighter or dimmer. If nothing happens, hold the Fn key while you press it, or turn off Fn Lock, which is a key that changes what the top row does.
Most laptops have the brightness keys on the F1 to F12 row, and the sun icons usually sit on F5 and F6 or F2 and F3. The exact spot depends on the maker. Look for a small sun symbol printed on the key or in the blue or white text above it.
This page covers where the keys are, how Fn Lock changes what they do, how to set brightness on a desktop PC or external monitor, and what to try when the keys stop working.
On a Windows 11 laptop, press the brightness key on the function row, marked with a sun icon, to change screen brightness. If nothing happens, hold Fn while you press it, or turn off Fn Lock so the key works with a single press. Desktop PCs and external monitors need a different method.
Find the brightness keys on your keyboard
Brightness keys are built into laptop keyboards and some desktop keyboards. Windows does not assign them. Your laptop’s firmware (the low-level software on the motherboard) handles them, which is why the exact keys differ between makers.
Locate the keys
Look at the top row of your keyboard for two keys with sun icons. One has a smaller or dimmer sun, and one has a larger or brighter sun. Some laptops use a sun with a minus and plus sign instead. Common positions are F1 and F2, F5 and F6, F9 and F10, or F11 and F12. The location depends on the manufacturer, so go by the icons rather than the numbers.
Some laptops put brightness on the arrow keys, with a sun icon on the Left and Right arrow keys. These work the same way as the function row keys.
Change brightness with the keys
This step changes brightness in small increments. The size of each step depends on your device.
- Find the brightness down key (the dimmer sun icon) on your keyboard.
- Press it once. If nothing happens, hold Fn (the Function key, usually at the bottom left of the keyboard) and press the same key again.
- Check the screen. A brightness indicator appears briefly, and the display dims by one step.
- Press the brightness up key (the brighter sun icon), with Fn held if your keyboard needs it. The display brightens by one step.
- Repeat until the screen is at the level you want.
If the key works only with Fn held, your keyboard is set so the function row acts as normal F1 to F12 keys. The next section explains how to switch that.
Switch Fn Lock to use brightness keys without holding Fn
Fn Lock (also called Function Lock) decides what the top row does by default. With Fn Lock on, the keys act as F1 to F12 and you hold Fn for brightness. With it off, the keys control brightness and volume directly, and you hold Fn for F1 to F12. Use this section if you want the brightness keys to work with a single press.
Toggle Fn Lock from the keyboard
- Look at the Esc key and the top row for a key with a padlock icon and the letters Fn. On many laptops the padlock is printed on Esc. Some keyboards have a separate Fn Lock key.
- Hold Fn and press the key with the padlock icon.
- Press a brightness key without holding Fn. The brightness indicator appears if Fn Lock is now off.
- If nothing changes, repeat step 2 to switch Fn Lock back, and try again.
Some laptops show a small light on the key or a pop-up on screen when you toggle Fn Lock. Many do neither, so test with a brightness key.
Change the default in UEFI settings
If your laptop has no Fn Lock key, the default may be set in UEFI (the firmware settings screen you open before Windows starts). The option is usually called something like Action Keys Mode or Function Key Behavior. The name and location differ by manufacturer, and I can't give one path that fits every laptop. Check your laptop maker's support page for the exact setting. Changing firmware settings is rarely risky, but write down the original value before you change it so you can undo it.
Change brightness with the keyboard when your keys don't work
If your keyboard has no brightness keys, or they fail, you can still adjust brightness without the mouse. Quick Settings (the panel that opens from the bottom-right corner of the taskbar) includes a brightness slider you can reach from the keyboard.
- Press Windows key + A. Quick Settings opens above the taskbar.
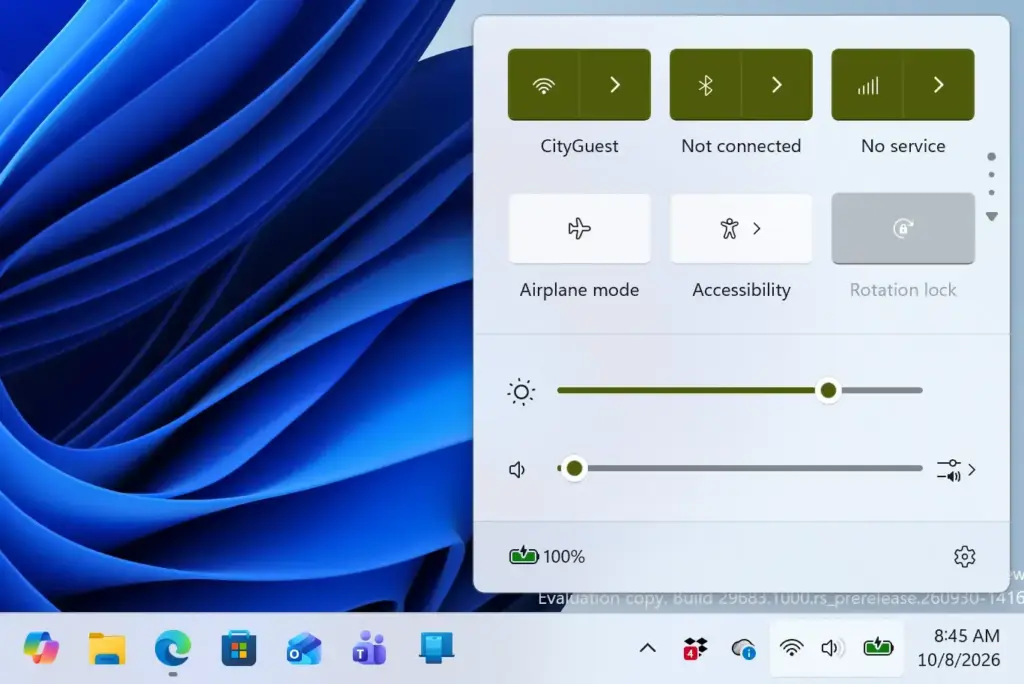
- Press Tab until the brightness slider is highlighted. The slider has a sun icon beside it.
- Press the Left arrow to lower brightness or the Right arrow to raise it. The screen changes as you press.
- Press Esc to close Quick Settings.
If the brightness slider does not appear in Quick Settings, your PC either has no built-in display or Windows can't control it. See the troubleshooting sections below.
You can also use the Settings app. Press Windows key + I to open it, then go to Settings System Display. Use Tab to reach the Brightness slider and the arrow keys to change it.
Brightness keys on desktop PCs and external monitors
Brightness keys control the built-in screen of a laptop or tablet. They normally do not control a separate monitor, and Windows 11 does not show a brightness slider in Settings for most desktop monitors.
Desktop PC with a standard monitor
Your monitor has its own buttons, usually on the bottom edge, back or side. Press one to open the monitor's on-screen menu, then find Brightness and adjust it there. A keyboard sun key does not reach this menu on most setups.
Laptop connected to an external monitor
The brightness keys change the laptop's built-in screen only. The external monitor stays the same. If you close the lid and use only the external monitor, the keys and the Windows slider have nothing to adjust. Use the monitor's buttons instead.
Control an external monitor from Windows
Many monitors support DDC/CI (a protocol that lets a PC send settings such as brightness to the monitor over the video cable). Windows 11 does not use it for brightness in the normal Settings pages, so you need third-party software. Free tools such as Twinkle Tray and Monitorian add a brightness slider for monitors that support DDC/CI. Check that DDC/CI is turned on in the monitor's own menu, because some monitors ship with it off. Check the tool's own settings to see whether it supports custom keyboard shortcuts.
Fix brightness keys that do nothing
Work through these in order. They go from the quickest check to the most involved.
Check that the keys are not just in Fn mode
- Hold Fn and press the brightness key.
- If brightness changes, Fn Lock is on. Follow the Fn Lock section above to switch it.
- If brightness still does not change, continue to the next check.
Check the slider in Settings
This tells you whether Windows can control your display at all. If the slider works but the keys do not, the problem is the key handling. If the slider is missing or does nothing, the problem is the display or its driver.
- Open Settings System Display
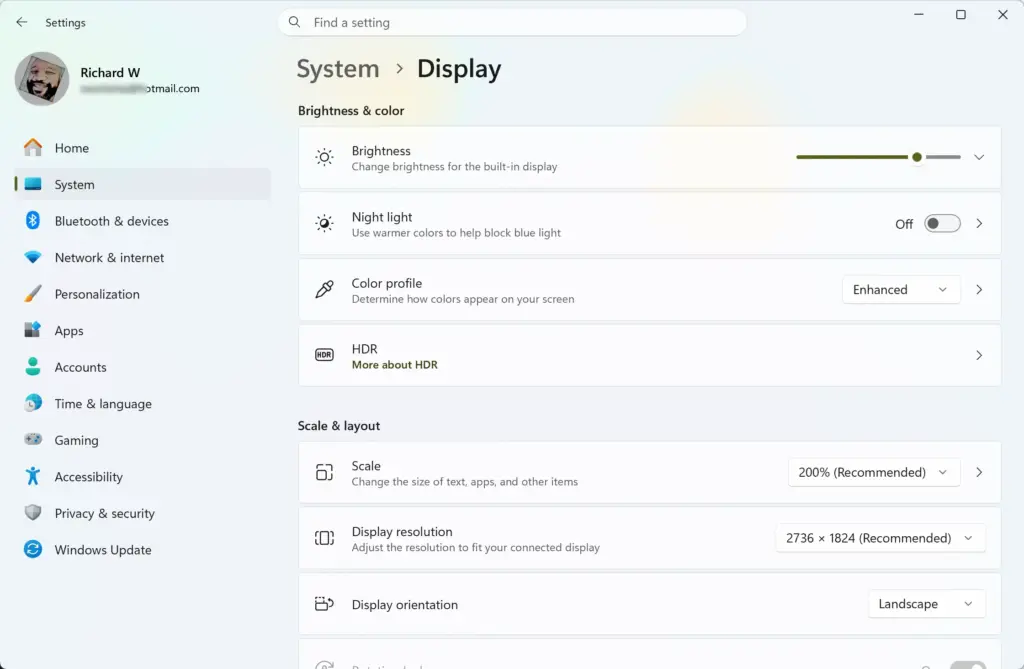
Settings › System › Display - Look under Brightness & color for the Brightness slider.
- Drag the slider. The screen should change right away.
If there is no slider, you are probably on a desktop PC or using only an external monitor. If you are on a laptop, continue below.
Enable Generic PnP Monitor in Device Manager
Brightness control can vanish when the built-in monitor entry is disabled in Device Manager (the Windows tool that lists your hardware). This is a known cause on laptops. This step needs administrator privileges.
- Right-click the Start button and select Device Manager. Approve the User Account Control prompt (the Windows security box that asks you to confirm changes) if it appears.
- Expand Monitors.
- Right-click Generic PnP Monitor.
- Select Enable device if it is listed. If the menu shows Disable device instead, the device is already enabled, so leave it alone and go to the next check.
- Press a brightness key or open Settings System Display and test the slider.
To undo this change, return to the same menu and select Disable device. You do not need to restart in most cases, though a restart helps if the slider does not return.
Update the display driver
If Windows is using the Microsoft Basic Display Adapter instead of your real graphics driver, the brightness slider often disappears. This step needs administrator privileges.
- Open Device Manager as above.
- Expand Display adapters.
- Check the name. If it says Microsoft Basic Display Adapter, you need the correct driver.
- Right-click the adapter and select Update driver.
- Select Search automatically for drivers and follow the prompts.
- Restart the PC if the wizard asks for it.
If Windows says the best driver is already installed but the adapter is still the basic one, download the graphics driver from your laptop maker's support page. Laptop makers often supply tuned drivers that work better than generic ones.
Install the manufacturer's hotkey driver
If the slider works but the keys do not, Windows may lack the driver that connects the keys to the operating system. Many laptop makers supply a small hotkey package (the driver that makes the special keys work) for this. Go to your laptop maker's support page, enter your model, and look in the downloads for a hotkey, keyboard or system interface item. Install it and restart. I can't name the right package for every model, so use the one listed for yours.
Stop brightness from changing on its own
Does the brightness change a moment after you set it? A power or sensor feature may be overriding your setting. The steps below show how to switch those features off. These are the usual ones in Windows 11.
Turn off automatic brightness
Some devices have a light sensor and adjust brightness to the room. Windows calls this adaptive brightness. You can switch it off.
- Open Settings System Display
- Select the arrow beside Brightness to expand the section.
- Clear the Change brightness automatically when lighting changes check box.
- Clear Help improve battery by optimizing the content shown and brightness if it is listed.
These options appear only if your hardware supports them. If you don't see them, your device doesn't have that feature, so look at power settings instead. To undo this, select the check boxes again.
Check the power-saving setting
Windows can dim the screen when the battery runs low. In Windows 11 version 22H2 and later this feature is called Energy saver. Earlier versions call it Battery saver.
- Open Settings System Power & battery
- Select Energy saver (or Battery saver on older builds) to expand it.
- Clear Lower screen brightness when using energy saver (or the matching battery saver option).
While this feature is active, the screen drops to a lower brightness. You can still raise it with the keys, but it can drop again when the mode turns on.
Don't confuse brightness with Night light
Night light shifts the screen to warmer colors in the evening. It does not change brightness, and the brightness keys do not control it. If the screen looks orange but still bright, open Settings System Display Night light to adjust or turn it off.
Does this need a restart or a specific edition?
Brightness key changes apply instantly, with no restart. The keys work the same on Windows 11 Home and Windows 11 Pro, since the feature comes from your hardware and drivers rather than the edition. Only the driver and Device Manager fixes might need a restart, and Windows tells you when it does.
To reverse any brightness change, press the opposite key or move the slider back. To restore the original key behavior, toggle Fn Lock again.
If this didn't work
If the Settings slider moves but the keys do nothing, the hotkey driver from your laptop maker is the most likely fix. Check that its support page lists a current version for Windows 11. If neither the slider nor the keys work after you update the display driver and enable Generic PnP Monitor, the screen may not be reporting itself to Windows correctly. Contact the laptop maker with the display adapter name from Device Manager.
Was this guide helpful?

About the Author
Richard
Tech Writer, IT Professional
Richard is a writer at Geek Rewind who turns complex IT tasks into clear, step-by-step guides. He draws on years of hands-on experience in system administration and enterprise IT operations, focusing on Windows, Linux and WordPress: the problems people actually run into, and the fixes that work. His server and WordPress guides come from systems he runs himself. Richard builds and maintains the platform behind Geek Rewind, from its Ubuntu servers and Nginx configuration to its custom WordPress plugins. Many new tutorials start with readers' questions, and he's always glad to answer them in the comments.



No comments yet — be the first to share your thoughts!