How to Turn On or off Night Light in Windows 11

Night Light is a built-in Windows 11 feature that you can turn on or off in a few clicks. This tutorial covers two ways to do it: Quick Settings and the Settings app. It also explains how to set a schedule and what to check if the option doesn’t work.
Open Quick Settings by pressing Win+A and click the Night light button to turn it on or off. The screen takes on a warm yellow tint immediately. To set a schedule, go to Settings System Display, click the Night light row, turn on Schedule night light, and choose Sunset to sunrise or custom hours.
Why Use Night Light?
Windows 11 Night Light helps you sleep better by reducing the blue light your screen gives off at night. It works for every user account on the PC separately, so your setting doesn’t change what anyone else sees. You don’t need to restart Windows when you turn it on or off. The change is instant.
Understanding Night Light Settings
Windows 11 Night Light makes your screen easier to look at when it’s dark by warming up the colors. This helps reduce eye strain. The screen takes on a yellow or orange tint, and a slider lets you choose how strong it is. Night Light can be set to turn on and off automatically. You can choose sunset to sunrise, or pick custom hours.
To set up automatic times:
- Open Settings System Display.
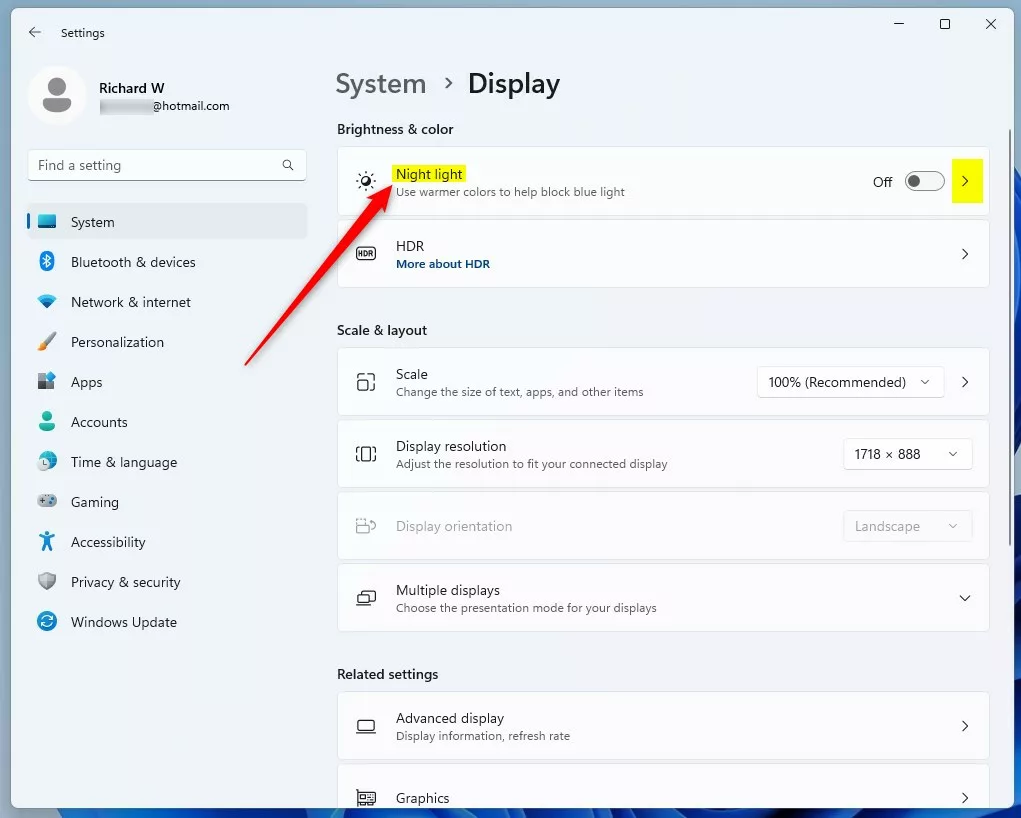
- Click the Night light row (not just the toggle) to open its page. You should see a Strength slider and a Schedule night light option.
- Turn on Schedule night light. More options appear below it.
- Select Sunset to sunrise and Windows handles the timing for you. Windows uses your location to work out the sunset and sunrise times. If it can’t find your location, turn on location services or check your time zone.
- Or select Set hours and enter the times you want Night Light to turn on and off.
To undo the schedule, turn Schedule night light off again. Night Light then only changes when you switch it yourself.
Important Information
Windows 11 Night Light might not work on all computers, especially those with certain drivers like DisplayLink. If the Night light setting is missing, greyed out, or has no effect on one display, the display driver is the first thing to check. Updating your graphics driver from the PC or GPU maker often fixes it.
For advanced users, Night Light settings are stored in the Windows registry. The path is 🗝️HKEY_CURRENT_USER\
If you do look around in it, back it up first and avoid editing values you don’t understand.
These registry keys hold your Night Light preferences:
HKEY_CURRENT_USER\SOFTWARE\Microsoft\Windows\CurrentVersion\CloudStore\Store\DefaultAccount\Current\default$windows.data.bluelightreduction.settingst$windows.data.bluelightreduction.bluelightreductionstate
HKEY_CURRENT_USER\SOFTWARE\Microsoft\Windows\CurrentVersion\CloudStore\Store\DefaultAccount\Current\default$windows.data.bluelightreduction.settingst$windows.data.bluelightreduction.settings
The Night Light feature requires the Connected Devices Platform Service to be enabled and running. If Night Light stops working after you’ve changed services on the PC, open the Services app and check that this service is set up and running.
Option 1Use Quick Settings
This is the quickest way to switch Night Light on or off during the day.
- Open Quick Settings by pressing Win+A. The panel opens above the taskbar , near the clock and network icons.
- Click the Night light button to turn it on or off. When it’s on, the button is highlighted and the screen turns warmer right away.
If you don't see the Night light button, click the pencil icon (Edit quick settings) at the bottom of the panel. Click Add, choose Night light, then click Done. If it isn't in the list, the display driver may not support it.

Option 2Use Settings
Use the Settings app if you want to change the strength or the schedule as well as turn Night Light on or off.
- Open Settings by pressing Win+I.
- Click System on the left side.
- Click Display on the right side. The brightness and Night light options are near the top.
- Turn Night light on or off for what you want. The screen color changes at once.
- You can now close Settings if you like.
The setting works the same in Windows 11 Home and Pro. If the toggle is greyed out, check your display driver, or try a different monitor or cable. Third-party display adapters are a common cause.
Summary
Windows 11 Night Light makes your screen show warmer colors at night to help you relax and sleep better. Turn it on from Quick Settings for a fast change, or use the Display page in Settings to set a schedule and adjust how strong the effect is.
Have a question about this guide?
Answered by AI from this guide. Good questions may be added to this page — please don't include personal details.
Did this guide fix your problem?

About the Author
Richard
Tech Writer, IT Professional
Richard is a writer at Geek Rewind who turns complex IT tasks into clear, step-by-step guides. He draws on years of hands-on experience in system administration and enterprise IT operations, focusing on Windows, Linux and WordPress: the problems people actually run into, and the fixes that work. His server and WordPress guides come from systems he runs himself. Richard builds and maintains the platform behind Geek Rewind, from its Ubuntu servers and Nginx configuration to its custom WordPress plugins. Many new tutorials start with readers' questions, and he's always glad to answer them in the comments.
[…] Volume, Brightness, Wi-Fi, Bluetooth, Airplane mode, Rotation lock, Battery saver, Accessibility, Night light, Mobile hotspot, Nearby sharing, Cast, and Project. It saves you time. Your most-used controls are […]