How to Disable Editing Quick Settings in Windows 11

Disabling Quick Settings editing locks the taskbar flyout so nobody can add, remove, or rearrange its buttons, such as Wi-Fi and Bluetooth . The pencil (Edit) icon at the bottom of the panel stops working for that user. This prevents accidental or unwanted layout changes. The Group Policy method below applies to Windows 11 Pro, Enterprise, and Education. The Registry and PowerShell methods also work on Home.
Group Policy Editor is a built-in Windows tool for changing deep system settings. It handles this change through a single policy. You need administrator rights on your PC for every method in this guide.
Open Local Group Policy Editor (gpedit.msc) and set User Configuration Administrative Templates Start Menu and Taskbar Disable Editing Quick Settings to Enabled. This works on Windows 11 Pro, Enterprise and Education. On Home, create the DisableEditingQuickSettings DWORD value set to 1 under 🗝️HKEY_CURRENT_USER\
Why disable Quick Settings editing?
A consistent layout for system controls helps prevent user errors in shared or office environments. If you manage several PCs, or you share one with family or coworkers, a locked panel means everyone finds the same buttons in the same place. Locking the layout does not disable the buttons themselves. People can still use Wi-Fi , Bluetooth , brightness and the rest. They just can’t change which ones appear.
Method 1Using Local Group Policy Editor (Pro/Enterprise Only)
The Local Group Policy Editor is not included in Windows 11 Home. If the command in step 1 returns an error saying Windows cannot find the file, you are probably on Home. Skip to the Registry method. To check your edition, go to Settings System About and look under Windows specifications.
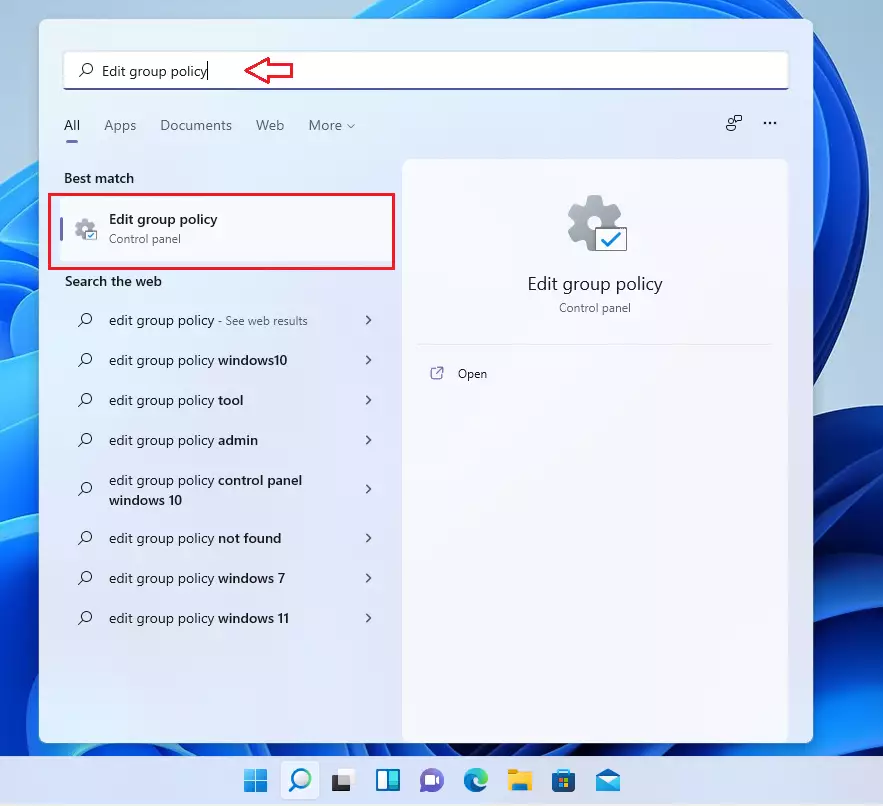
- Press Win+R to open the Run dialog, type
gpedit.msc, and press Enter. The Local Group Policy Editor window opens. If a User Account Control prompt appears, click Yes.
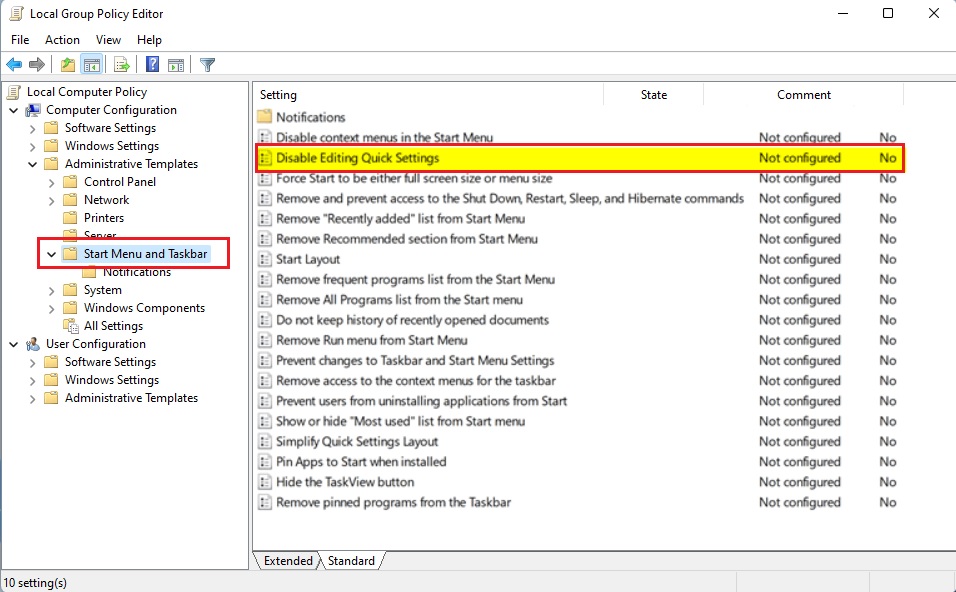
- In the left pane, expand the folders to reach the path shown below.
User Configuration\Administrative Templates\Start Menu and Taskbar
- Find the policy named Disable Editing Quick Settings in the right pane and double-click it. Its settings window opens. If the list is long, click the Setting column header to sort it by name.
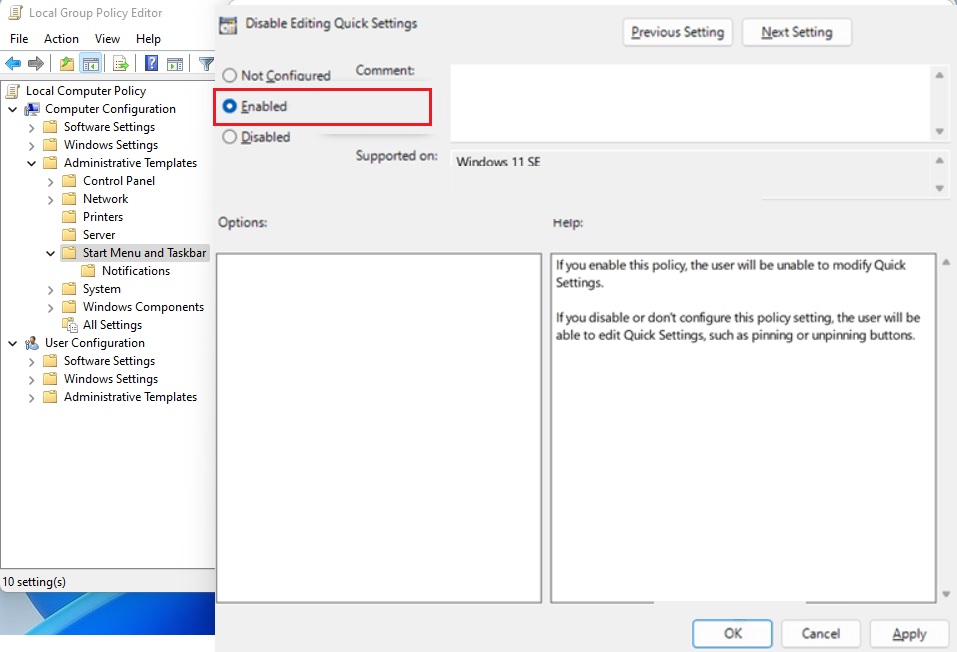
- Select Enabled and click OK. The policy now shows as Enabled in the list.
The change usually takes effect after you sign out and back in, or after a restart. Once it applies, open Quick Settings from the taskbar . The edit (pencil) button should be gone or have no effect. To undo this later, open the same policy and set it to Not Configured (or Disabled), then click OK.
Method 2Using Registry Editor (All Editions)
Registry Editor is a database for low-level system and application settings. It lets you disable Quick Settings editing on any Windows 11 edition, including Home. This method stops anyone from adding, removing, or rearranging buttons on the taskbar panel. You create one registry value and set it, which takes a few minutes.
Before you start, consider exporting the key you are about to change (File Export in Registry Editor) or creating a restore point, so you can go back if something goes wrong.
- Press Win + R, type
regedit, and press Enter. Click Yes if User Account Control asks for permission. Registry Editor opens.
- Browse to the registry path shown below. Use the folder tree in the left pane, or paste the path into the address bar at the top of the window. If a key in the path is missing, right-click its parent key, choose New Key, and give it the missing name.
HKEY_CURRENT_USER\Software\Policies\Microsoft\Windows\Explorer
- Right-click an empty area in the right pane and choose New DWORD (32-bit) Value. Name the new value
DisableEditingQuickSettings. Press Enter to confirm the name. The value appears in the list with a default data of 0.
- Double-click the new value, enter
1in the Value data box, and click OK. The list now shows the value with the data you entered.
- Close Registry Editor and restart your computer to apply the change. After you sign back in, open Quick Settings and check that you can no longer edit the layout.
To undo the change, return to the same value and set it back to its original state, or delete the value, and restart again.
Method 3Using PowerShell
PowerShell is a command-line shell for running system commands. It lets you disable Quick Settings editing with a single command. This approach suits you if you prefer typing commands to clicking through menus, or if you need to repeat the change on several PCs. It works on Home as well as Pro. Open PowerShell with administrator permissions so the command can change your user policies and lock the panel layout.
To open an elevated window, click Start, type PowerShell, right-click Windows PowerShell in the results, and choose Run as administrator. Click Yes on the User Account Control prompt. The window title should start with "Administrator". Elevated windows run with administrator privileges, which you need to modify system-level settings.
Run the command shown below. It prevents accidental changes to the Quick Settings layout. If PowerShell prints a red error, check that you opened it as administrator and that you typed the command exactly as shown.
Set-ItemProperty -Path "HKCU:\Software\Policies\Microsoft\Windows\Explorer" -Name "DisableEditingQuickSettings" -Value 1
Sign out and back in, or restart, so the setting is picked up. To revert the configuration, change the value back to 0 and restart again.
Conclusion
Locking the Quick Settings menu keeps the Windows 11 interface clean and controlled. Group Policy suits enterprise and managed environments on Pro, Enterprise, or Education. For a single PC, and for any Home PC, the Registry or PowerShell method does the same job. All three methods are reversible, so you can unlock the layout whenever you need to change it.
Have a question about this guide?
Answered by AI from this guide. Good questions may be added to this page — please don't include personal details.
Did this guide fix your problem?

About the Author
Richard
Tech Writer, IT Professional
Richard is a writer at Geek Rewind who turns complex IT tasks into clear, step-by-step guides. He draws on years of hands-on experience in system administration and enterprise IT operations, focusing on Windows, Linux and WordPress: the problems people actually run into, and the fixes that work. His server and WordPress guides come from systems he runs himself. Richard builds and maintains the platform behind Geek Rewind, from its Ubuntu servers and Nginx configuration to its custom WordPress plugins. Many new tutorials start with readers' questions, and he's always glad to answer them in the comments.
No comments yet — be the first to share your thoughts!