How to Enable or Disable Location Services in Windows 11

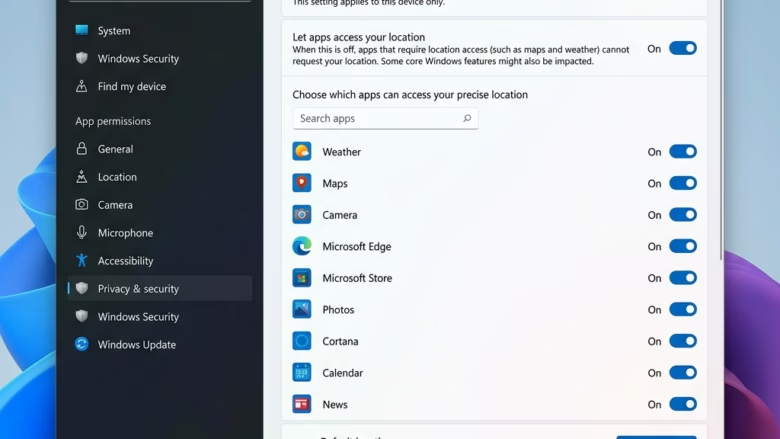
Location services in Windows 11 work out where your PC is by using GPS, nearby Wi-Fi networks, and cell towers. Apps like Maps and Weather use that position. Turning the feature off stops apps from checking where you are. That protects your privacy and can save a little battery on a laptop.
You can switch location tracking on or off for the whole computer in the Windows 11 Settings app. You can also leave it on and choose which apps may see your position. This guide covers three methods: the Settings app, Windows Terminal, and the Registry Editor.
Open Settings with Win+I, go to Privacy & security, click Location, then toggle the switch to On or Off. You can also control which individual apps access your location below the main switch. No restart is needed.
Understanding Windows Location Services
Windows 11 location services use GPS, Wi-Fi networks, and cell towers to work out your position for apps and system features. This data lets things like your time zone and weather apps update automatically. You can view and clear your saved location history at any time in the main location settings.
Windows saves your location history when apps use your location. If you sign in with a Microsoft account, your last known location can also be saved online and used on your other devices. Some older apps, especially those installed from discs or downloaded from the internet, don’t follow these settings. They may still be able to find your location.
Microsoft requires apps from the Microsoft Store to follow your Windows location settings. Still, be careful where you download software from. For the strongest privacy, you could turn off your device’s wireless connections. That also stops your internet, phone calls, and Bluetooth , so it’s rarely practical.
To keep an eye on things, check the list of apps that have permission to use your location. The list appears in the Location page of the Settings app, and you can switch off any app you don’t trust or don’t use.
This is a safety feature and cannot be turned off.
Option 1Turning Location Services On or Off in Settings
This is the easiest and most common way to manage location services. It works the same on Windows 11 Home and Pro, and you don't need to touch the registry or a command line.
Step 1Open Windows Settings
- Press the
Windows key + Ikeys on your keyboard at the same time. - The Settings app should open. This is the quickest way to get there.
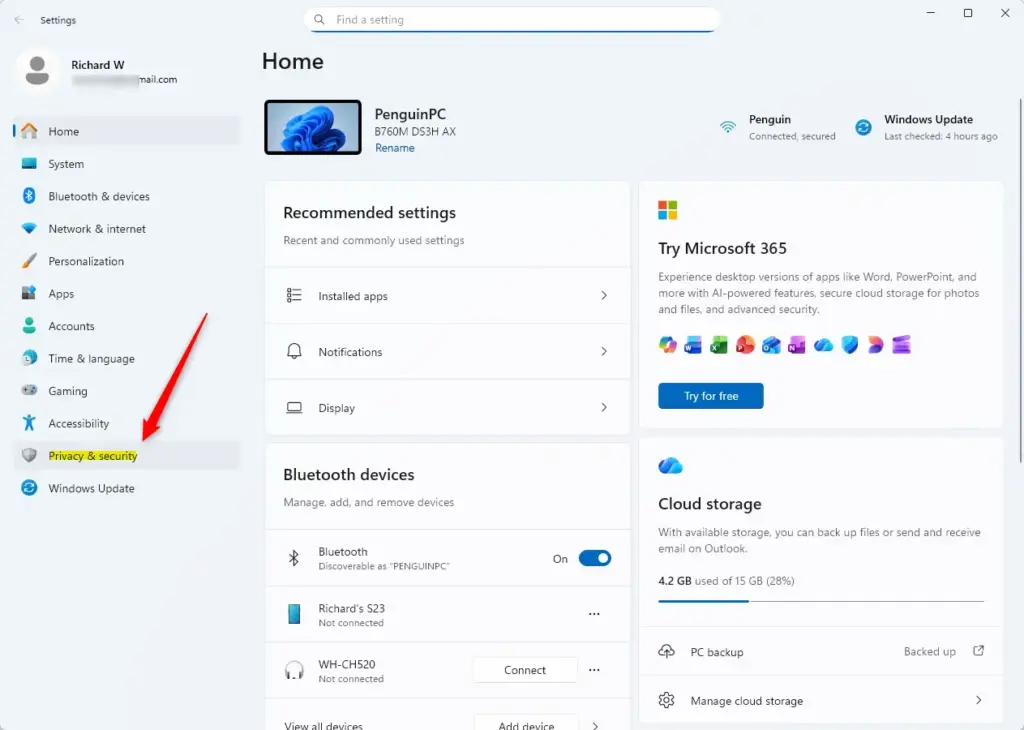
Step 2Go to Privacy & Security
- In the Settings window, look at the menu on the left side.
- Click
Privacy & security. The privacy options now appear on the right.
Step 3Find Location Settings
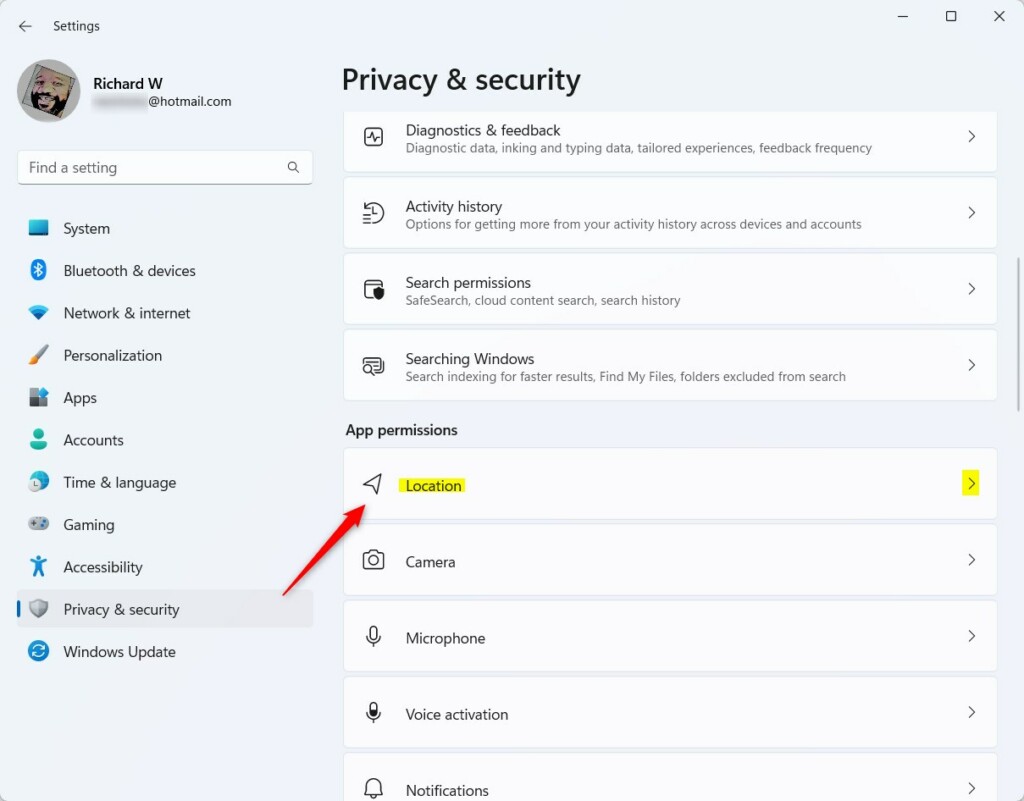
- On the right side of the Privacy & security page, scroll down to the App permissions area.
- Click the
Locationoption. The location settings page opens.
Step 4Control Location Services
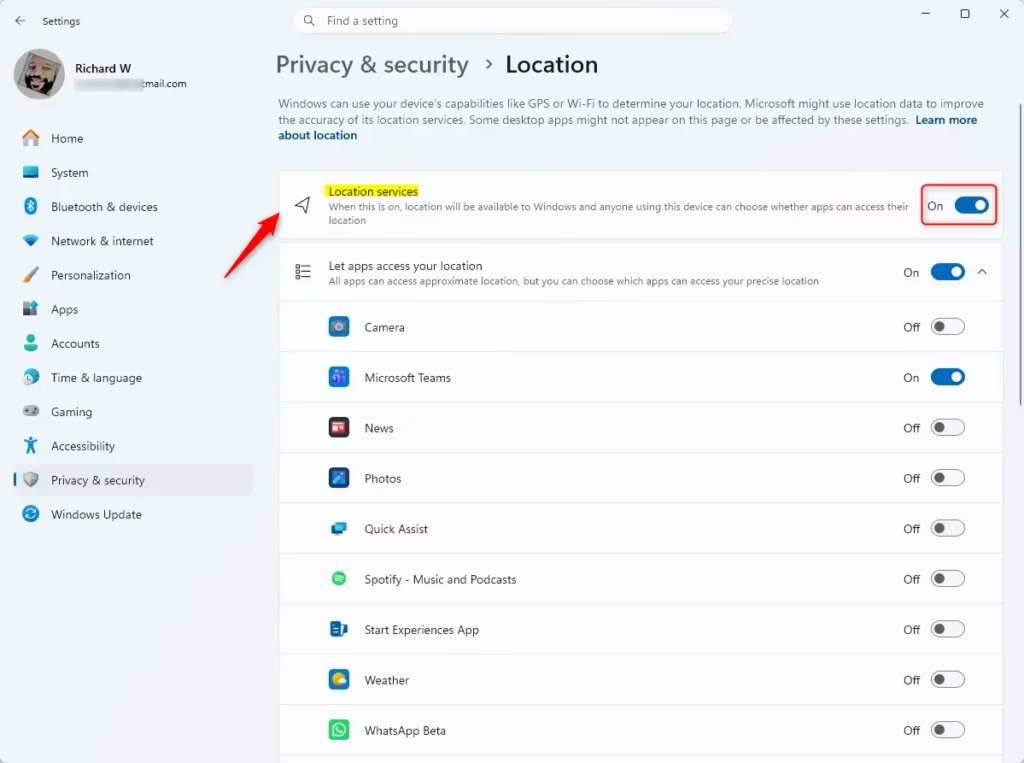
The main switch on this page controls Windows 11 location tracking for your device. Below it are settings for individual apps. The steps are:
- To turn Location Services ON: Make sure the switch is in the "On" position. Most Windows computers are set up this way by default.
- To turn Location Services OFF: Click the switch so it moves to the "Off" position.
If the switch is greyed out, or you see a message that some settings are managed by your organization, a work or school policy is controlling it. Settings can't override that. Changing the device-wide switch may also need an administrator account. If you're on a standard account, you may only be able to change the options for your own user.
With the main switch on, you can scroll down to the list of apps and turn individual apps on or off. To remove saved history, look for the location history option on the same page and use its clear button.
Step 5Confirm If Turning Off
When you turn location services off, Windows will probably ask you to confirm.
- Look for the button labelled
Turn off. - Click it to finish the change. The switch should now show "Off".
Step 6Close Settings
Once you've made the changes you want, close the Settings window. No restart is needed. To undo the change, come back to the same page and flip the switch again.
Option 2Managing Location Services with Command Prompt or Windows Terminal
If you like working from the command line, or you need to apply these changes to several computers, you can use Windows Terminal. It hosts both Command Prompt and PowerShell. You need administrator rights for this method.
Step 1Open Windows Terminal as Administrator
- Click the Start button.
- Type
Terminal. - Right-click
Windows Terminalin the search results. - Choose
Run as administrator. - If a User Account Control (UAC) message asks for permission to make changes, click
Yes.
A terminal window opens with administrator rights. The window title usually says so.
Step 2Enter the Command
With the elevated terminal open, type or paste the command for what you want, then press Enter. The change applies straight away.
- To turn Location Services ON:Code
SystemSettingsAdminFlows.exe SetCamSystemGlobal location 1 - To turn Location Services OFF:Code
SystemSettingsAdminFlows.exe SetCamSystemGlobal location 0
Explanation: These commands change a system setting that turns the main location service on or off. The number '1' usually means 'on' or 'enabled,' and '0' means 'off' or 'disabled.' To undo a change, run the other command.
Step 3Close the Terminal
After the command runs, you can close the Windows Terminal window. If you want to check the result, open Settings Privacy & security Location and look at the main switch.
A small mistake can cause problems. It's best to copy and paste the commands exactly as given.
Option 3Using the Registry Editor (for Experienced Users)
The Registry Editor gives you direct control over Windows 11 location settings. It's meant for experienced users who are comfortable editing system keys. Back up the registry before you change anything, so you can recover from a mistake. This method works on both Home and Pro.
Important Note: Before you start, create a backup of your registry. Open the Registry Editor, go to File > Export, and save a copy of your registry somewhere safe.
Step 1Open Registry Editor
- Press
Windows key + Rto open the Run box. - Type
regedit. - Press
Enteror clickOK. - If User Account Control (UAC) asks for permission, click
Yes.
The Registry Editor opens, with the key tree on the left and values on the right.
Step 2Go to the Correct Registry Key
You need to reach a specific registry key to configure location settings by hand. Paste this path into the Registry Editor address bar and press Enter:
HKEY_LOCAL_MACHINE\SOFTWARE\Microsoft\Windows\CurrentVersion\Location
The editor jumps to that key. If it can't find it, you'll need to create it, as described next.
HKEY_LOCAL_MACHINE\SOFTWARE\Policies\Microsoft\Windows\LocationAndSensorsIf the Location folder (called a "key") doesn't exist, create it:
- Right-click
CurrentVersion. - Choose
New > Key. - Name the new key
Location.
Step 3Create or Change the Value to Enable Location Services
To turn location tracking on in the registry, make sure the DisableLocation value is set to 0 or removed entirely. If the value doesn't exist yet, create it as a new DWORD value named DisableLocation and set its data to 0.
- In the right-hand pane, right-click an empty spot.
- Choose
New > DWORD (32-bit) Value. - Name the new value
DisableLocation. - Double-click
DisableLocation. - Make sure its
Value datais set to0. If the value is already there and set to1, changing it to0will turn on location services. If it's not there, creating it with a value of0will also turn it on. - Click
OK.
Explanation: A value of 0 for DisableLocation means that location services are not turned off, so they are on.
Step 4Create or Change the Value to Disable Location Services
To turn location services off for the whole computer, create or edit the DisableLocation value and set its value data to 1.
- In the right-hand pane of the
HKEY_LOCAL_MACHINE\SOFTWARE\Policies\Microsoft\Windows\LocationAndSensorskey, right-click an empty spot. - Choose
New > DWORD (32-bit) Value. - Name the new value
DisableLocation. - Double-click
DisableLocation. - Set its
Value datato1. - Click
OK.
Explanation: A value of 1 for DisableLocation tells Windows to turn off location services. To undo it, set the value back to 0 or delete the value.
Step 5Apply Changes
Registry changes usually need a restart before they take full effect. Restarting only the Windows Explorer process sometimes works, but a full restart is the most reliable. To restart, open Start, click the power button, and choose Restart. Afterwards, check Settings Privacy & security Location to confirm the result.
Summary
For most people, the Settings app under Privacy & security is the right place to manage Windows 11 location services. For automation or advanced control, use Command Prompt or Windows Terminal with administrator rights. The Registry Editor offers the most granular control, but it needs caution and a backup first.
Was this guide helpful?

About the Author
Richard
Tech Writer, IT Professional
Richard is a writer at Geek Rewind who turns complex IT tasks into clear, step-by-step guides. He draws on years of hands-on experience in system administration and enterprise IT operations, focusing on Windows, Linux and WordPress: the problems people actually run into, and the fixes that work. His server and WordPress guides come from systems he runs himself. Richard builds and maintains the platform behind Geek Rewind, from its Ubuntu servers and Nginx configuration to its custom WordPress plugins. Many new tutorials start with readers' questions, and he's always glad to answer them in the comments.




No comments yet — be the first to share your thoughts!