How to Enable or Disable Screen Tint in Windows 11

Screen Tint in Windows 11 puts a custom color filter over your display. The overlay lowers brightness and softens harsh tones to reduce eye strain, and it leaves your other display settings alone.
Night Light only targets blue light. Screen Tint lets you pick any color and change how strong it looks. You turn it on or off in the Accessibility settings whenever your eyes feel tired. The setting is the same on Windows 11 Home and Pro. It does not appear on every Windows 11 build, so if you can’t find it, see the Registry Editor section below.
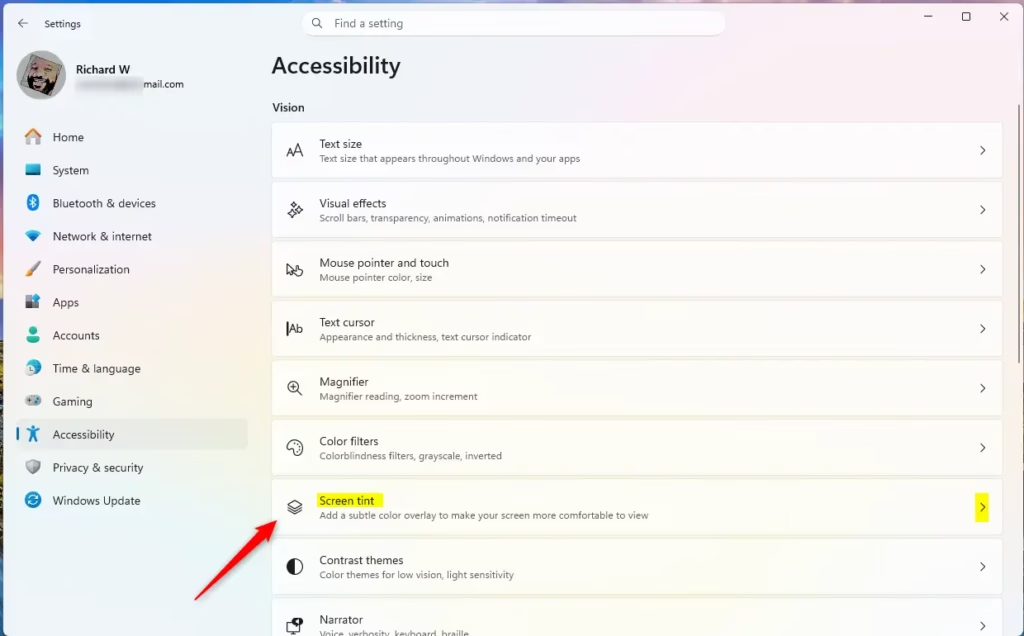
Press Win+I to open Settings, click Accessibility in the left sidebar, scroll down to Screen tint, and click the switch to turn it on or off. Adjust the color and brightness using the color picker and slider.
Turning Screen Tint On or Off Using Settings
The Settings app is the easiest way to turn Screen Tint on or off, and the only way to change its color and strength. You don’t need administrator rights, and you don’t need to restart.
- Press Win+I to open the Settings app.
- In the left sidebar, click Accessibility. The accessibility options appear on the right.
- Scroll down on the right side until you see Screen tint, then click it. The Screen tint page opens.
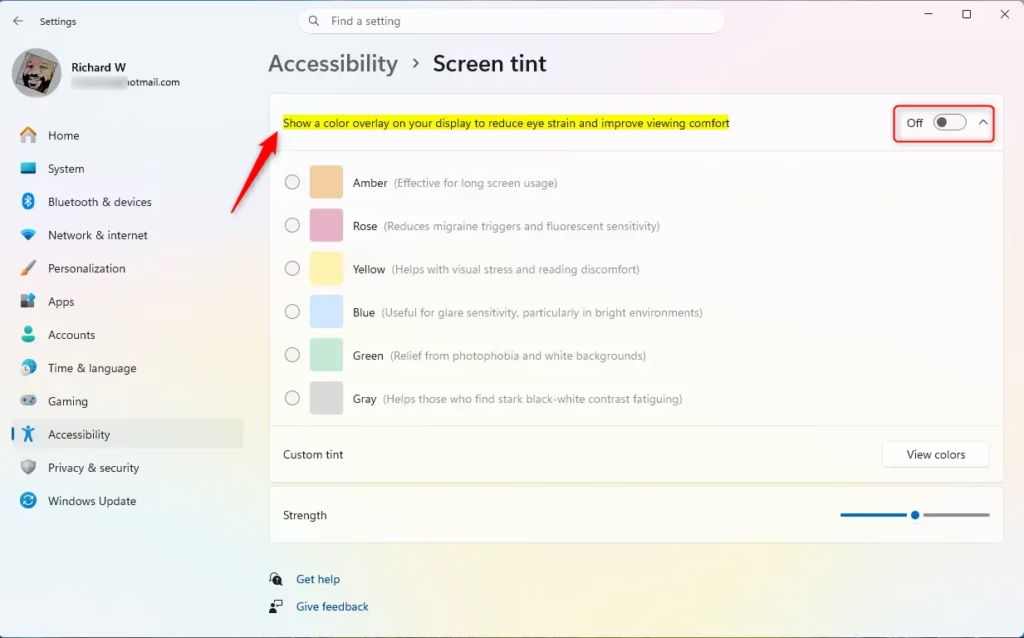
- Click the switch next to Screen tint to turn the feature on or off. When you turn it on, a color appears over your screen right away. When you turn it off, the screen returns to normal.
- If Screen Tint is on, adjust it to suit you:
- Click the color box to open a color picker, then choose a color that feels comfortable.
- Drag the slider to make the tint lighter or darker. The screen updates as you move it.
- Close the Settings window when you are happy with how the screen looks. The tint stays as you set it.
To undo the change, go back to Settings Accessibility Screen tint and switch it off. If you don’t see Screen tint in the list, your build may not include it or it may be hidden. Try the Registry Editor method below. Windows also has Color filters under Settings Accessibility, and Night light under Settings System Display. Both are separate features.
Enabling or Disabling Screen Tint Using the Registry Editor
Use the Registry Editor if the Screen Tint option is missing from the Settings app. The registry is a database where Windows and your apps store low-level settings. Adding or changing one value in it controls whether the Screen Tint feature is available.
You need an administrator account to make these changes. A wrong edit in the registry can cause problems, so follow the steps exactly and back up first. In Registry Editor, click File, then Export, and save a copy of the registry. You can double-click that file later to restore it.
How to Manually Enable Screen Tint
The steps below add or change one value so that Screen Tint shows up in Accessibility. You will open Registry Editor, go to the right location, and set the value.
- Press Windows key + R to open the Run box.
- Type
regeditand press Enter, or click OK. A User Account Control (UAC) message will probably ask for permission to make changes. Click Yes. Registry Editor opens. - Click the address bar at the top of Registry Editor. Type or paste this path carefully, then press Enter:
regedit - Check whether the
Colorsfolder exists underPersonalizationin the left pane. If it does, click it and go to the next step. If it doesn't, create it:- Right-click the
Personalizationfolder. - Select New, then Key.
- Name the new folder
Colorsand press Enter.
- Right-click the
- Click the
Colorskey (folder) so its contents show on the right. You need to create or change an item called "Active."- If "Active" is already there, double-click it.
- If "Active" is not there, right-click the empty space on the right side, select New, then DWORD (32-bit) Value, and name it exactly
Active. Then double-click the new item.
- In the small window that opens, make sure Hexadecimal is selected under "Base." Change the "Value data" to
1, then click OK. The window closes and "Active" now shows the new value in the list. - Sign out of your Windows account and sign back in, or restart your computer. The change does not take effect until you do this. Afterward, open Settings Accessibility and look for Screen tint. If it still isn't there, your Windows build probably doesn't include the feature.
How to Manually Disable Screen Tint
To turn Screen Tint off through the registry, set the same "Active" value back to zero. You can also delete the key. Both methods need a sign-out or restart to take effect.
- Press Windows key + R, type
regedit, and press Enter. Click Yes on the UAC prompt. Registry Editor opens. - Click the address bar and go to:
HKEY_CURRENT_USER\Software\Microsoft\ColorFiltering - Make sure the
Colorskey exists. If you created it earlier to enable the feature, it should be there. If you're not sure, follow the steps in the enable section above to create it. If the key was never there, Screen Tint is already off by default and you have nothing to change. - On the right side, double-click the "Active" DWORD value. The "Edit DWORD (32-bit) Value" window opens.
- Make sure Hexadecimal is selected. Change the "Value data" to
0, then click OK.Explanation: Setting "Active" to 0 tells Windows to turn off the Screen Tint feature. This is also the default when the registry item doesn't exist.
- Sign out and sign back in, or restart your computer. After that, the Screen Tint option should be off in your Accessibility settings.
- Optional: to remove the Screen Tint settings from the registry completely, delete the whole
ScreenTintkey. Right-click theColorsfolder in the left pane and select Delete. Confirm when asked. The folder disappears from the left pane.💡TipDeleting the key is a clean way to remove the setting if you don't plan to use it again soon.Leaving it with "Active" set to 0 is also fine. If you exported a backup earlier, you can restore it by double-clicking the saved file.
Summary
Screen Tint reduces eye strain by applying a colored filter to your display. You manage it through the Settings app or the Registry Editor. Both methods let you turn it on or off, and Settings lets you adjust its color and strength. Use Settings first, since it is the safer route, and fall back on the registry only when the option is missing.
Have a question about this guide?
Answered by AI from this guide. Good questions may be added to this page — please don't include personal details.
Did this guide fix your problem?

About the Author
Richard
Tech Writer, IT Professional
Richard is a writer at Geek Rewind who turns complex IT tasks into clear, step-by-step guides. He draws on years of hands-on experience in system administration and enterprise IT operations, focusing on Windows, Linux and WordPress: the problems people actually run into, and the fixes that work. His server and WordPress guides come from systems he runs himself. Richard builds and maintains the platform behind Geek Rewind, from its Ubuntu servers and Nginx configuration to its custom WordPress plugins. Many new tutorials start with readers' questions, and he's always glad to answer them in the comments.
No comments yet — be the first to share your thoughts!