How to Adjust Mouse Scroll Settings in Windows 11 Accessibility Settings

Mouse scroll settings in Windows 11 live in Settings Bluetooth & devices Mouse, not on the Accessibility page. From here, you can change how many lines scroll with each wheel notch, scroll a full screen at a time, or reverse the scroll direction entirely. Changes take effect right away and don’t need a restart or administrator access.
Windows 11 also has scroll-related options on the Accessibility page that help if you have trouble seeing or controlling the scroll bar — like keeping scroll bars always visible. This article covers both locations, plus the older Control Panel method if you need to adjust horizontal scrolling.
Open Settings Bluetooth & devices Mouse to change how far the mouse wheel scrolls. Drag the Lines to scroll at a time slider to set the number of lines per notch, or open the Roll the mouse wheel to scroll drop-down to choose One screen at a time. Changes apply immediately, with no restart or administrator access needed.
Where scroll settings are in 🪟 Windows 11
Scroll settings are split across three places (plus the touchpad page for laptops). Knowing which one holds what saves you from hunting through the wrong page.
- Settings Bluetooth & devices Mouse holds the wheel behavior: lines per notch, one screen at a time, scroll direction and scrolling inactive windows.
- Settings Accessibility Visual effects holds Always show scrollbars, which keeps scroll bars on screen instead of letting them fade.
- Mouse Properties in the classic Control Panel holds the Wheel tab, the only place with a horizontal scrolling setting.
The Accessibility Mouse page covers Mouse keys (a feature that lets you move the pointer and click using the numeric keypad). It does not change wheel scrolling.
Change how far the mouse wheel scrolls
This is the setting most people are looking for. Each notch of the wheel moves the page by a set number of lines. Windows uses 3 lines by default. Raise the number to scroll faster, or lower it for finer control.
Set the number of lines per notch
- Open Settings by pressing Win+I.

Windows 11 Start menu with Settings gear icon highlighted. - Select Bluetooth & devices in the left pane.
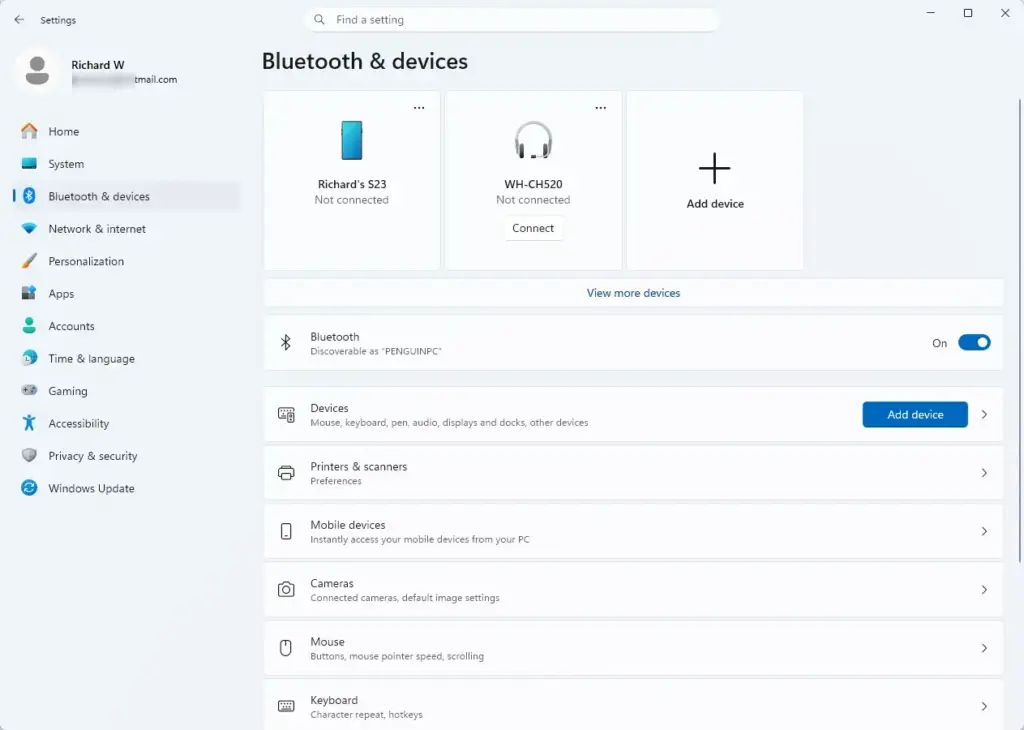
Windows Settings menu highlighting the Bluetooth and devices option for printers - Select Mouse. The page lists your pointer and button options, followed by the scroll options.
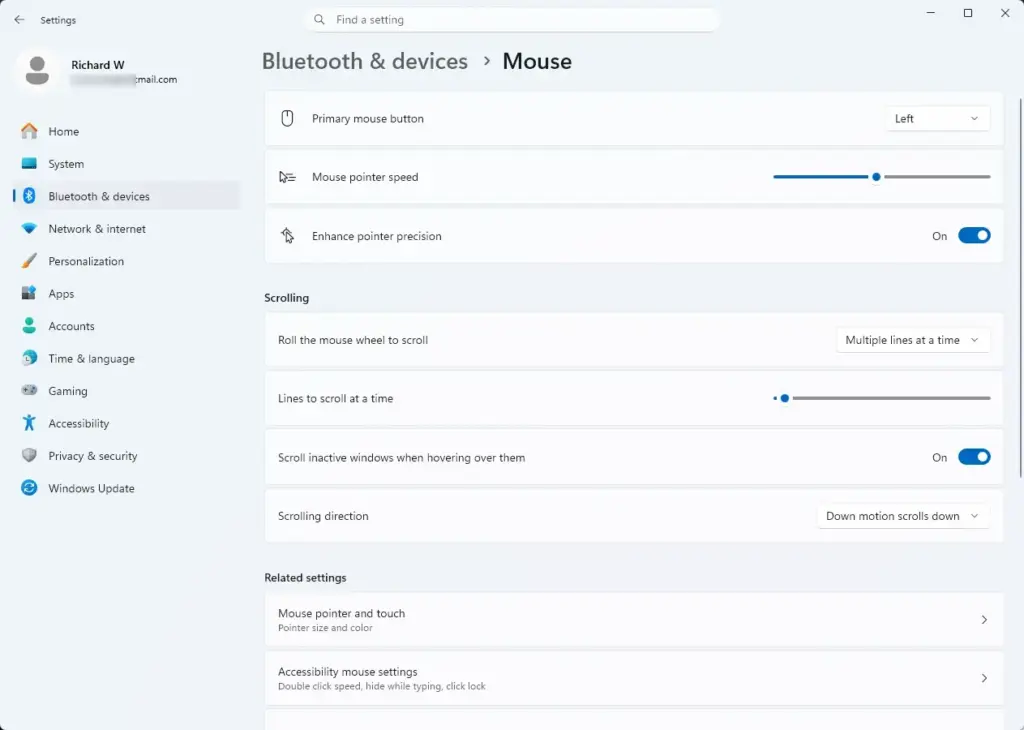
Settings › Bluetooth › Mouse - Find Roll the mouse wheel to scroll and check that it is set to Multiple lines at a time. If it is set to One screen at a time, the next option is hidden.
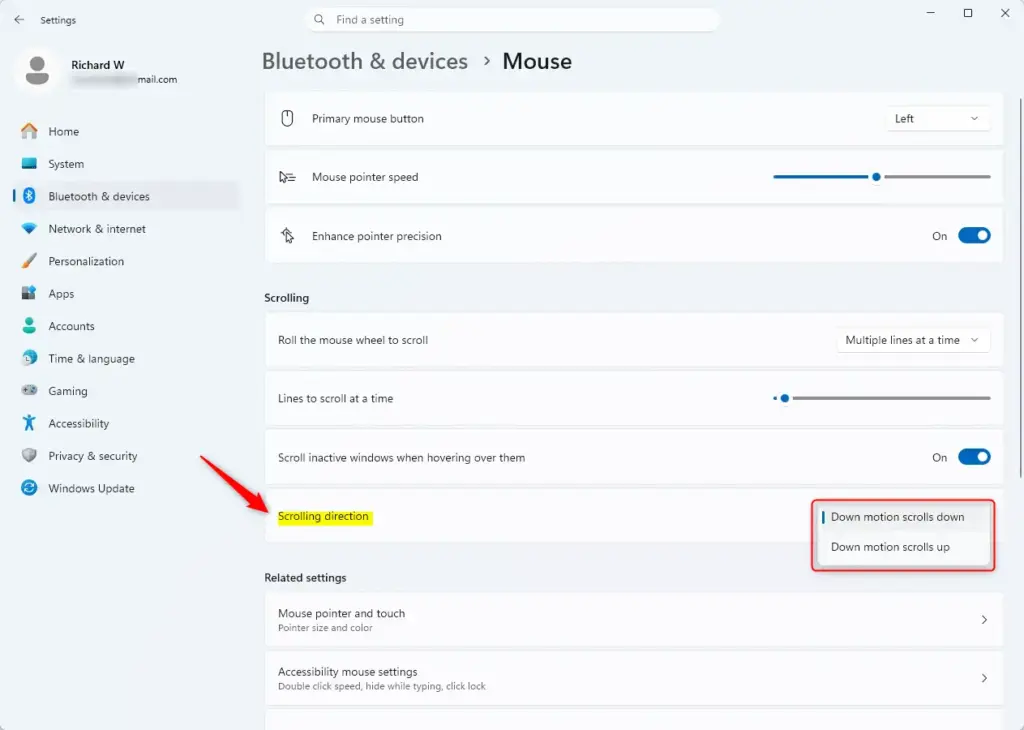
Windows 11 mouse settings showing scrolling direction options. 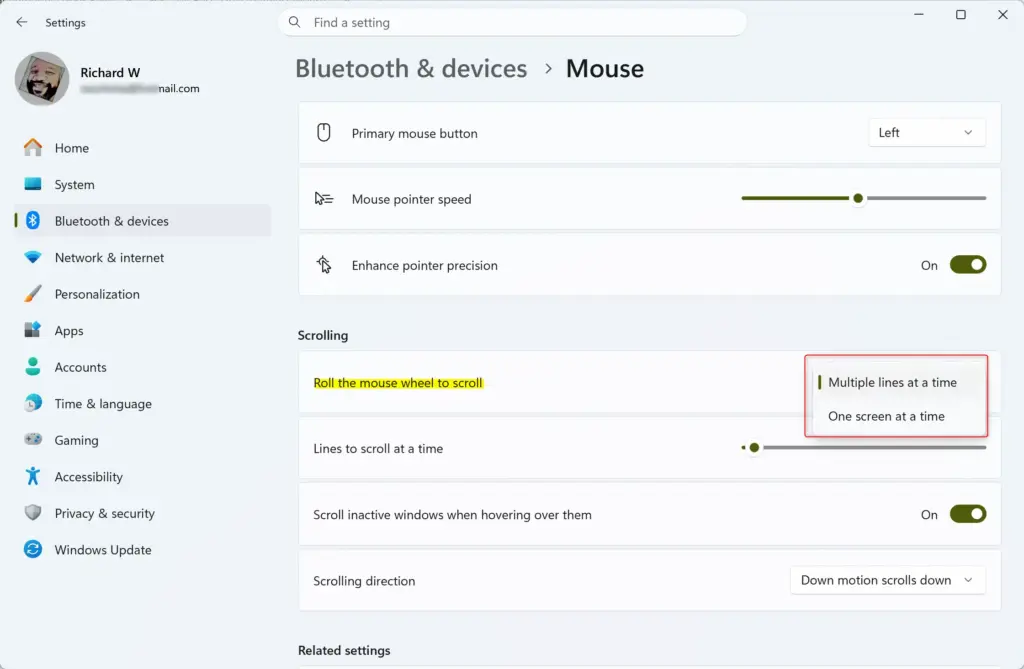
- Drag the Lines to scroll at a time slider. Move it right to scroll more per notch, or left to scroll less.
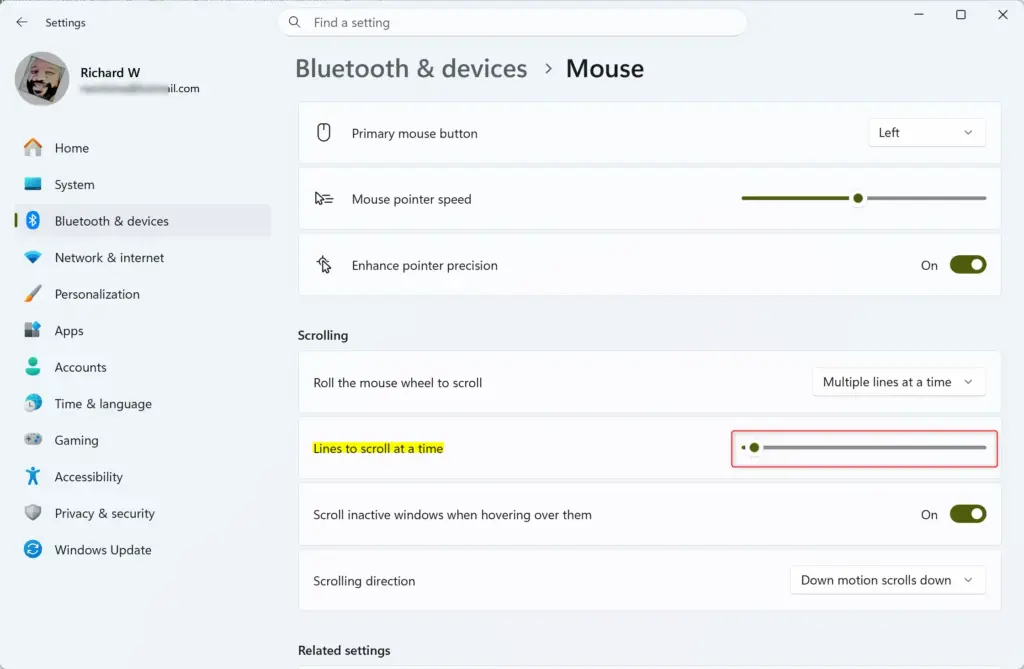
- Open a long web page or document and roll the wheel one notch. Adjust the slider until the movement feels right.
The change applies as soon as you move the slider. There is no Apply button.
If you want the original behavior back, set the slider to 3.
Scroll one screen at a time
This option makes each wheel notch move the page by a full screen, similar to pressing Page Down. It suits long documents, but it can feel jumpy in apps where you want to read as you scroll.
- Go to Settings Bluetooth & devices Mouse.
- Open the Roll the mouse wheel to scroll drop-down.
- Select One screen at a time. The Lines to scroll at a time slider disappears or becomes unavailable, because it no longer applies.
- Roll the wheel in a long document to confirm that one notch moves roughly one screen.
To undo this, choose Multiple lines at a time from the same drop-down. Your slider position is normally kept.
Reverse the scroll direction
By default, rolling the wheel down moves the page down. Some people prefer the reverse, which matches how touchscreens and Mac mice behave. This changes the direction for the mouse only. It does not affect the touchpad.
- Go to Settings Bluetooth & devices Mouse.
- Find Scrolling direction and open its drop-down.
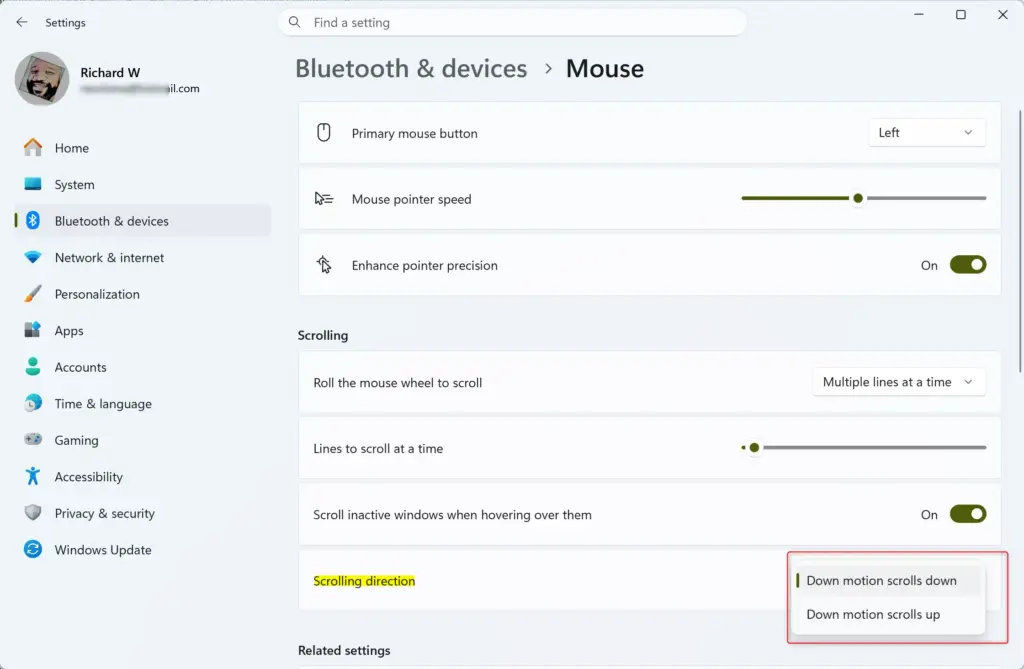
- Choose Down motion scrolls up to reverse the direction, or Down motion scrolls down to return to the default.
- Roll the wheel on any page to test it.
If you do not see Scrolling direction, your build of Windows 11 may be too old to include it. Run Windows Update and check again. Mouse manufacturer software may also offer a reverse-scroll option. See the troubleshooting section below.
Scroll windows you are not clicked into
With Scroll inactive windows when I hover over them turned on, you can point at a background window and scroll it without clicking first. This is on by default. It is useful when you read in one window while typing in another, but it can cause accidental scrolling if you rest your hand on the mouse.
- Go to Settings Bluetooth & devices Mouse.
- Find Scroll inactive windows when I hover over them.
- Switch the toggle to Off to scroll only the window you have clicked, or On to scroll whichever window is under the pointer.
Some apps handle scrolling on their own and may ignore this setting.
Keep scroll bars visible in Accessibility settings
Windows 11 hides scroll bars in many apps until you move the pointer over them. If you have trouble finding or grabbing them, you can make them stay visible. This is the only scroll-related setting on the Accessibility page.
- Open Settings and select Accessibility.
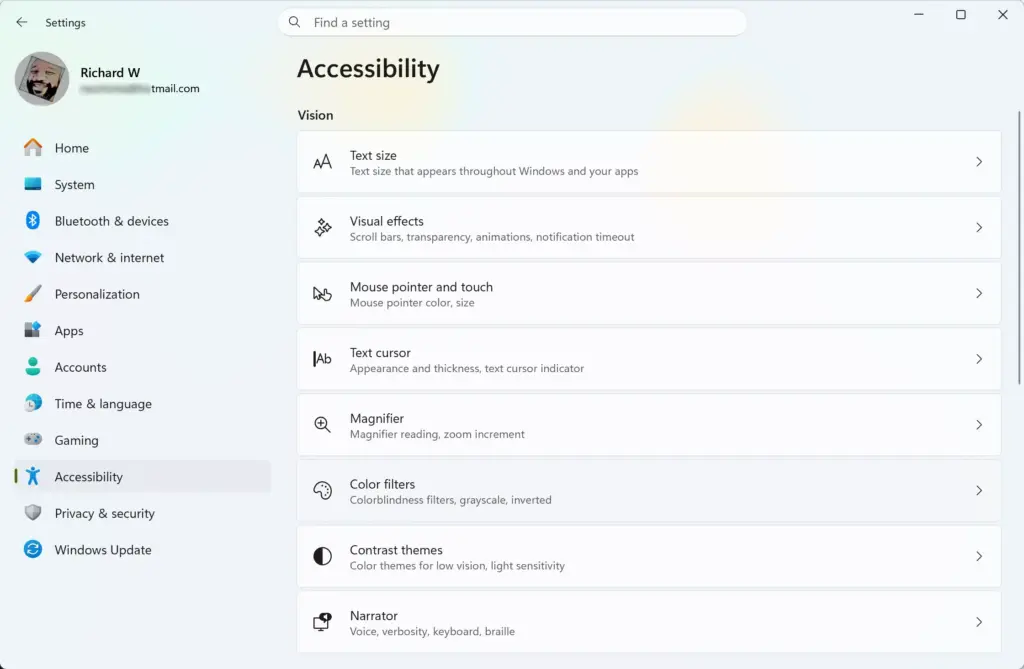
Settings › Accessibility - Select Visual effects.
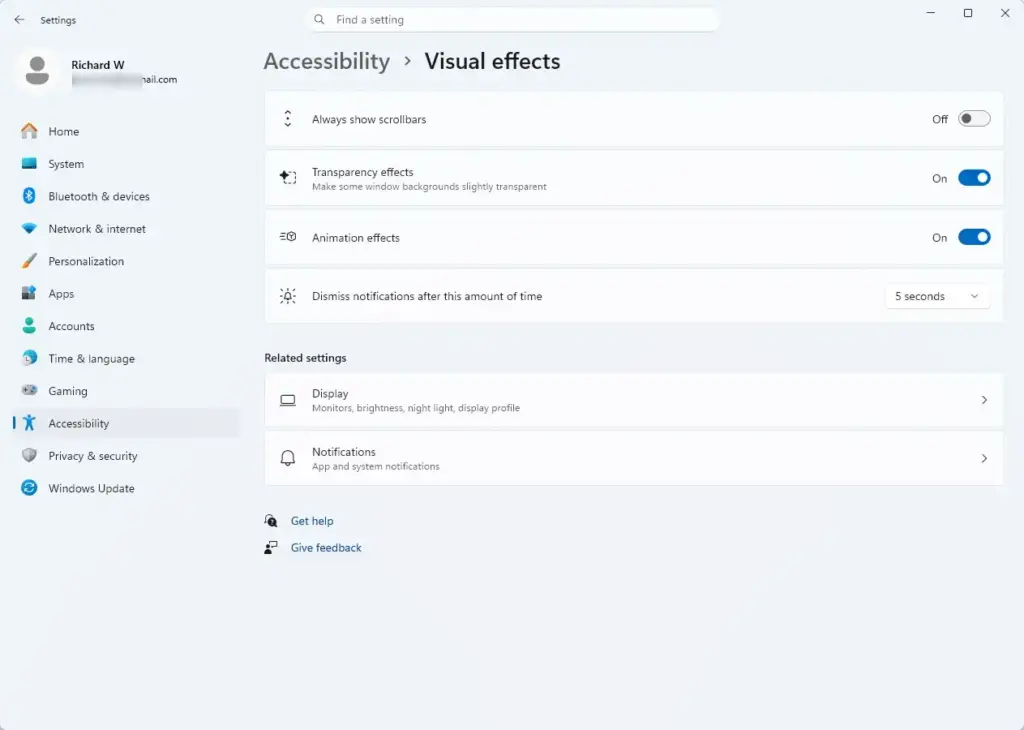
Settings › Accessibility › Visual effects - Switch Always show scrollbars to On.
- Open File Explorer or Settings and check the right edge of the window. The scroll bar now stays on screen.
Switch the toggle to Off to go back to the auto-hiding behavior. Some apps draw their own scroll bars and may not follow this setting.
It does not scroll pages. If you cannot use the wheel at all, you can scroll with the keyboard instead, using Page Up, Page Down, the arrow keys or the Spacebar in most apps.
Adjust horizontal scrolling in Control Panel
If your mouse has a tilt wheel (a wheel that clicks left and right as well as rolling), you can set how far each sideways tilt scrolls. This route also offers the same vertical options as Settings.
- Go to Settings Bluetooth & devices Mouse.
- Scroll to Related settings and select Additional mouse settings. The Mouse Properties window opens.
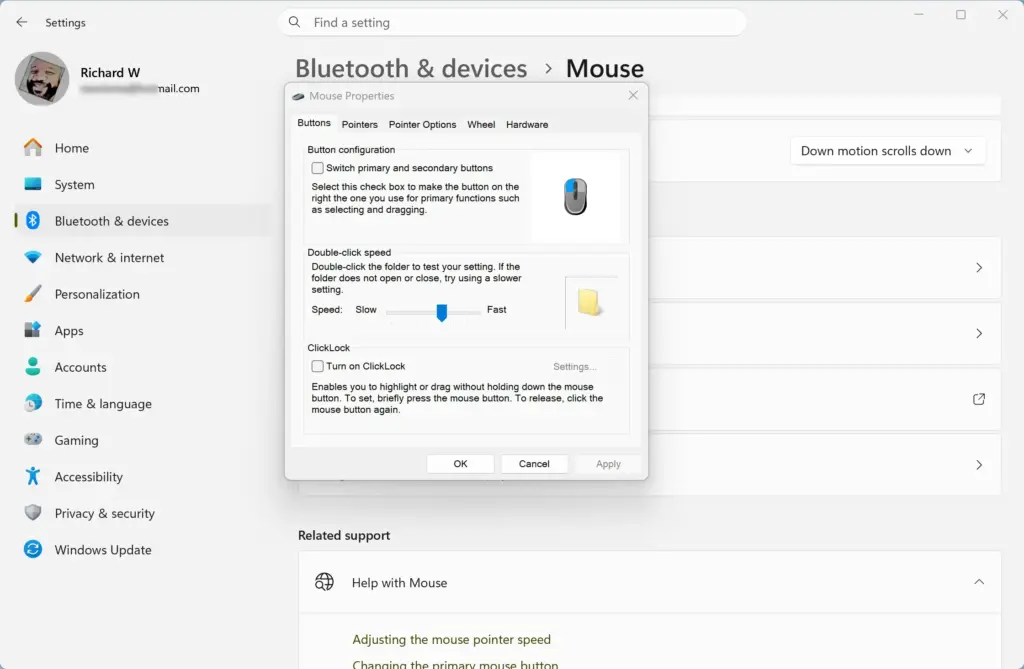
- Select the Wheel tab.
- Under Vertical Scrolling, choose The following number of lines at a time and enter a number, or choose One screen at a time.
- Under Horizontal Scrolling, enter the number of characters to scroll each time you tilt the wheel.
- Select Apply, then OK.
If the Wheel tab is missing, your mouse driver has replaced it. Use the manufacturer’s software instead. If the Horizontal Scrolling box is missing, your mouse has no tilt wheel, or the driver does not report one.
You can also open this window directly. Press Windows key + R, type main.cpl and press Enter.
Change touchpad scrolling on a laptop
The mouse settings above do not control the touchpad. If you scroll with two fingers on a laptop, the touchpad has its own settings.
- Go to Settings Bluetooth & devices Touchpad.
- Expand Scroll & zoom.
- Make sure Drag two fingers to scroll is ticked.
- Open the Scrolling direction drop-down and choose Down motion scrolls down or Down motion scrolls up.
If the Touchpad page is missing, your PC has no touchpad, or Windows does not detect it.
Why scroll options are missing or do not work
Most problems come down to a handful of causes. Check these in order.
- The lines slider is missing. Roll the mouse wheel to scroll is set to One screen at a time. Change it to Multiple lines at a time.
- The Mouse page shows few options. Windows shows the full set of scroll options only when it detects a mouse with a wheel. Plug in or reconnect the mouse, wait a few seconds and reopen the page. For a Bluetooth mouse, check that it shows as connected under Bluetooth & devices.
- Your changes have no effect. Software from your mouse maker—such as the app that came with a Logitech or Microsoft mouse—can override Windows settings. Open that app and adjust scrolling there, or close the app and test again.
- One app scrolls differently from the rest. Some apps, including browsers and design tools, have their own scroll or smooth-scrolling behavior and may not follow the system value. Check that app's own settings.
- The Scrolling direction option is missing. Install pending updates in Windows Update, then reopen Mouse. If it is still missing, use your mouse software or the touchpad setting described above.
- Scrolling is erratic or jumps. This is usually hardware. Clean the wheel with compressed air, then test the mouse on another PC or USB port. Settings cannot fix a worn wheel sensor.
What to do next
To undo everything here, set Lines to scroll at a time back to 3, choose Multiple lines at a time and Down motion scrolls down, and turn Always show scrollbars off. If your scroll speed changes after a Windows feature update or after you install new mouse software, return to Settings Bluetooth & devices Mouse and check the values. The next setting worth adjusting is pointer speed and pointer size, which sit on the same Mouse page and under Accessibility Mouse pointer and touch.
Frequently asked questions
How do I change the mouse scroll settings in 🪟 Windows 11?
Open Settings, go to Bluetooth & devices, then Mouse. Here you can change how many lines scroll per wheel notch, scroll one full screen at a time, or reverse scroll direction. Changes apply immediately without restarting.
How do I change the scroll settings for my Windows mouse?
Go to Settings Bluetooth & devices Mouse to adjust wheel behavior like lines per notch and scroll direction. For horizontal scrolling, open Control Panel, search for Mouse, and use the Wheel tab. Both update right away.
How to reset accessibility settings in 🪟 Windows 11?
Open Settings and go to Accessibility. Windows 11 has no reset option for Accessibility settings; turn each feature off or change it back manually. For mouse scroll specifically, Settings Bluetooth & devices Mouse returns to default by changing values back to their original numbers.
How do I adjust the mouse settings on 🪟 Windows 11?
Open Settings and select Bluetooth & devices, then Mouse. From here you can adjust pointer speed, scrolling behavior, and the primary mouse button; pointer size and color are under Accessibility Mouse pointer and touch. Keyboard settings are under Accessibility Keyboard and Time & language Typing
Still have a question?
Answered by AI from this guide. Good questions may be added to this page — please don't include personal details.
Did this guide fix your problem?

About the Author
Richard
Tech Writer, IT Professional
Richard is a writer at Geek Rewind who turns complex IT tasks into clear, step-by-step guides. He draws on years of hands-on experience in system administration and enterprise IT operations, focusing on Windows, Linux and WordPress: the problems people actually run into, and the fixes that work. His server and WordPress guides come from systems he runs himself. Richard builds and maintains the platform behind Geek Rewind, from its Ubuntu servers and Nginx configuration to its custom WordPress plugins. Many new tutorials start with readers' questions, and he's always glad to answer them in the comments.
No comments yet — be the first to share your thoughts!