How to Customize Pointer Appearance and Cursor Thickness in Windows 11 Accessibility Settings

Windows 11 accessibility settings let you change mouse cursor size from level 1 up to 15, pick custom pointer colors, and adjust text cursor (caret) thickness from 1 to 20 so you can track your mouse easily on screen. Default pointers often blend into bright web pages or hide in dense text documents, but these built-in visibility controls fix that problem across high-resolution displays.
Open Settings , select Accessibility, then click Mouse pointer and touch to change pointer size and colour. Drag the Size slider from 1 up to 15, and pick White, Black, Inverted or Custom for the style, with changes showing as you drag. For the Pointers tab in Mouse Properties, use Additional mouse options from mouse settings.
How to Open Mouse Properties in Windows
You can open Mouse Properties in Windows by typing mouse settings into the Start menu search bar and selecting Additional mouse options. This classic control panel gives you direct access to deep cursor settings for customizing pointer appearance that are not always available in the main modern settings app . The steps below apply to both Windows 11 Home and Pro.
- Open Start , type
mouse settings(a configuration menu for pointing devices), and press Enter. The mouse settings page should open.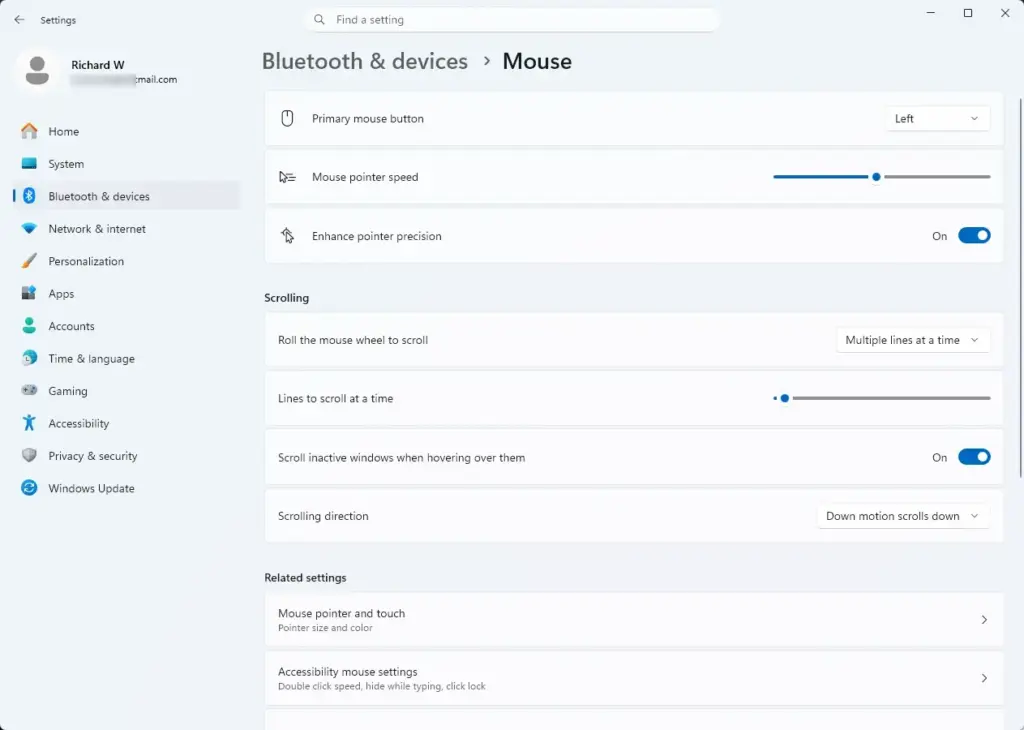
Settings › Bluetooth › Mouse - Scroll down the settings panel and click Additional mouse options to open the classic properties dialog box. You should now see a window titled Mouse Properties.
- Click the Pointers tab at the top of the window to view current cursor schemes and individual pointer behaviors.
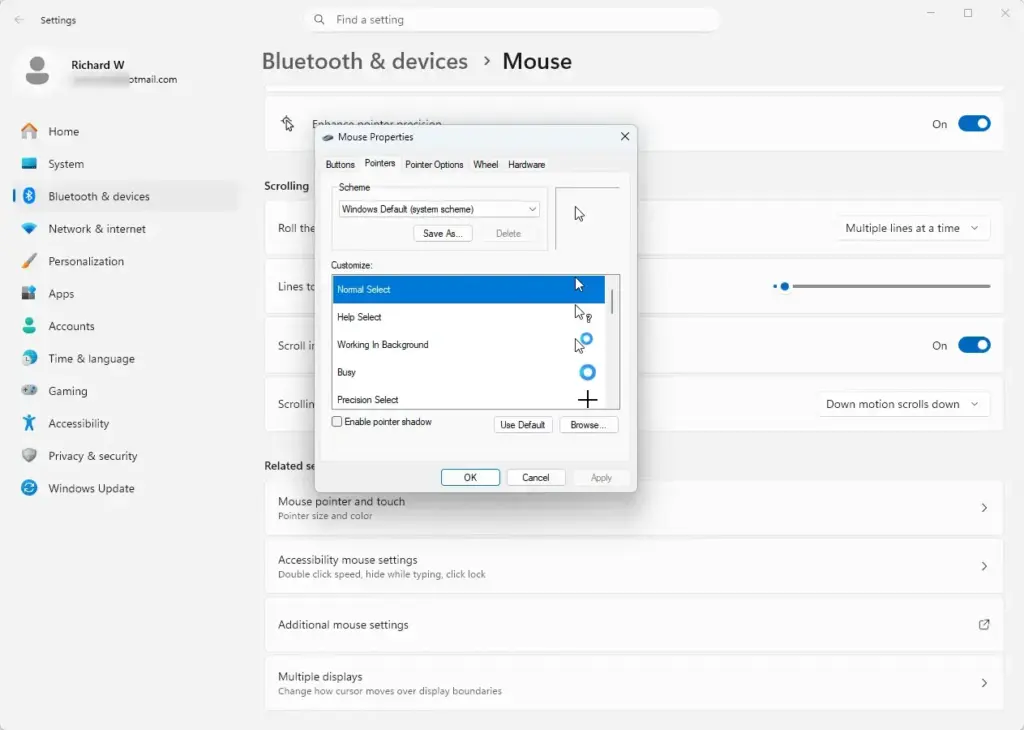
Choosing a Built-In Pointer Scheme
You can choose a built-in pointer scheme in Windows 11 by opening the Pointers tab inside Mouse Properties and selecting a pre-made style from the Scheme drop-down menu. This method lets you instantly apply high-contrast or inverted cursor graphics for customizing pointer appearance across every system action all at once.
- Open the Mouse Properties window and click the Pointers tab.
- Click the Scheme drop-down menu. A list of installed schemes appears.
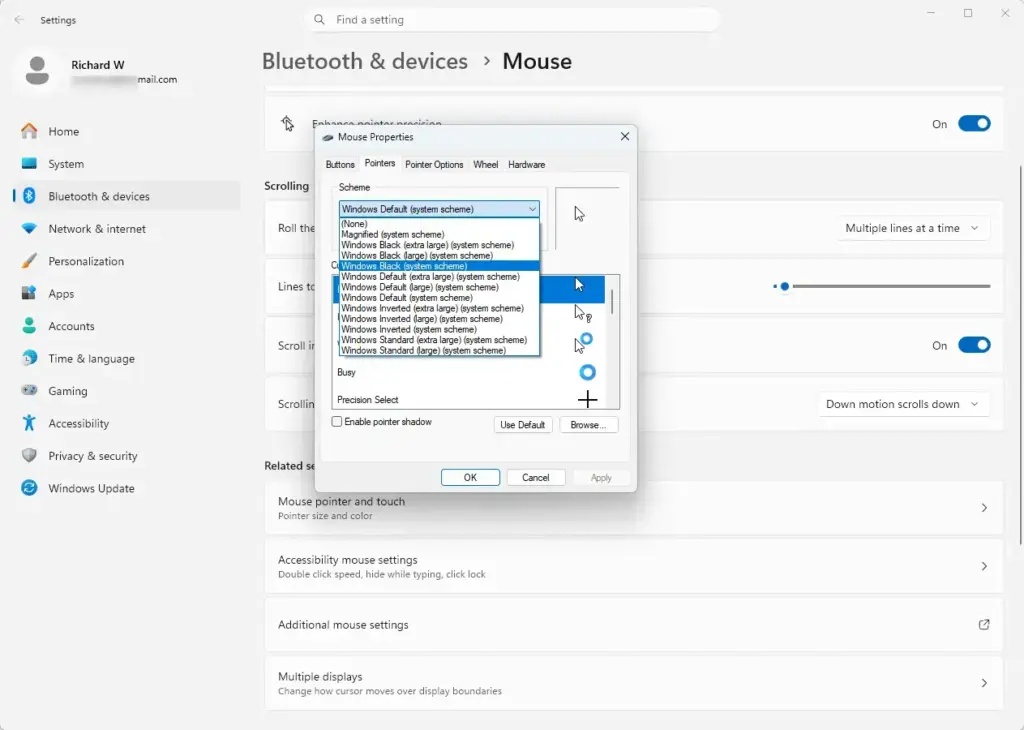
- Select an alternative scheme such as Windows Black (extra large) or Windows Inverted (large). The pointer list below the drop-down updates to show the new graphics.
- Click Apply to preview the new cursor styles instantly.
- Click OK to save your changes and close the window.
If you don’t like the result, open the same drop-down and pick the default Windows scheme, then click Apply. No restart is needed for scheme changes.
Changing Individual Mouse Pointers
You can change individual mouse pointers in Windows by picking a specific action from the Customize list in Mouse Properties and browsing for a replacement file. This gives you fine control over customizing pointer appearance when you only want to update the busy icon or text select cursor without changing your whole theme.
- Open the Mouse Properties window and click the Pointers tab.
- Click an individual action in the Customize list, such as Text Select or Working in Background.
- Click the Browse button to open the default system cursor folder containing available cursor graphics.
- Select a new cursor file ending in
.curor.aniand click Open. The preview next to the list shows the new pointer. - Click Apply to save the individual pointer change.
Changing one pointer this way turns your scheme into a modified one. To put the original back, select the action again and click Use Default.
Adjusting Pointer Size and Color in Settings
You can adjust pointer size and color in Windows 11 by opening the Mouse pointer and touch menu inside Accessibility settings. This modern interface is the fastest way for customizing pointer appearance by letting you drag a size slider and pick bright custom accent colors that stand out on your screen.
- Open Start and click Settings (the central configuration app).
- Click Accessibility in the left sidebar.
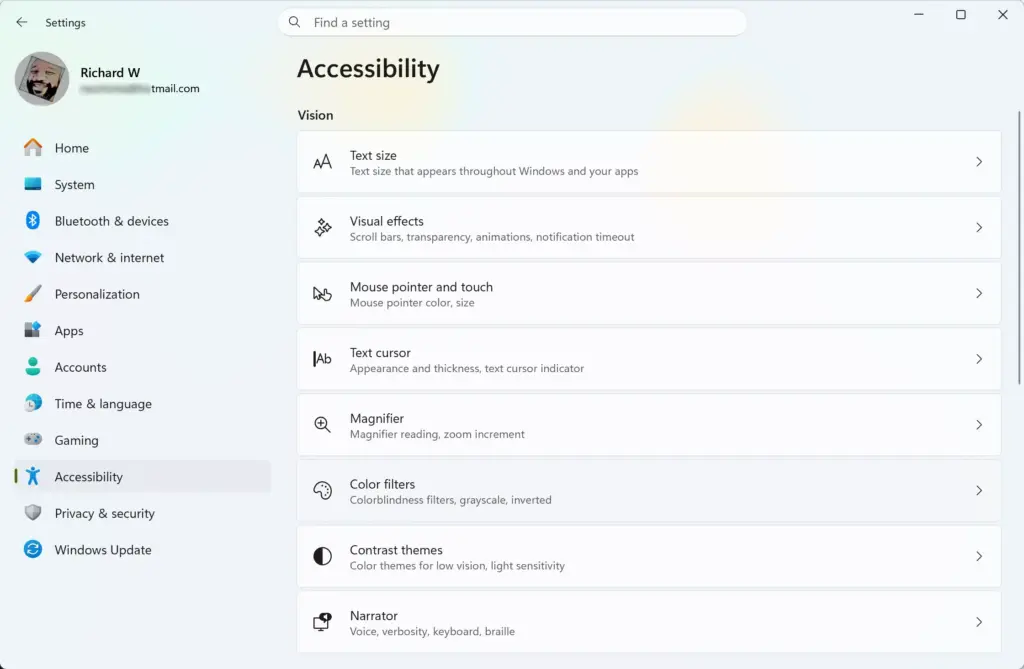
Settings › Accessibility - Click Mouse pointer and touch to open visual pointer controls.
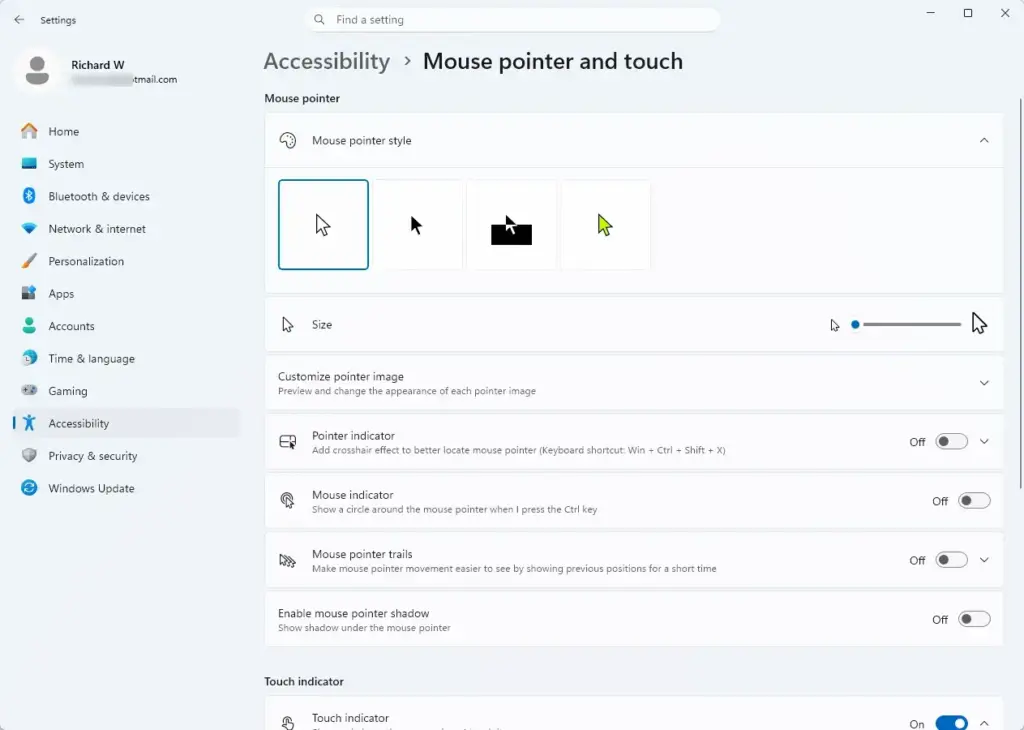
Settings › Accessibility › Mouse pointer and touch - Choose one of the four pointer style options: White, Black, Inverted, or Custom.
- If you select the Custom style, click one of the suggested accent colors or click the plus icon to pick a custom RGB color.
- Drag the Size slider to the right to make the pointer larger and easier to track across multiple monitors. The slider runs from 1 (the default, smallest size) to 15 (the largest). The pointer changes as you drag, so there is no Apply button.
To undo these changes, set the style back to White and drag the Size slider back to 1.
The title of this post also promises cursor thickness. That is the text cursor, the blinking vertical line you see when typing. It has its own page in Settings, separate from the mouse pointer:
- Open Settings Accessibility Text cursor
- Turn on the Text cursor indicator toggle. A colored marker now appears on the text cursor wherever you type.
- Drag the indicator size slider to make the marker larger.
- Choose an indicator color from the suggested colors, or pick your own with the plus icon.
- Drag the Text cursor thickness slider to the right to make the cursor line thicker. A preview next to the slider shows the result as you drag.
Thickness changes apply right away in most apps. Some older apps draw their own cursor and may not follow the setting until you reopen them. To go back, drag the thickness slider to its lowest value and turn the indicator toggle off.
Installing Custom Cursor Packs
This advanced method expands your options for customizing pointer appearance beyond the built-in Microsoft designs by adding unique animated or custom-themed mouse sets.
- Download a trusted cursor pack containing
.infinstallation files or raw.curand.anifiles. - Extract the downloaded archive folder to an easily accessible location on your hard drive.
- Open the extracted folder, locate the file named
Install.inforAutoSetup.inf.
Download cursor packs only from sources you trust. Right-click the extracted folder and scan it with Microsoft Defender before you install anything. Also create a restore point first (search for "Create a restore point" in Start), so you can roll back if something goes wrong. System Protection must be turned on for your system drive for a restore point to be created.
- Right-click the installation file and select Install (requires administrator privileges). If Windows shows a User Account Control prompt, confirm it only if you trust the file.
- Open the Mouse Properties window, navigate to the Pointers tab, and select your newly installed scheme from the Scheme drop-down menu.
Turning on Pointer Trails and Sonar
You can turn on pointer trails and sonar in Windows by checking the display trails box in the Pointer Options tab and enabling the control key locator. These helpful visibility features are great additions when customizing pointer appearance because they make it much easier to track a fast-moving cursor across large displays.
- Open the Mouse Properties window and click the Pointer Options tab.
- Check the box labeled Display pointer trails and drag the slider between Short and Long to set trail length.
- Check the box labeled Show location of pointer when I press the Ctrl key to enable the sonar locator. Pressing Ctrl afterward shows a circle that closes in on the pointer.
- Click Apply to save the changes.
To turn either feature off, clear its checkbox and click Apply again.
What to do next
You can now navigate your desktop with a customized cursor tailored to your visual preferences. Explore how to adjust mouse click speeds or configure custom keyboard shortcuts next.
Have a question about this guide?
Answered by AI from this guide. Good questions may be added to this page — please don't include personal details.
Did this guide fix your problem?

About the Author
Richard
Tech Writer, IT Professional
Richard is a writer at Geek Rewind who turns complex IT tasks into clear, step-by-step guides. He draws on years of hands-on experience in system administration and enterprise IT operations, focusing on Windows, Linux and WordPress: the problems people actually run into, and the fixes that work. His server and WordPress guides come from systems he runs himself. Richard builds and maintains the platform behind Geek Rewind, from its Ubuntu servers and Nginx configuration to its custom WordPress plugins. Many new tutorials start with readers' questions, and he's always glad to answer them in the comments.
No comments yet — be the first to share your thoughts!