How to Adjust Text Cursor Thickness in Windows 11

Text cursor thickness in Windows 11 changes the width of the blinking vertical line you see when typing. On large screens and multi-monitor setups that line is easy to lose. Windows has a built-in slider that runs from size 1 (the default, thinnest) up to size 20, which makes the cursor much easier to see.
The quickest way to change it is the Settings app, and the change takes a few seconds. Two other methods are covered below: Control Panel and the Registry. All three change the same setting, so use whichever is handy.
Open Settings , go to Accessibility, click Text cursor, and drag the thickness slider left for thinner or right for thicker. The preview shows your selection, and the change saves immediately without restarting.
How to Change Text Cursor Thickness in 🪟 Windows 11 Using Settings
- Open Settings : Click the Start button and select Settings.
Or press Windows key + I on your keyboard to open Settings directly. The Settings window should now be on screen. - Click Accessibility in the left menu. The accessibility options appear on the right.
- On the right side, scroll down to the Vision group if needed and click Text cursor.
- Find Text cursor thickness. Drag the slider right to make the cursor thicker or left to make it thinner.
- Check the live preview next to the slider. It shows how thick your cursor will look at the current setting.
- When you’re happy with the thickness, close the Settings window. The change is saved as you move the slider, so there is no Save or Apply button and no restart is needed.
The same Text cursor page also has a separate Text cursor indicator option on recent Windows 11 builds. It adds a coloured marker to the cursor. It is a different setting from thickness, but the two work well together.
Some apps draw their own cursor and may ignore this setting. If a particular program doesn’t change, check its own options.
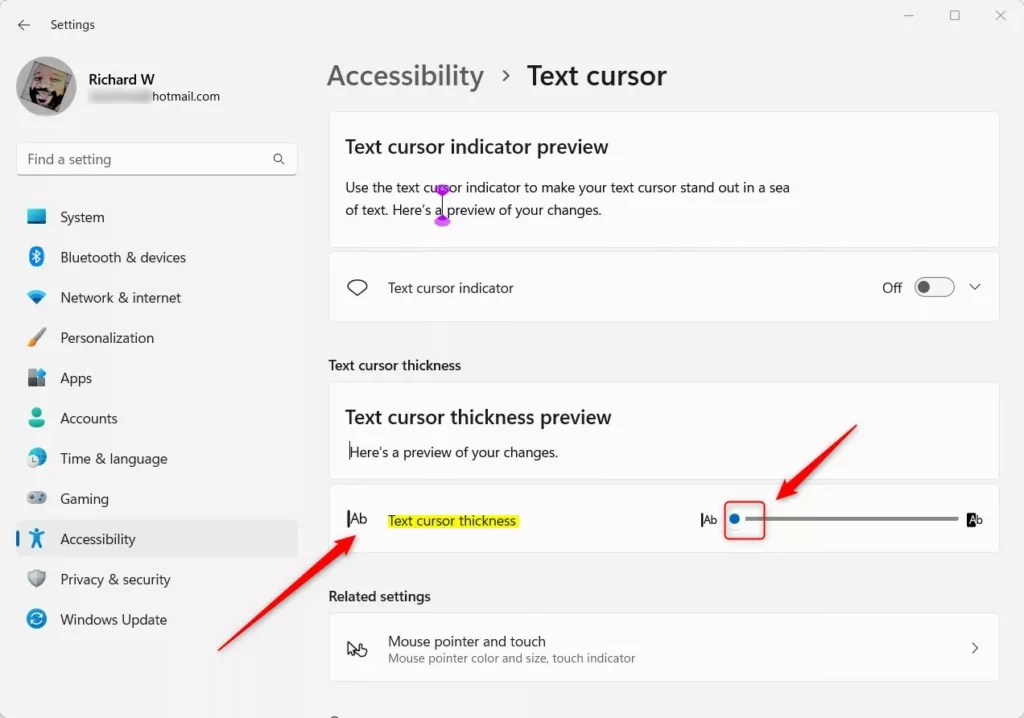
Adjusting the text cursor thickness through Settings takes just a few clicks and helps you spot your cursor faster while typing. Press Win+I, go to Accessibility, click Text cursor, and drag the slider to the size you prefer.
How to Change Text Cursor Thickness Using Control Panel
The classic Control Panel gives you another way to change the cursor in Windows 11. It is useful if you already work in Control Panel or if you follow older guides written for Windows 10 or earlier. Open Control Panel from the Start menu , go to Ease of Access, open the Ease of Access Center, and pick a new number for the Set the thickness of the blinking cursor option.
- Open Control Panel. Click Start, type Control Panel, and select it from the results.
- Go to Ease of Access Ease of Access Center. If Control Panel is set to view by large or small icons, click Ease of Access Center directly.
- Click Make the computer easier to see. A long list of display options opens.
- Scroll down to the dropdown for Set the thickness of the blinking cursor. It shows a number, and the preview box next to it shows a blinking cursor at that width.
- Choose your preferred thickness number from the dropdown (1 to 20), then click Apply and OK, or close the window. The new thickness takes effect straight away.
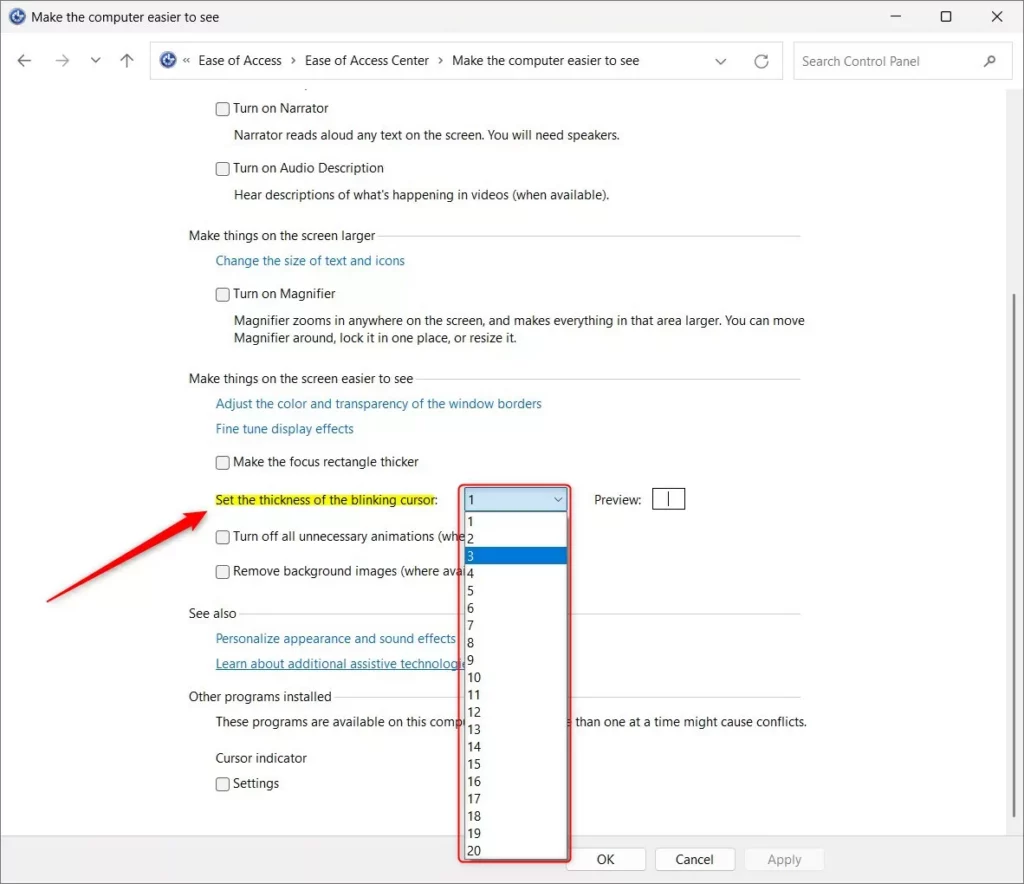
This setting and the one in Settings control the same value, so a change in one place shows up in the other. To undo it, set the dropdown back to 1.
How to Change Text Cursor Thickness Using Windows Registry (Advanced)
Editing it is an advanced method, best for people who are comfortable making changes directly, such as when configuring several PCs. Press Windows key + R, type regedit, and go to HKEY_CURRENT_USER\Control Panel\Desktop to change the thickness value manually. Registry Editor works the same on Windows 11 Home and Pro. Wrong edits can cause problems, so back up first: in Registry Editor, choose File Export and save a copy.
- Press Windows key + R, type
regedit, and press Enter to open the Registry Editor. Click Yes if User Account Control asks for permission. - Navigate to this path:
HKEY_CURRENT_USER\Control Panel\Desktop - If you don't see a Desktop folder, right-click Control Panel, choose New Key, and name it Desktop. This is rare, since the key normally exists.
- Look at the right pane for a value named CaretWidth. If it isn't there, right-click an empty area of the right pane, select New DWORD (32-bit) Value, and name it CaretWidth.
- Double-click CaretWidth, choose Decimal as the base, and enter a number between 1 and 20 for the thickness.
- Click OK and close Registry Editor. Restart your computer to apply the change. Signing out and back in may be enough, but a restart is the safe choice.
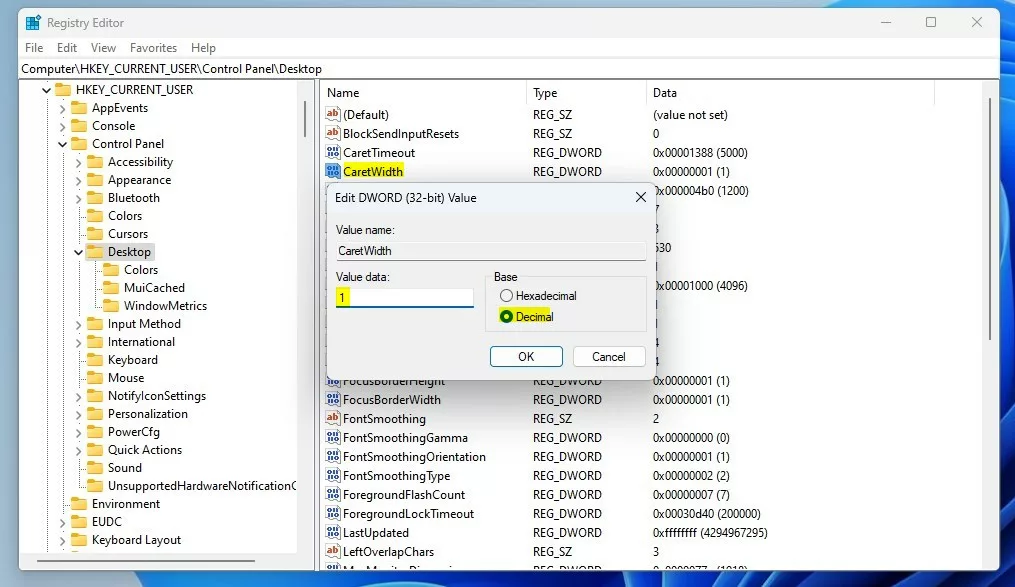
To undo this, open the same path, double-click CaretWidth, and set it back to 1, or right-click it and delete it. Restart afterwards. If you exported a backup first, you can also double-click the exported file to restore your earlier settings.
Summary
- Making your text cursor thicker can help you see it better while typing.
- You can easily change cursor thickness in Windows 11 through Settings or Control Panel. Both apply the change right away.
- Advanced users can also adjust the thickness in the Windows Registry. Back it up first, and expect to restart.
- Try different sizes to find what works best for you. Size 1 is the default if you want to go back.
Adjusting text cursor thickness in Windows 11 makes your typing pointer much easier to find across different apps and documents. You can change this setting using the main Settings app, the classic Control Panel, or by editing values directly in the Windows Registry.
Turn on the text cursor indicator
Enabling the text cursor indicator adds bright colored circles above and below your pointer so you never lose track of it on screen. Open Settings, go to Accessibility, select Text cursor, and turn on the switch next to text cursor indicator to pick your custom colors.- Open Settings by pressing Windows Key + I on your keyboard.
- Click Accessibility on the left side of the screen.
- Select Text cursor from the options shown.
- Turn on the switch next to Text cursor indicator to add colored circles above and below your cursor.
- Click the color boxes to choose a color that stands out best against your background.
Have a question about this guide?
Answered by AI from this guide. Good questions may be added to this page — please don't include personal details.
Did this guide fix your problem?

About the Author
Richard
Tech Writer, IT Professional
Richard is a writer at Geek Rewind who turns complex IT tasks into clear, step-by-step guides. He draws on years of hands-on experience in system administration and enterprise IT operations, focusing on Windows, Linux and WordPress: the problems people actually run into, and the fixes that work. His server and WordPress guides come from systems he runs himself. Richard builds and maintains the platform behind Geek Rewind, from its Ubuntu servers and Nginx configuration to its custom WordPress plugins. Many new tutorials start with readers' questions, and he's always glad to answer them in the comments.
No comments yet — be the first to share your thoughts!