How to Change Text Cursor Thickness in Windows 11

Text cursor thickness in Windows 11 controls how wide the blinking typing line is. A thicker cursor is easier to spot on high-resolution screens. Windows accepts any size from 1 to 20, so you can stop losing your place in long documents and ease the strain on your eyes.
Open Settings , click Accessibility, then Text cursor, and move the Text cursor thickness slider to your preferred width between 1 and 20 pixels. The preview updates in real time, and the change applies immediately to all text fields.
Why Change Your Cursor Thickness?
The default cursor is one pixel wide. On a large or high-resolution display it often disappears into a block of text. A wider cursor helps you find your place in documents, web browsers and forms without squinting.
The setting applies system-wide, so most desktop apps follow it. A few apps draw their own cursor and ignore it. Some code editors and games are examples. This tutorial covers three methods: the Settings app, the Control Panel and the Registry Editor. They all change the same value, so use whichever you prefer.
Learn More
Make your mouse, keyboard, and other input devices easier to use – Microsoft Support Learn how to use Windows accessibility features to make your mouse, keyboard, and other input devices easier to use. CaretWidth
Option 1Use Settings
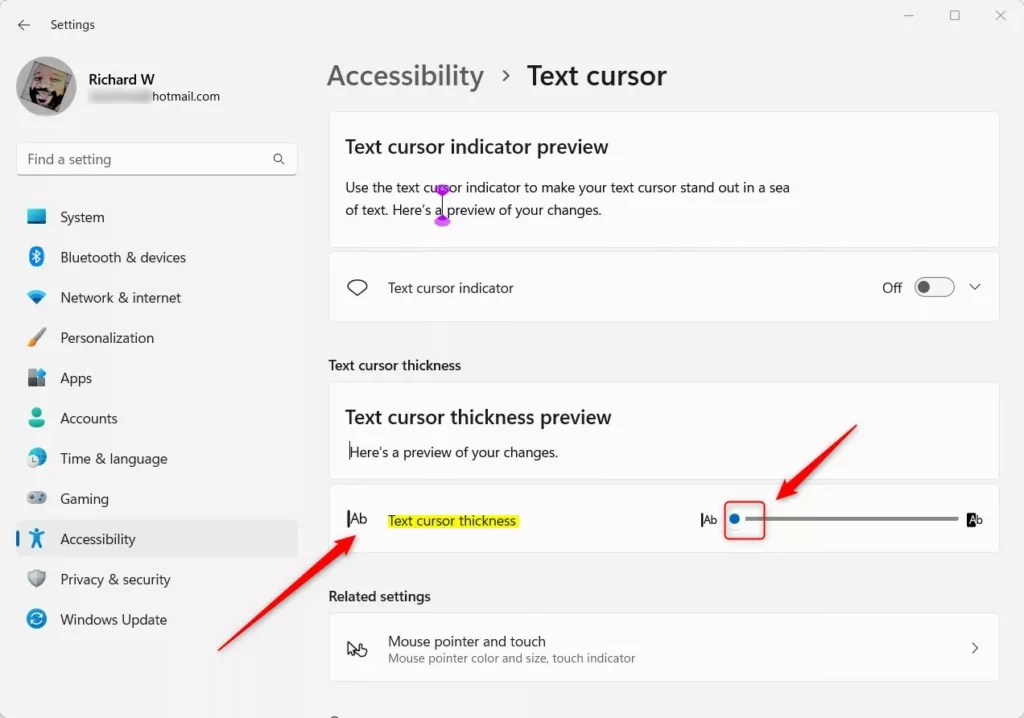
The Settings app is the fastest and safest method. It gives you a visual slider, so you can see the result as you drag. The range runs from a thin one-pixel mark up to a bold twenty-pixel block. You will find it in the Accessibility section of Settings. It works the same on Windows 11 Home and Pro, and you do not need administrator rights.
When you move the slider, a preview of the cursor should change right away. Start with a value between 3 and 6. Very thick settings can hide the letter you are about to type.
- Open Settings by pressing
Win+Ion your keyboard. - Click Accessibility on the left side.
- Click Text cursor on the right side. Open Text cursor settings
- Find the Text cursor thickness slider.
- Move the slider between 1 and 20 pixels until it looks right to you.
- The preview will show you how thick your cursor will be.
- Close Settings when you're done.
To check the result, open Notepad or any text field and click inside it. The cursor should now be the thickness you chose. To undo the change, go back to the same slider and set it to 1, which is the default.
Option 2Use Control Panel
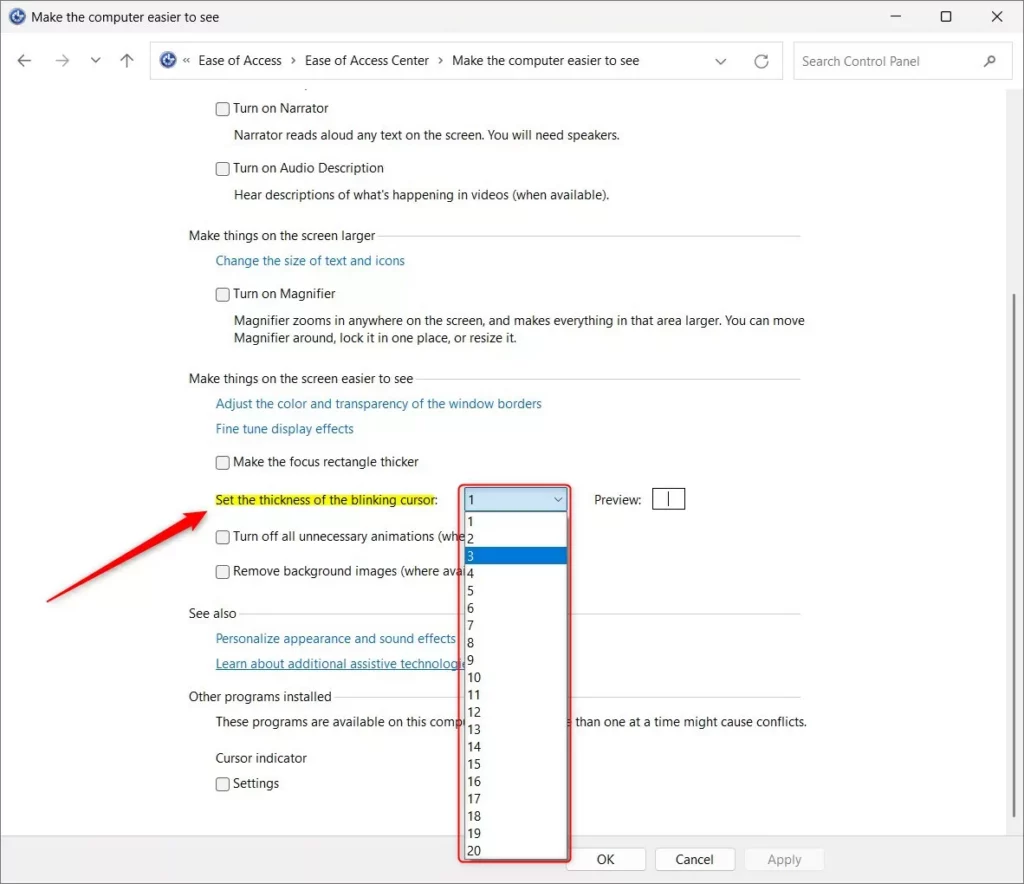
You can also use the older Control Panel if you prefer the traditional system menus. This route goes through the Ease of Access Center and changes the same blinking cursor setting without opening the newer Settings app. Windows 11 still includes this page, though Microsoft is moving most options into Settings, so it may disappear in a future release.
The steps below start from the Control Panel and end at the cursor thickness option. If you cannot find an item, switch the Control Panel view to Large icons or Small icons. Or use the search box in the top-right corner of the window.
- Open Control Panel and switch to icons view.
- Click Ease of Access Center.
- Click Make the computer easier to use.
- Find the Set the thickness of the blinking cursor dropdown menu.
- Select a thickness between 1 and 20 pixels.
- Click OK to save your changes.
The value you pick here is the same one the Settings app uses. If you change it in one place, the other will show the new number. To go back to the default, repeat the steps and set the thickness to 1. Remember to apply or save the change before you close the window.
Option 3Use Registry Editor
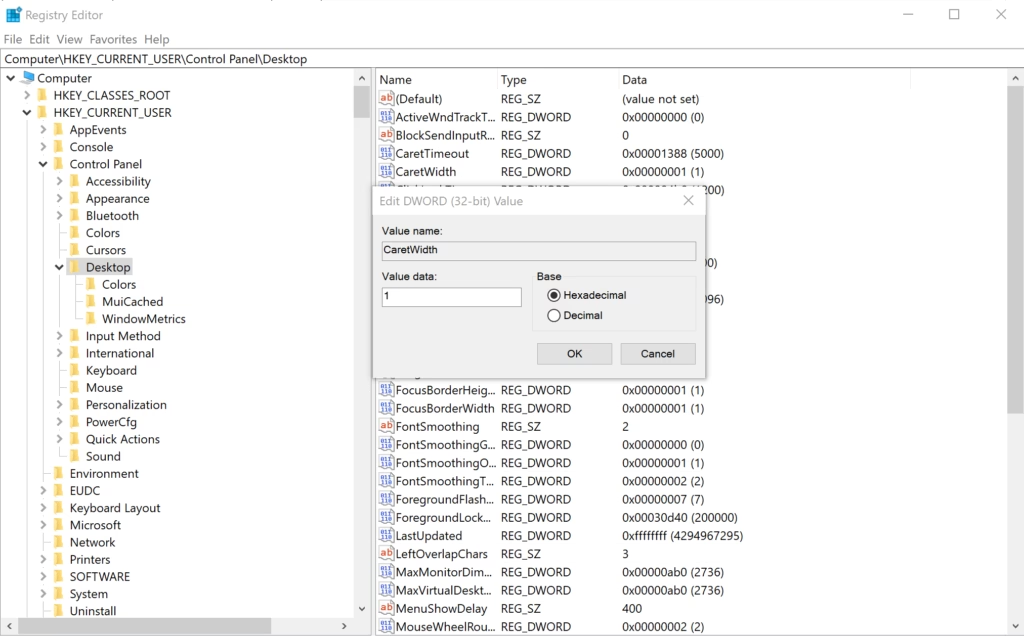
The registry method is the advanced option, for anyone who wants to skip the visual menus. You open the Registry Editor and edit one value named CaretWidth, which stores the cursor thickness. Registry Editor is available on both Windows 11 Home and Pro. The setting is stored under your own user account, so it only affects you.
Before you start, consider exporting the key you are about to change so you can restore it. Change only the CaretWidth value and nothing else.
- Press
Win+Rto open Run. - Type
regedit.exeand press Enter. - Navigate to this location in the left pane:
HKEY_CURRENT_USER\Control Panel\Desktop
- In the right pane, find CaretWidth.
- Double-click CaretWidth to open it.
- Select Decimal.
- Type a number between 1 and 20 for your cursor thickness.
- Click OK to save.
- Close Registry Editor.
- Sign out and sign back in, or restart your computer for the changes to take effect.
Use a number from 1 to 20, the same range as the other two methods. If the cursor does not change straight away, sign out and back in, or restart the PC, so running apps pick up the new value. To undo the change, set CaretWidth back to 1 or import the backup you exported earlier.
Summary
A thicker text cursor stops you from losing your place on dense, high-resolution displays. You can change it in three ways: the Settings app, the traditional Control Panel, or the Registry Editor. For most people the Settings slider is the best choice, because it is quick, shows a live preview and is easy to reverse. Use the Control Panel or the registry only if you have a reason to.
Have a question about this guide?
Answered by AI from this guide. Good questions may be added to this page — please don't include personal details.
Did this guide fix your problem?

About the Author
Richard
Tech Writer, IT Professional
Richard is a writer at Geek Rewind who turns complex IT tasks into clear, step-by-step guides. He draws on years of hands-on experience in system administration and enterprise IT operations, focusing on Windows, Linux and WordPress: the problems people actually run into, and the fixes that work. His server and WordPress guides come from systems he runs himself. Richard builds and maintains the platform behind Geek Rewind, from its Ubuntu servers and Nginx configuration to its custom WordPress plugins. Many new tutorials start with readers' questions, and he's always glad to answer them in the comments.
No comments yet — be the first to share your thoughts!