How to Change Mouse Key Speed In Windows 11

Open Settings , navigate to Accessibility, then Mouse, and use the “Mouse pointer speed” slider under Mouse Keys. This allows you to adjust how quickly the pointer moves when using your number pad.
What Is Mouse Keys?
Mouse Keys is a built-in Windows 11 feature that lets you use your keyboard’s number pad to move the mouse pointer and click things. Traditional mice can be difficult to use, so Mouse Keys offers a reliable alternative.
Why would you use this? Physical strain or injury often makes a regular mouse or trackpad unusable. Mouse Keys gives you another way to control the system. It also works as a fallback when a mouse stops responding.
Pressing the 5 key clicks, the + key double-clicks, and the remaining number keys steer the pointer across the screen. Mouse Keys works from the number pad, so you need a keyboard that has one. By default, Num Lock also has to be on.
Why Adjust Mouse Keys Speed?
Pointer speed affects how usable Mouse Keys is. If the pointer crawls, simple tasks take forever. If it races, you overshoot buttons and links. Windows 11 lets you adjust this speed so the pointer moves at a pace that suits you.
There are two ways to do it. The Settings app is the easy route and is the one most people need. The Registry Editor gives you a way to set a specific top speed value by hand.
Method 1Using Windows Settings (Easy Way)
The Settings app is the simplest way to change how fast the pointer moves when you use Mouse Keys. It works on both Windows 11 Home and Pro, and you don’t need administrator rights or any technical knowledge.
- Open the Settings app. You can do this in either of two ways:
- Click the Start menu, then select Settings.
- Or press Windows key + I on your keyboard.
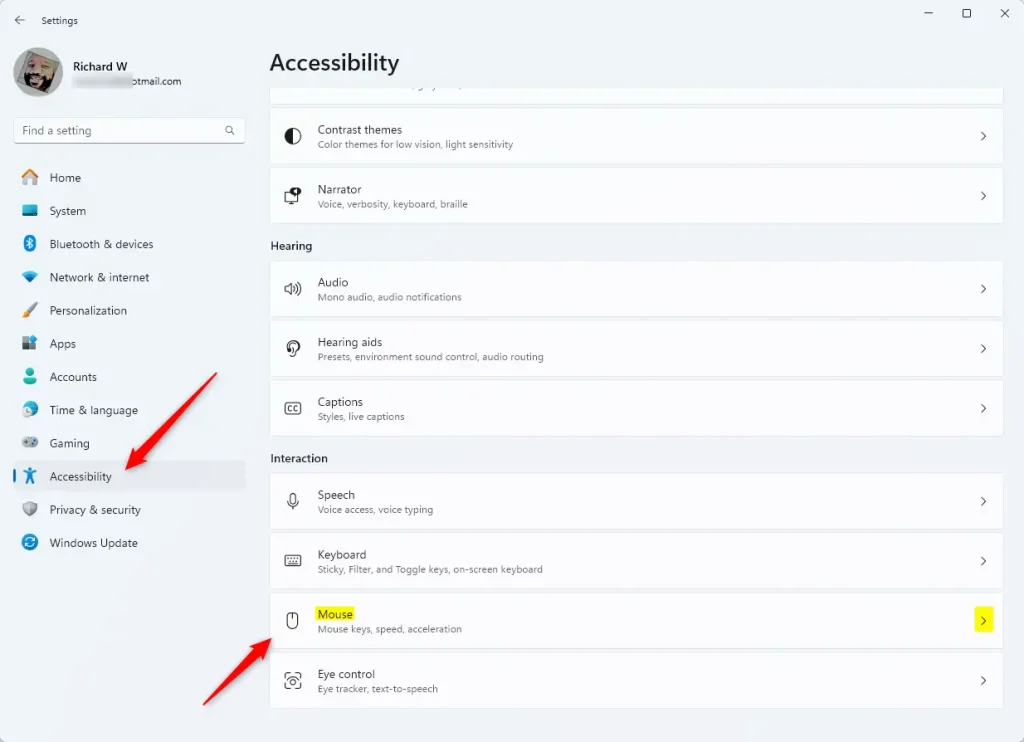
- In Settings, click Accessibility on the left side.
- On the right side, scroll down to the Interaction group and click Mouse to open it. The full path is Settings Accessibility Mouse
You should now see the mouse options for Windows 11, including the Mouse keys switch.
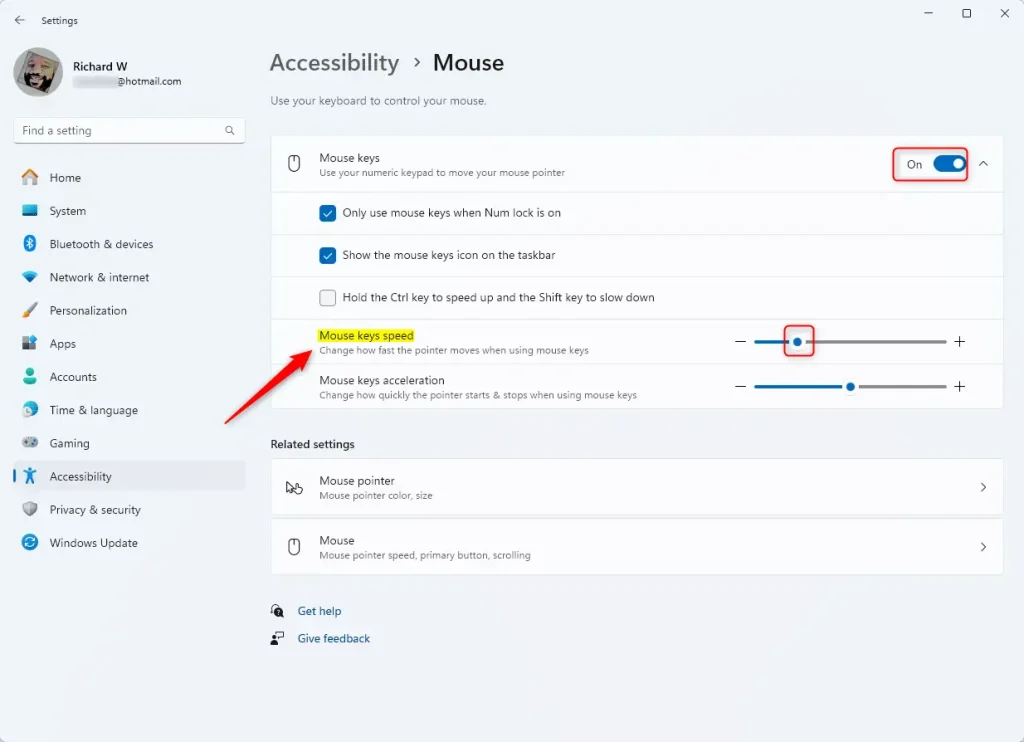
- Turn on the Mouse keys switch. If you only want to adjust the speed, you can leave it on or switch it off again afterwards. The speed setting is kept either way.
- Use the slider under Mouse pointer speed to make the pointer move faster or slower when using Mouse Keys. If you don't see the slider, click the Mouse keys row to expand it. Depending on your Windows 11 build, the label may read slightly differently, but it is the speed slider for Mouse Keys.
Test the new speed straight away. Make sure Num Lock is on, then press the number pad keys to move the pointer. If it still feels wrong, move the slider a little and try again. Small steps work better than big jumps.
- When you finish, close the Settings app. The change is saved automatically and you don't need to restart.
To undo it, return to the same page and move the slider back, or turn off the Mouse keys switch. You can also toggle Mouse Keys quickly with the shortcut Left Alt + Left Shift + Num Lock, though Windows may show a confirmation prompt first.
Method 2Using the Registry Editor (Advanced Way)
The Registry Editor (a database that stores low-level system settings) lets you set the Mouse Keys top speed as a raw number. Use it only if you are comfortable editing system settings, because a wrong change in the registry can cause problems. Registry tweaks give finer control over pointer speed than the slider does. Note down the original value before you change it so you can put it back.
- ⚠️ Requires admin privileges: Open the Registry Editor as an administrator. Click Yes if Windows asks for permission. Be careful when using this tool.
- In the left sidebar, go to this folder:
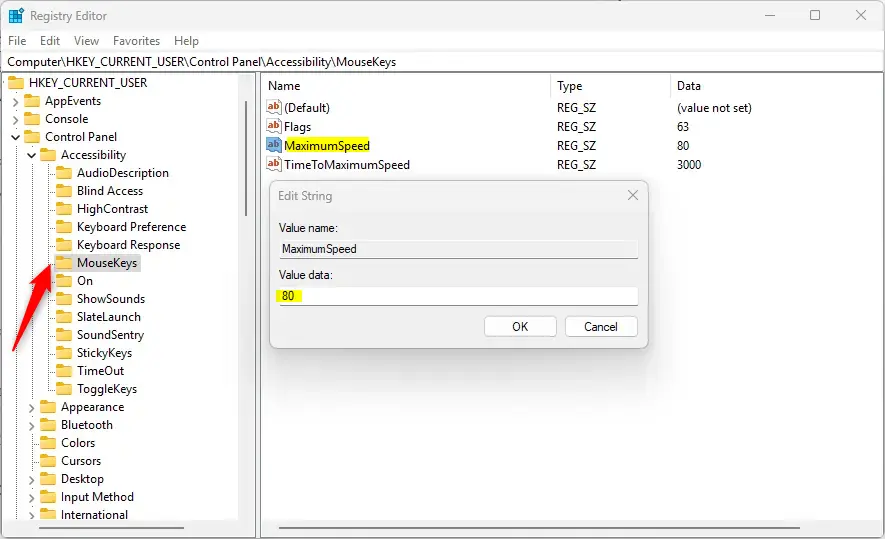
Computer\HKEY_CURRENT_USER\Control Panel\Accessibility\MouseKeys. You can expand the folders one at a time, or paste the path into the address bar at the top of the window. - Look for an entry called MaximumSpeed in the right panel.
- Double-click MaximumSpeed and enter a number between 10 (slow) and 358 (fast) to set the speed you want. Click OK to save it.
- If you don't see MaximumSpeed, right-click a blank space in the right panel, choose New String Value, name it MaximumSpeed, and set its value as above.
The new or edited entry should now appear in the right panel with the number you entered.
- ⚠️ Requires admin privileges: Close the Registry Editor and restart your computer to make sure the changes take effect.
After the restart, test Mouse Keys with the number pad. If the speed is wrong, go back to the same entry and change the number. To undo the tweak, restore the value you noted earlier, or delete the entry if you created it yourself.
Summary
Mouse Keys in Windows 11 lets you use your number pad to control the mouse pointer, alongside options to adjust movement speed. This accessibility feature helps when traditional hardware proves challenging to operate. Operators can configure velocity using standard Windows Settings or, for advanced users, the Registry Editor.- Mouse Keys lets you control your mouse pointer using your keyboard's number keys.
- You can change how fast the pointer moves to make it easier to use.
- Adjust speed either through the simple Settings app or by using the Registry Editor if you want more control.
- Try both methods and find the speed that feels best for you!
Have a question about this guide?
Answered by AI from this guide. Good questions may be added to this page — please don't include personal details.
Did this guide fix your problem?

About the Author
Richard
Tech Writer, IT Professional
Richard is a writer at Geek Rewind who turns complex IT tasks into clear, step-by-step guides. He draws on years of hands-on experience in system administration and enterprise IT operations, focusing on Windows, Linux and WordPress: the problems people actually run into, and the fixes that work. His server and WordPress guides come from systems he runs himself. Richard builds and maintains the platform behind Geek Rewind, from its Ubuntu servers and Nginx configuration to its custom WordPress plugins. Many new tutorials start with readers' questions, and he's always glad to answer them in the comments.
No comments yet — be the first to share your thoughts!