4 PCs, 1 Mouse: PowerToys Mouse Without Borders

PowerToys Mouse Without Borders lets you control up to 4 Windows computers with a single mouse and keyboard. This free Microsoft tool works like a software KVM switch. Your cursor moves from one screen to the next across all connected devices, with no extra hardware.
You can copy text on one machine and paste it on another, and you can drag files between machines. The setup works on mixed networks running Windows 11 and Windows 10.
PowerToys Mouse Without Borders lets you control up to 4 Windows PCs with a single mouse and keyboard. Install PowerToys on all machines, enable Mouse Without Borders in PowerToys Settings, click Apply as Service, generate a security key on your primary PC, then enter that key and the primary PC’s name in Mouse Without Borders settings on each additional computer.
Prerequisites for Setup
Most connection problems come from one of these four items, so it is worth a few minutes to confirm them on every machine.
- All machines must be on the same local network (Wi-Fi or Ethernet). A mix of one wired and one wireless PC is fine as long as both connect to the same router or network. Guest networks and VPNs often isolate devices from each other, so avoid them.
- All machines must run Windows 10 or Windows 11. You can mix the two versions in one setup.
- PowerToys must be installed on every machine. Installing it on only the main PC is not enough, because each computer needs its own copy to send and receive input.
- Firewall settings must allow PowerToys to communicate over the network. If Windows Defender Firewall asks for permission the first time you connect, allow it. Otherwise the PCs will not see each other.
How to Set Up Mouse Without Borders
Step 1Install PowerToys
PowerToys provides the framework for controlling multiple computers with one mouse. It shares the cursor and clipboard between up to 4 PCs. Do the following on every computer you want to include:
- Download the latest version of PowerToys and run the installer.
- Finish the installer and open PowerToys. You can start it from the Start menu or from its icon in the system tray .
- Open PowerToys Settings and select Mouse Without Borders in the left-hand list. The settings page for the tool should now appear.
- Turn on the Enable Mouse Without Borders toggle if it is off.
Keep PowerToys up to date on all machines. Running very different versions on different PCs is a common reason for a connection to fail.
Step 2Enable the Service (Admin Privilege Required)
To keep a stable connection, even at the Windows login screen, run the service in System Mode. This means it operates at a deeper system level than a normal app.
[Admin Privilege Required]- Open PowerToys Settings and go to Mouse Without Borders.
- Click Apply as Service.
- Approve the User Account Control prompt. Administrator permissions are required for this step, so a standard account will need to enter an admin password.
Repeat this on each computer. If you later want to go back to normal mode, return to the same page and turn the service option off. You may need to restart PowerToys for the change to take effect.
Step 3Generate a Security Key
The security key is what pairs your computers, so you create it once on your primary computer and then use it on all the others.
- On your primary computer, open PowerToys Settings and go to Mouse Without Borders.
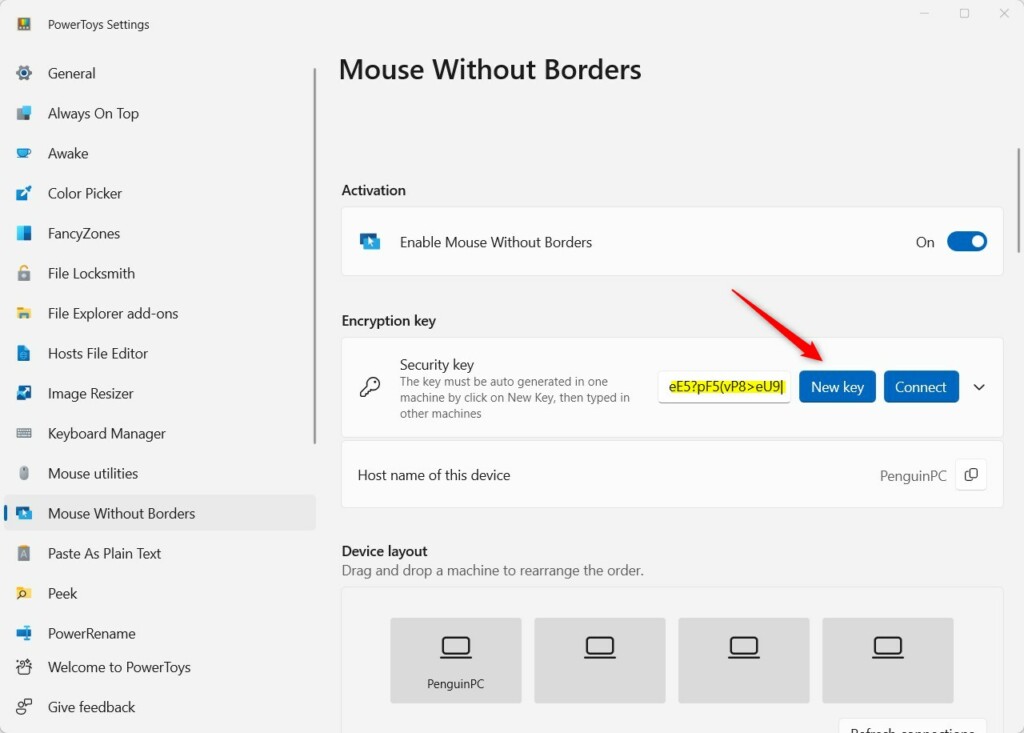
- Click New Key. This generates an encrypted security key that pairs your computers together securely.
- Note the key and the computer name shown on this page. You will need both on the other machines. Share the key only with your own devices.
You would then have to enter the new key on every other PC.
Step 4Connect Additional Computers
Now connect each additional machine to the primary one:
- On your secondary computer, open PowerToys Settings and go to Mouse Without Borders.
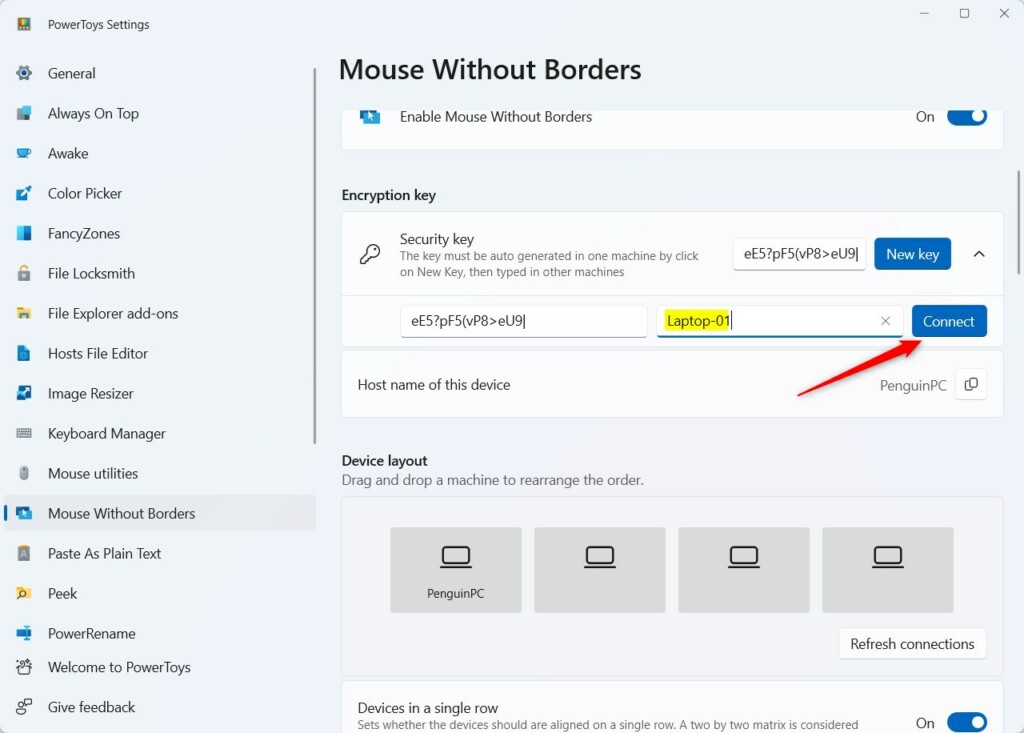
- Enter the security key from your primary machine.
- Enter the computer name of your primary machine. Type it exactly as shown, because a typo is the most common reason a connection fails.
- Click Connect. The computer should now appear as connected in the settings.
- Repeat these steps for all other devices.
If the connection fails, check the requirements at the top of this tutorial, especially the network and firewall points.
Step 5Arrange Your Layout
The layout tells Windows which edge of the screen leads to which computer. If it does not match your desk, the cursor will leave on the wrong side.
- In Mouse Without Borders settings, open the Device Layout tab.
- Drag your computers into the correct order. If your monitor sits physically to the left, drag that icon to the left in the settings menu.
- Move the mouse off the edge of the screen. The cursor should appear on the next computer in the direction you moved it.
If the cursor goes the wrong way, go back and rearrange the icons.
Advanced Features: Clipboard and File Transfer
Mouse Without Borders supports clipboard synchronization. Copy text on one PC with Ctrl+C, move the cursor to another PC, and paste it with Ctrl+V. Dragging and dropping files between machines also works.
Very large files may run into limits from network speed and latency. For big transfers, a shared network folder or cloud storage is usually a better choice. A wired connection also helps.
Troubleshooting and Known Issues
Troubleshooting usually starts with the network connection when your devices stop talking to each other. Work through these checks in order:
- Make sure all your computers use the same local network and subnet.
- Check Windows Firewall to make sure it is not blocking the app.
- If you notice lag or sudden performance drops, switch from Wi-Fi to a wired Ethernet cable. This often fixes the issue.
- If a PC still will not connect, confirm the security key and computer name were entered correctly. Also confirm every machine runs a current version of PowerToys.
- Ensure all devices are on the same subnet.
- Check your Windows Firewall to ensure PowerToys is allowed through the network.
- If you experience lag, try connecting via Ethernet instead of Wi-Fi.
- For advanced issues, refer to the official Microsoft Learn documentation.
Summary
PowerToys Mouse Without Borders lets you use one mouse and keyboard across multiple PCs. Once the devices share the same local network and are paired with the same security key, you can copy text and drag files between them. Setup comes down to installing PowerToys everywhere, generating a key on the primary PC, connecting the others, and arranging the layout to match your desk.
Have a question about this guide?
Answered by AI from this guide. Good questions may be added to this page — please don't include personal details.
Did this guide fix your problem?

About the Author
Richard
Tech Writer, IT Professional
Richard is a writer at Geek Rewind who turns complex IT tasks into clear, step-by-step guides. He draws on years of hands-on experience in system administration and enterprise IT operations, focusing on Windows, Linux and WordPress: the problems people actually run into, and the fixes that work. His server and WordPress guides come from systems he runs himself. Richard builds and maintains the platform behind Geek Rewind, from its Ubuntu servers and Nginx configuration to its custom WordPress plugins. Many new tutorials start with readers' questions, and he's always glad to answer them in the comments.
No comments yet — be the first to share your thoughts!