How to Change Mouse Keys Acceleration in Windows 11

Mouse Keys acceleration in Windows 11 changes how quickly your mouse cursor moves when you use your keyboard’s number pad. Mouse Keys turns your numeric keypad into a mouse, letting you control the pointer, click, and drag using specific keys.
This feature is a great help if you find using a regular mouse difficult. You can set how fast the cursor speeds up when you hold down a movement key and how often it repeats a movement.
Adjusting these settings in the Control Panel can make using Mouse Keys much more precise and faster. This guide shows you how to find and change the acceleration and repeat delay for Mouse Keys.
Go to Settings > Accessibility > Mouse, turn on Mouse Keys, and adjust the acceleration slider. Alternatively, use the Registry Editor to modify the TimeToMaximumSpeed value.
Why Change Mouse Keys Acceleration?
When you use Mouse Keys, you can change how quickly the pointer moves. This adjustment helps you control how fast it starts and stops moving. Making this change can significantly improve your computing experience and make the pointer movement feel more comfortable for you.
Change Mouse Keys Acceleration in Windows
Here’s how to adjust your Mouse Keys acceleration.
Using the Settings App
You can change Mouse Keys acceleration in Windows 11 easily using the Settings app by going to Accessibility, then Mouse settings, and turning Mouse Keys on.Using Windows Registry Editor
You can change Mouse Keys acceleration in Windows 11 using the Registry Editor to get finer control over how fast your mouse pointer speeds up. This advanced method lets you adjust the setting more precisely than the normal Settings app. To do this, you need to open the Registry Editor with administrator rights and go to a specific spot.
- Admin required: Open Windows Registry editor as administrator.
- Navigate to this registry key:
Computer\HKEY_CURRENT_USER\Control Panel\Accessibility\MouseKeys - Double-click the
TimeToMaximumSpeed(REG_SZ) name on the right pane to open it. - Enter a value between 1000 (faster) and 5000 (slower) to change how fast the pointer accelerates on your screen.
- If you don’t see the “TimeToMaximumSpeed” item, right-click a blank area and create a new String value registry item. Type the name “TimeToMaximumSpeed” and enter a value between 1000 (faster) and 5000 (slower).
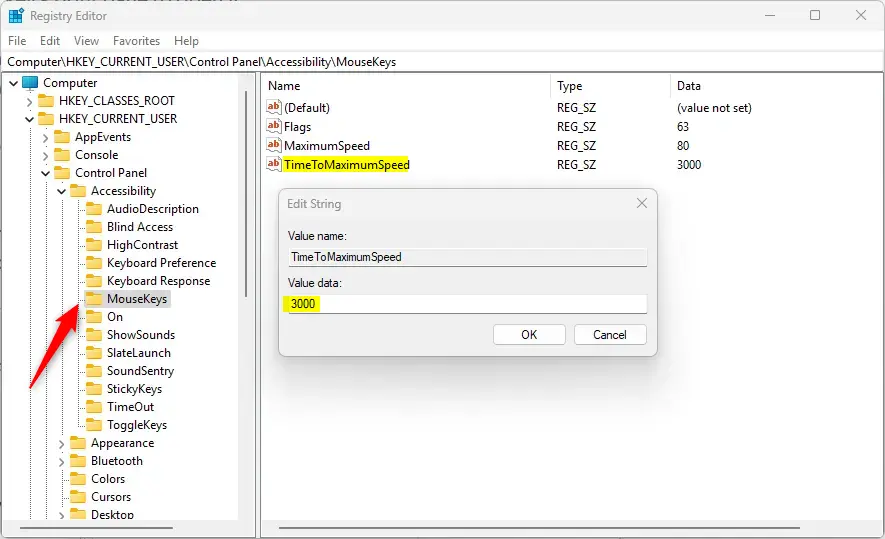
Change mouse keys accelations in Windows 11 registry - You may need to restart your computer to apply the changes.
Summary
- Mouse Keys lets you control your cursor using your keyboard’s numeric keypad instead of a mouse
- You can adjust how fast the pointer accelerates by changing the Mouse Keys acceleration setting
- The easiest way is through the Windows Settings app under Accessibility > Mouse
- Advanced users can also adjust this setting using Windows Registry Editor by modifying the TimeToMaximumSpeed value
- Values range from 1000 (faster) to 5000 (slower) in the Registry Editor method
- You may need to restart your computer for registry changes to take effect
- Experiment with different settings to find what works best for you
Mouse Keys lets you use your keyboard’s number pad to move your cursor instead of a mouse. You can adjust how fast the pointer speeds up by changing the Mouse Keys acceleration. The simplest way is through Windows Settings under Accessibility > Mouse, but advanced users can also tweak this using the Registry Editor.
Is there mouse acceleration on 🪟 Windows 11?
You want to click on additional mouse settings. Now in the little dialogue box that opens these tabs across the top up here you want to click on pointer options. And then in the motion area.
Is 50g mouse acceleration good?
Typically gaming mice come in 40g or 50g acceleration, which is higher than a human shoulder (20g) can produce. A mouse with higher acceleration may be beneficial in games that require quick, sudden movements, such as first-person shooters.
Was this guide helpful?

About the Author
Richard
Tech Writer, IT Professional
Richard, a writer for Geek Rewind, is a tech enthusiast who loves breaking down complex IT topics into simple, easy-to-understand ideas. With years of hands-on experience in system administration and enterprise IT operations, he’s developed a knack for offering practical tips and solutions. Richard aims to make technology more accessible and actionable. He's deeply committed to the Geek Rewind community, always ready to answer questions and engage in discussions.


No comments yet — be the first to share your thoughts!