How to Adjust the Mouse Pointer Speed In Windows 11 Settings

Mouse pointer speed in Windows 11 controls how fast your cursor moves across the screen when you move your mouse. If the cursor crawls or darts around, changing this setting makes everyday clicking much easier.
Windows 11 gives you a slider with 20 speed levels, so you can match the cursor to how far you actually move your hand. You can change it in a few seconds in the Settings app, with no extra software. This guide covers three ways to do it: Settings, the classic Control Panel , and your mouse maker’s own software.
Open Settings , click Bluetooth & devices, then Mouse. Find the Mouse pointer speed slider and drag it right to increase speed or left to decrease it. The change applies immediately as you move your mouse.
Using the Settings App to Change Mouse Pointer Speed
The Settings app is the quickest way to change pointer speed. The new speed applies as soon as you move the slider, so there is no Save button to hunt for. It works the same on Windows 11 Home and Pro.
- Press the Windows key and select Settings (the gear icon), or press Win+I to open the app directly.

Windows 11 Start menu with Settings gear icon highlighted. - Click Bluetooth & devices in the left-hand menu. You should see a list of connected devices on the right.
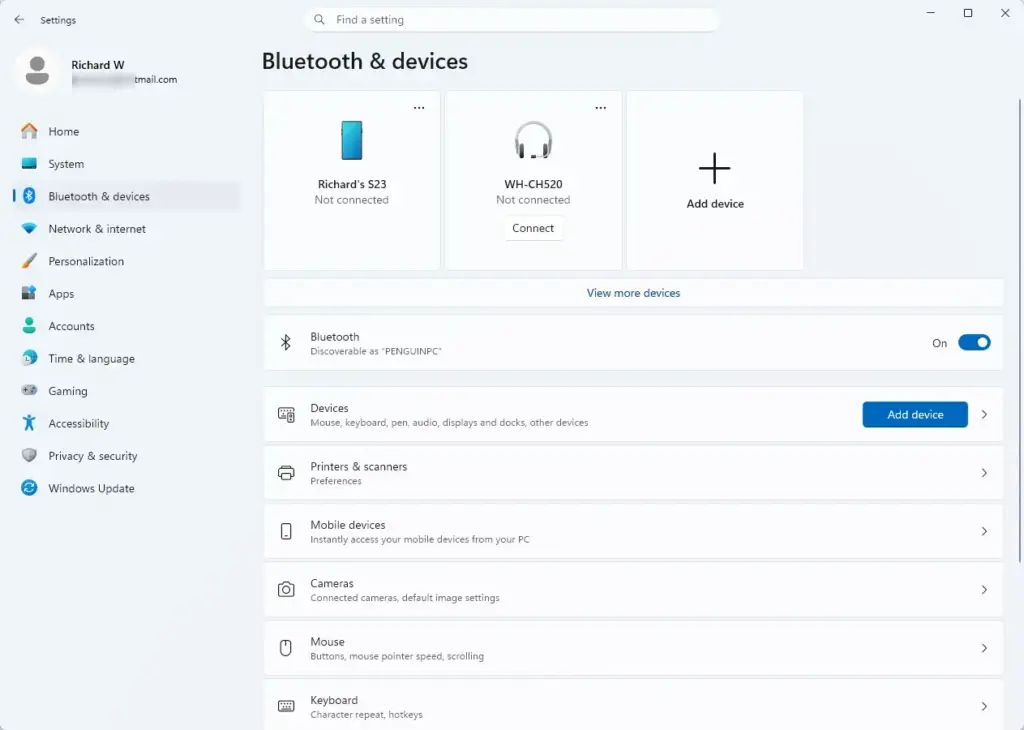
Windows Settings menu highlighting the Bluetooth and devices option for printers - Click Mouse on the right side of the screen. This opens the main mouse configuration page.
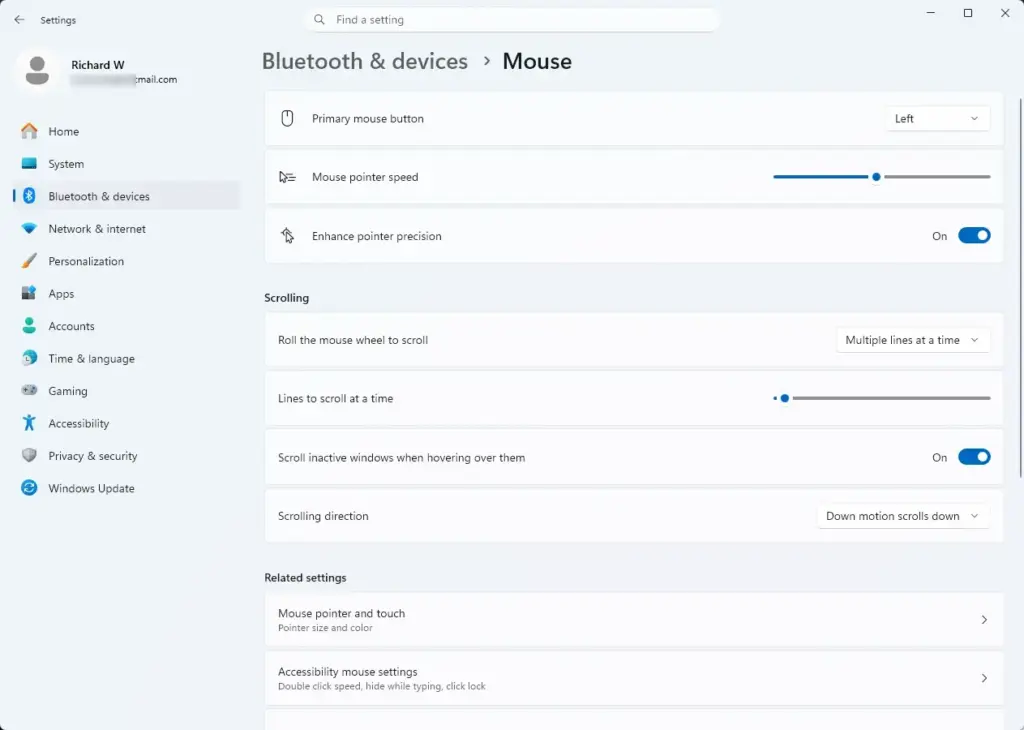
Settings › Bluetooth › Mouse - Find the slider labeled Mouse pointer speed.
- Click and drag the slider to the right to increase the speed, or to the left to decrease it. Move your mouse as you drag, because the cursor changes speed in real time. Stop when it feels natural.
To undo the change, drag the slider back to the middle. Windows normally starts at the middle value, which is 10 on the 20-point scale.
For a wireless mouse, check the battery and the receiver or Bluetooth connection.
Calibrating Pointer Speed Through the Control Panel
It has an eleven-point speed slider and an Enhance pointer precision checkbox, which helps when you need to hit small buttons and links accurately. It works on all Windows 11 editions. It adjusts the same pointer speed as the Settings app, so the two always agree.
- Press the Windows key, type
control panel, and press Enter. The Control Panel window opens.
Control Panel - Click Hardware and Sound, then click Mouse under the Devices and Printers heading. The Mouse Properties window opens. If your Control Panel is set to Large icons or Small icons instead of Category, you can click Mouse directly.
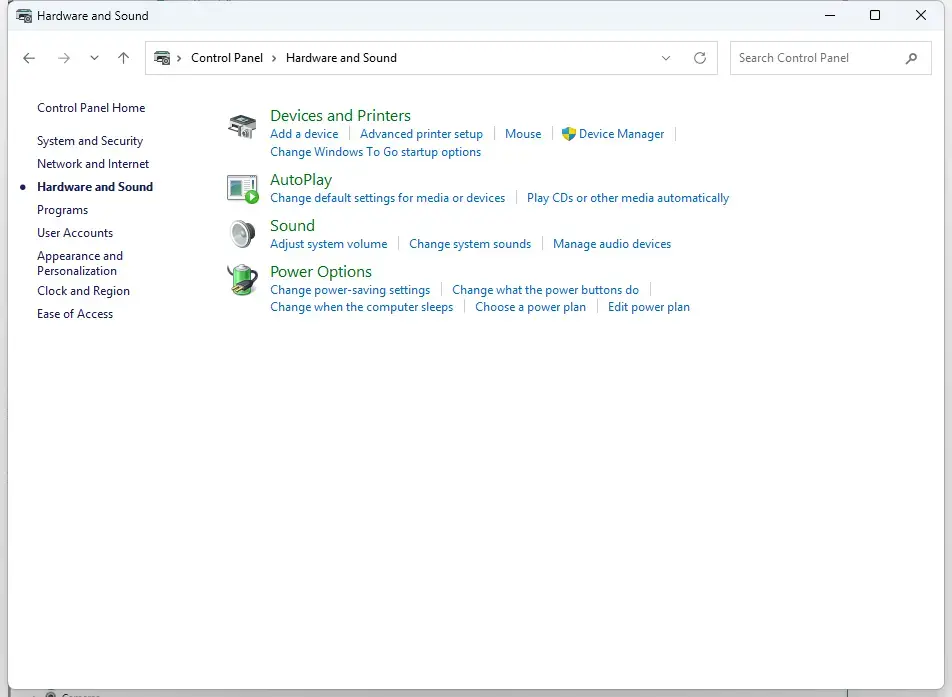
Control Panel › Hardware and Sound - Click the Pointer Options tab at the top of the window.
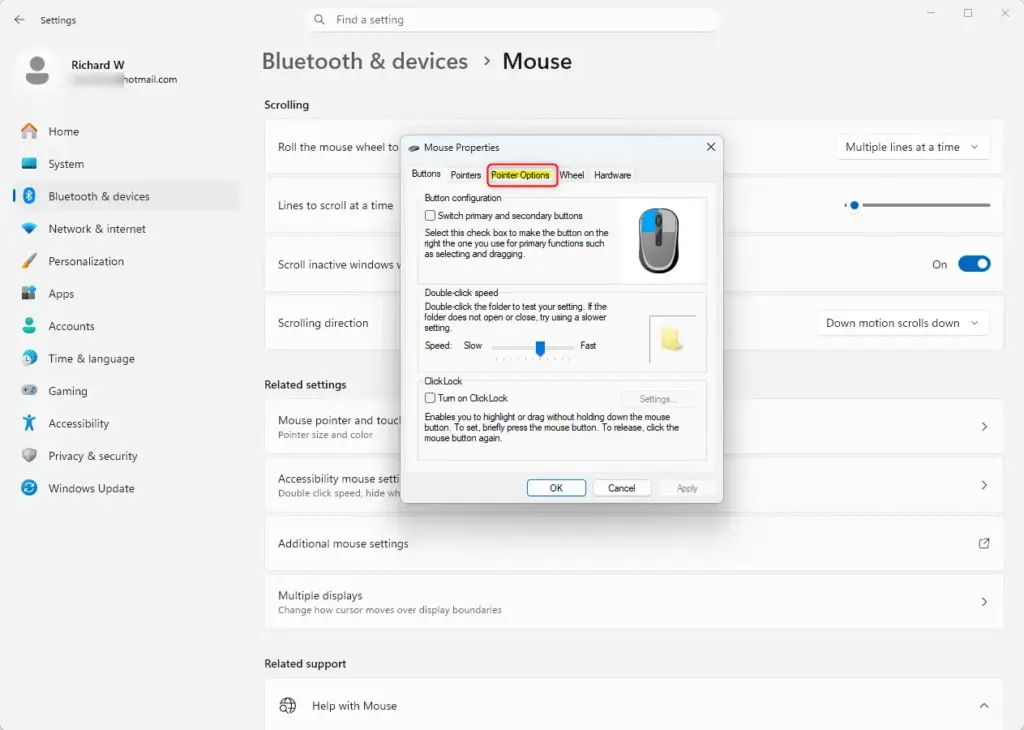
Mouse Properties window showing the Pointer Options tab. - Find the Motion section at the top of the tab.
- Drag the slider under Select a pointer speed to the speed you prefer.
- Decide on Enhance pointer precision. Check the box if you want Windows to change the cursor speed depending on how fast you move the mouse. Uncheck it for raw, uniform tracking, where the same hand movement always moves the cursor the same distance. Many gamers and designers turn it off for that reason.
- Click Apply, then click OK to save your changes and close the window. Move the mouse to test it. If it still feels wrong, reopen the window and adjust again.
To undo your changes, reopen the tab, move the slider back to the middle notch, and set the checkbox back to how it was before.
Fine-Tuning Gaming Mice with Dedicated Software
If you use a gaming or advanced productivity mouse, its manufacturer's software may be the better place to change speed. Programs like Logitech G HUB or Razer Synapse let you change the mouse's DPI (Dots Per Inch, or how sensitive the sensor is). DPI changes how far the cursor moves at the hardware level, before Windows applies its own pointer speed.
The two settings combine. A high DPI together with a high Windows slider can make the cursor far too fast. A good approach is to leave the Windows slider near the middle and tune the speed with DPI.
- Open your mouse manufacturer's companion software from your taskbar or Start menu. Check the system tray if you don't see it; these programs often run in the background.
- Go to the sensitivity, DPI, or performance tab. The exact name varies by brand.
- Create a custom DPI stage, or change the existing DPI value, until it matches the tracking speed you want. A lower number gives slower, more precise movement, and a higher number gives faster movement.
- Save the profile to your mouse's onboard memory if you plan to use the device on multiple computers without reinstalling the software. Not every mouse has onboard memory, so check your model's documentation if you don't see this option.
- Test the new sensor speed by moving your hand across the desk and watching how the cursor responds.
To undo the change, switch back to your previous DPI stage or restore the default profile in the same software.
What to do next
Your cursor should now respond smoothly and accurately to your hand movements across the display. If it still feels off, go back to your chosen method and change the speed in small steps rather than big jumps. Next, consider changing your pointer size and color so the cursor is easier to follow during long working sessions.
Frequently asked questions
How do I adjust the mouse speed on a PC?
Open Settings and go to Bluetooth & devices Mouse. Find the Mouse pointer speed slider and drag it left to slow down your cursor or right to speed it up. Windows applies the change instantly without restarting.
How do I adjust the mouse cursor speed in 🪟 Windows 11?
Press Windows Key + I to open Settings, select Bluetooth & devices, then click Mouse. Adjust the Mouse pointer speed slider to your preference. The slider offers 20 different speed levels to match your hand movements.
How do I change the pointer speed?
Go to Settings Bluetooth & devices Mouse and use the Mouse pointer speed slider to change how fast your cursor moves. Drag it left for slower movement or right for faster movement across your screen.
How to fix a slow mouse cursor?
Open Settings, navigate to Bluetooth & devices Mouse, and drag the Mouse pointer speed slider to the right to make your cursor move faster. If your mouse hardware is faulty, check the manufacturer's driver updates or try a different mouse.
Still have a question?
Answered by AI from this guide. Good questions may be added to this page — please don't include personal details.
Did this guide fix your problem?

About the Author
Richard
Tech Writer, IT Professional
Richard is a writer at Geek Rewind who turns complex IT tasks into clear, step-by-step guides. He draws on years of hands-on experience in system administration and enterprise IT operations, focusing on Windows, Linux and WordPress: the problems people actually run into, and the fixes that work. His server and WordPress guides come from systems he runs himself. Richard builds and maintains the platform behind Geek Rewind, from its Ubuntu servers and Nginx configuration to its custom WordPress plugins. Many new tutorials start with readers' questions, and he's always glad to answer them in the comments.
No comments yet — be the first to share your thoughts!