How to Adjust Mouse Pointer Speed In Windows 11 Settings

Mouse pointer speed in Windows 11 controls how far the cursor moves on screen for a given movement of your hand. The slider runs from 1 to 20, and the default is 10. Set it to match how fast you like to work.
If your cursor feels too fast or sluggish, you can adjust it in the modern Settings app or in the traditional Mouse Properties window. Both are covered below. Changes apply straight away and none of them needs a restart.
Open Settings , select Bluetooth & devices, click Mouse, then drag the Mouse pointer speed slider left to slow the cursor or right to speed it up. The change takes effect immediately.
Open Mouse Settings in 🪟 Windows 11
Almost every mouse setting in Windows 11 starts from the same page. It holds the pointer speed slider, the button assignments and the scroll options. It also links to the older Mouse Properties window.
- Press the Win+I on your keyboard to open the Settings app.

Windows 11 Start menu with Settings gear icon highlighted. - Select Bluetooth & devices from the left-hand sidebar menu. The list of hardware on the right now shows your connected devices.
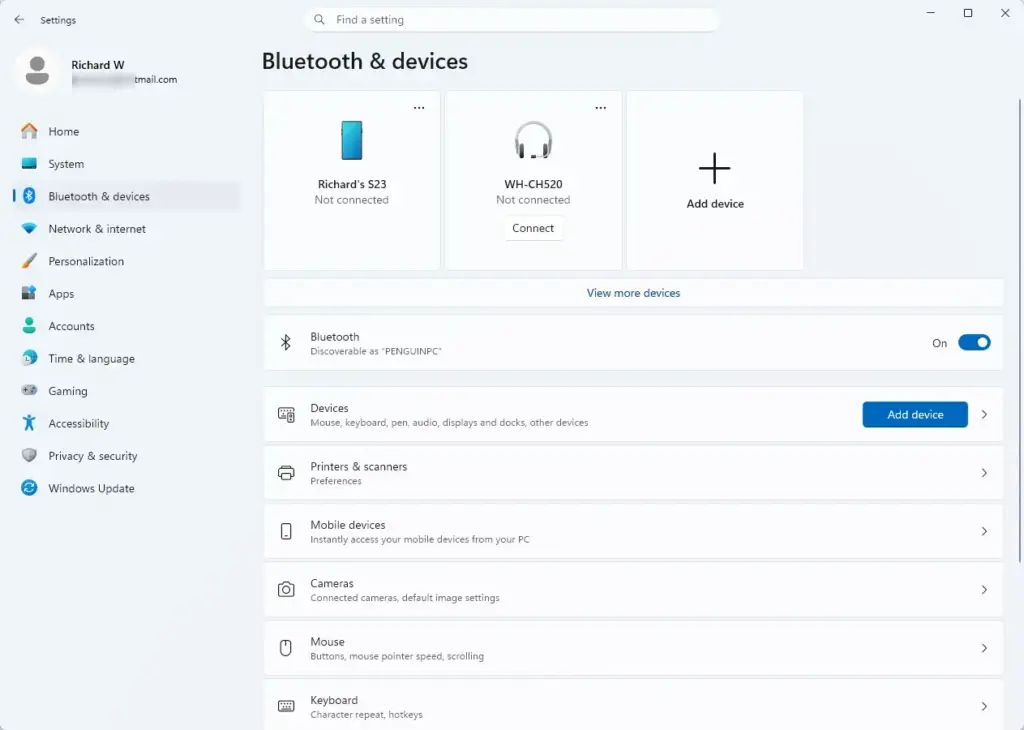
Windows Settings menu highlighting the Bluetooth and devices option for printers - Click Mouse in that list. The mouse configuration panel opens.
If you prefer, you can also right-click Start and choose Settings to get to the same place.
Change the Mouse Pointer Speed
Dragging the pointer speed slider is the quickest way to fix a cursor that feels too fast or too slow. Lower numbers slow the cursor down, which helps with precise design work. Higher numbers speed it up, which helps on large or multiple screens.
- Open Settings.
- Select Bluetooth & devices.
- Click Mouse.
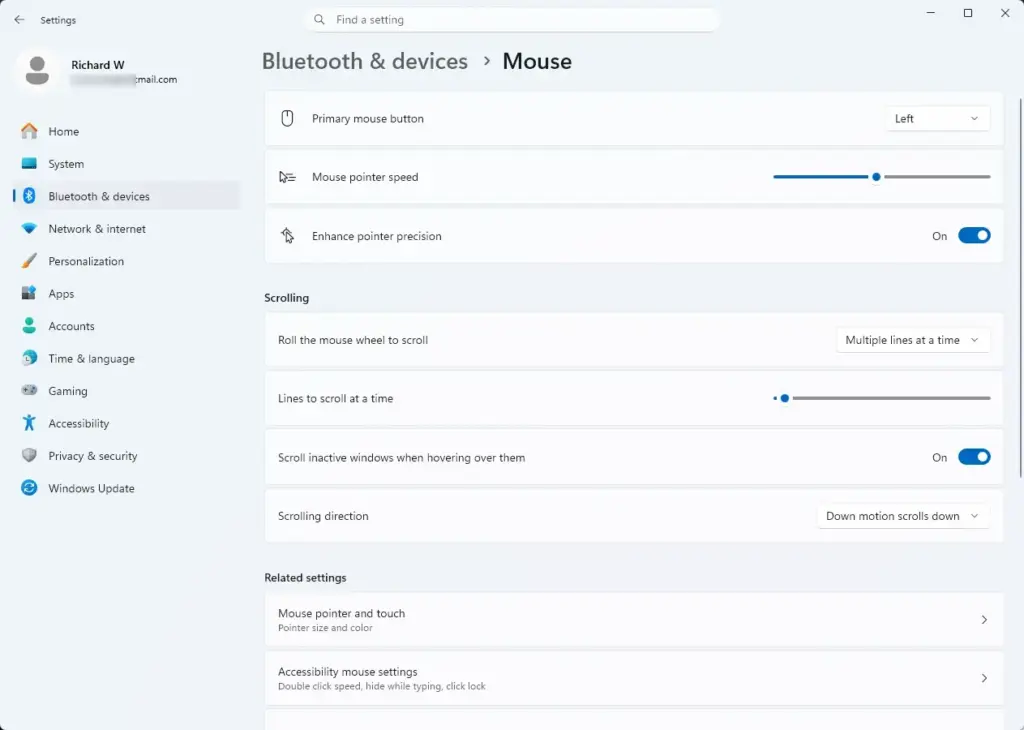
Settings › Bluetooth › Mouse - Find the Mouse pointer speed slider near the top of the window.
- Click and drag the slider handle to the left to make the pointer slower, or to the right to make it faster.
The change takes effect immediately as you move the slider, so move the mouse around while you drag and judge the feel. Make small changes and test each one. If you end up somewhere you don’t like, set the slider back to 10, the default.
Make the Pointer More Accurate
Pointer acceleration is the setting Windows calls Enhance pointer precision. When it is on, the cursor travels farther if you move the mouse quickly and stays steady and fine-grained when you move slowly. It is on by default. Many desktop users like it. Many gamers turn it off so the cursor moves the same distance every time.
- Open Settings.
- Select Bluetooth & devices.
- Click Mouse.
- Scroll down to the Related settings section and click Additional mouse settings. The legacy Mouse Properties window opens.
- Click the Pointer Options tab at the top of the small window.
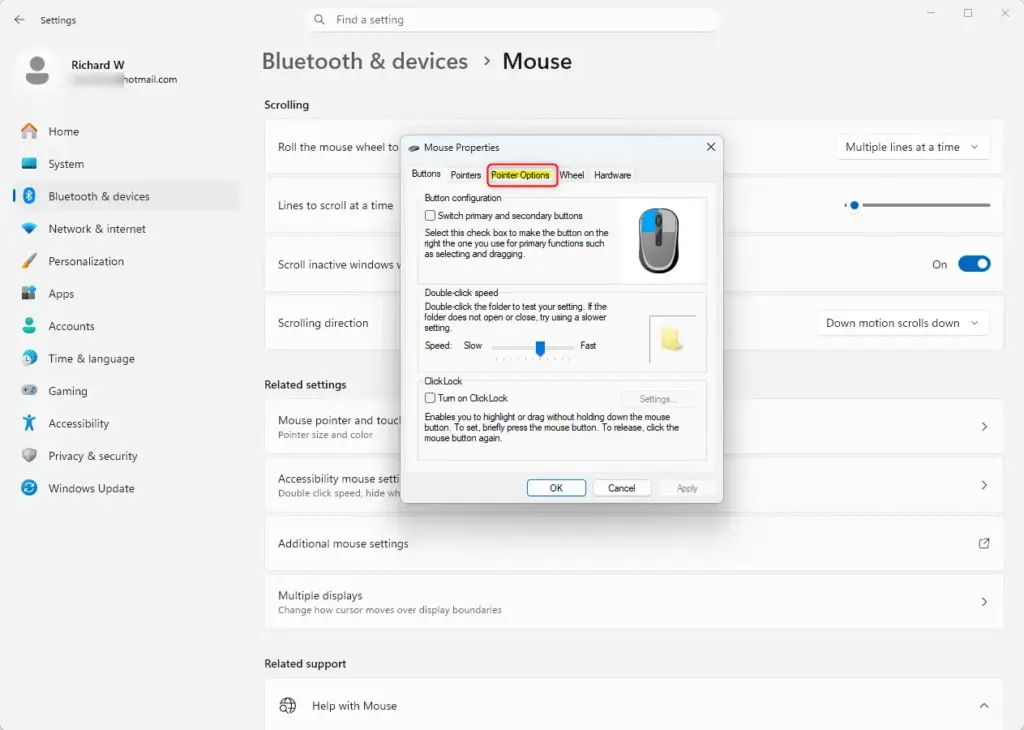
Mouse Properties window showing the Pointer Options tab. - Under Motion, check or uncheck Enhance pointer precision, depending on whether you prefer it for desktop navigation or want it off for gaming.
- Click Apply, then click OK to save your changes and close the window.
Some recent Windows 11 builds also show this option on the main Mouse page in Settings. If yours does, you can use that instead. To undo the change, return to the same box and reverse it.
Change How the Mouse Pointer Works
The main Mouse page also holds your button and scroll preferences. Use it to swap the primary button if you are left-handed, or to change how far the page moves when you scroll.
- Open Settings.
- Select Bluetooth & devices.
- Click Mouse.
Settings › Bluetooth › Mouse - Open the Primary mouse button drop-down menu and choose Left or Right. Choose Right if you are left-handed. The change applies at once, so your next click already uses the new assignment.
- Adjust the Roll the mouse wheel to scroll setting to choose whether one notch of the wheel moves multiple lines or a whole screen. If you pick multiple lines, a Lines to scroll at a time slider appears so you can set the exact amount.
The old right button now does the left-click job, and it is easy to click the wrong thing for a minute or two. If you get stuck, press the Windows key and use the keyboard to get back to this page, then switch the setting back.
Change the Double-Click Speed
The double-click speed controls how close together two clicks must be for Windows to count them as a double-click. If your double-clicks keep registering as two single clicks, slow it down. If it feels sluggish, speed it up. This setting lives in the legacy Mouse Properties window.
- Open Settings.
- Select Bluetooth & devices.
- Click Mouse.
- Click Additional mouse settings to open the Mouse Properties window.
- Stay on the Buttons tab, which is the one shown first.
- Find the Double-click speed slider. Drag it toward Slow if you need more time between clicks, or toward Fast if you want quicker responses.
- Double-click the small folder icon in the test area. If the folder opens and closes, the speed suits you. If nothing happens, move the slider a little and try again.
- Click Apply and then click OK.
If you share the PC with someone who has trouble double-clicking, a slower setting here often solves the problem.
Change How the Mouse Wheel Works
The Wheel tab gives you finer control over scrolling than the main Settings page. You can set the exact number of lines per notch, or make each notch move a full screen, which is handy for reading long documents.
- Open Settings.
- Select Bluetooth & devices.
- Click Mouse.
- Click Additional mouse settings.
- Click the Wheel tab at the top of the Mouse Properties window.
- Under Vertical Scrolling, change the number of lines to scroll each time, or select One screen at a time.
- If your mouse supports horizontal tilting, adjust the characters per scroll setting under Horizontal Scrolling.
- Click Apply, then click OK.
The Wheel tab does not appear on every machine. Whether it shows depends on the mouse and its driver. If it is missing, use the scroll options on the main Mouse page in Settings. The horizontal option only does anything if your mouse has a tilt wheel or a side scroll control.
Find a Mouse Pointer
On a large display or a multi-monitor setup, the cursor is easy to lose. Windows can show an animated ring that closes in on the pointer whenever you tap the Control key.
- Open Settings.
- Select Bluetooth & devices.
- Click Mouse.
- Click Additional mouse settings.
- Click the Pointer Options tab.
- Near the bottom, under Visibility, check the box next to Show location of pointer when I press the CTRL key.
- Click Apply and click OK.
Now press your keyboard's Ctrl key at any time. You will see an animated ring converge on your cursor. To turn the feature off, clear the same check box.
Turn on ClickLock
ClickLock lets you drag without holding the mouse button down. Press and hold briefly to start, release, move the pointer, then click again to let go. It works for highlighting text, dragging windows and moving files, and it helps a lot if holding a button causes hand strain.
- Open Settings.
- Select Bluetooth & devices.
- Click Mouse.
- Click Additional mouse settings.
- On the Buttons tab, check the box next to Turn on ClickLock.
- Click the Settings button next to ClickLock. In the small window that opens, choose how long you must hold the button down before the lock engages.
- Click OK on the settings sub-window, click Apply, and click OK to close the main properties box.
It can feel odd for the first few drags. If the lock kicks in too easily, move the hold time toward the long end. To switch it off, clear the Turn on ClickLock box.
Change How the Mouse Pointer Looks
If the pointer is hard to see, you can change its color and size. These options are in the Accessibility section, not on the Mouse page.
- Open Settings.
- Select Accessibility from the left sidebar.
- Click Mouse pointer and touch.
- Choose your preferred pointer style from the available options: White, Black, Inverted, or a custom colored pointer. Inverted changes color to contrast with whatever is behind it.
- Use the Size slider to make the cursor larger or smaller.
You will see the pointer change as you adjust these. Choose White and move the Size slider back to the left if you want to return to the default look.
Configure Raw Input and DPI for Gaming Accuracy
For gaming, the mouse's own hardware settings matter more than the Windows pointer speed. Many gaming mice need the maker's companion software to set sensor sensitivity (DPI) and polling rate. Which app you use depends on the brand. Windows itself does not set DPI.
- Open your mouse manufacturer's companion utility application.
- Locate the DPI (Dots Per Inch) settings page.
- Set your hardware DPI to a native step (such as 800, 1200, or 1600 DPI) rather than extreme values that cause sensor interpolation errors.
- Enable Raw Input inside your individual video game settings to bypass operating system acceleration entirely and read data directly from the physical sensor.
Not every game has a Raw Input option, and the name varies between titles. If you want consistent aim, also turn off Enhance pointer precision as described earlier. The utility's own settings are saved to the mouse or to your profile, so they are separate from anything you change in Windows.
Troubleshooting Mouse Acceleration and Speed Regressions
Sometimes a Windows update or a driver reinstall resets your pointer speed to the default. If that happens, check the setting again in the classic Control Panel, then look for software that may be changing it back.
- Press the Windows key and type
control, then press Enter to open the classic Control Panel. - Click Hardware and Sound, then select Mouse. This opens the same Mouse Properties window as before. If you do not see Hardware and Sound, set View by in the top right to Category.
- Go to the Pointer Options tab and check the position of the pointer speed slider under Motion. Reset it if needed, then click Apply and OK.
- Check whether third-party peripheral software running in the background is overriding your preferences at startup. Open Task Manager by pressing Ctrl+Shift+Esc, select Startup apps in the left sidebar, and disable any unnecessary apps that start automatically. Right-click an app and choose Disable.
Restart the PC after changing startup apps and check the pointer speed again. If the speed stays correct, one of the apps you disabled was the cause. You can re-enable apps you still need one at a time to find which one it is.
What to do next
With your pointer speed set, you can move on to customizing the rest of your desktop. Try changing your display scale and resolution settings, or set up custom keyboard shortcuts to streamline your daily workflow.
Have a question about this guide?
Answered by AI from this guide. Good questions may be added to this page — please don't include personal details.
Did this guide fix your problem?

About the Author
Richard
Tech Writer, IT Professional
Richard is a writer at Geek Rewind who turns complex IT tasks into clear, step-by-step guides. He draws on years of hands-on experience in system administration and enterprise IT operations, focusing on Windows, Linux and WordPress: the problems people actually run into, and the fixes that work. His server and WordPress guides come from systems he runs himself. Richard builds and maintains the platform behind Geek Rewind, from its Ubuntu servers and Nginx configuration to its custom WordPress plugins. Many new tutorials start with readers' questions, and he's always glad to answer them in the comments.
No comments yet — be the first to share your thoughts!