How to Change Primary Mouse Button Assignment in Windows 11 Mouse Pointer Settings

Primary mouse button assignment in Windows 11 lets you swap the functions of your left and right mouse buttons, so your index finger handles the main clicking tasks. By default, Windows sets up mice for right-handed use. If you use the mouse with your left hand, switching the setting takes a few clicks in the Settings app.
Once the buttons are swapped, Windows treats the right button as your selection tool. It also moves the context menu (the menu with extra options) to the left button. That puts the click you use most on the side your index finger already rests on, which cuts down hand strain over a long working day. The change applies to any mouse connected to the PC, wired or wireless, and it works the same on Windows 11 Home and Pro.
Open Settings by pressing Win+I, click Bluetooth & devices, then Mouse. Find the Primary mouse button drop-down near the top and switch it from Left to Right. The change takes effect immediately without restarting.
How to Open Mouse Settings in 🪟 Windows 11
The quickest way to reach the mouse settings is the Settings app. Press the Win and the letter I together, click Bluetooth & devices, then click Mouse. That page holds the main options: primary button, pointer speed, and scrolling.
- Click the Start button on your taskbar at the bottom of your screen. The Start menu opens.

Taskbar - Click the Settings icon, which looks like a small gear. You can skip the first two steps by pressing the Win and the letter I at the same time. The Settings window opens.
- In the menu on the left side of the Settings window, click Bluetooth & devices.
- On the right side of the screen, click Mouse. The mouse options now fill the right-hand pane.
If you don’t see a Mouse entry, Windows has not detected a mouse. Check the cable or the USB receiver, or check the Bluetooth pairing, and the page should appear.
Step-by-Step: How to Change the Primary Mouse Button
To change the primary mouse button, open Settings , go to Bluetooth & devices Mouse, and find the Primary mouse button drop-down near the top of the page. Switch it from Left to Right. The change takes effect immediately, so you do not need to restart the computer.
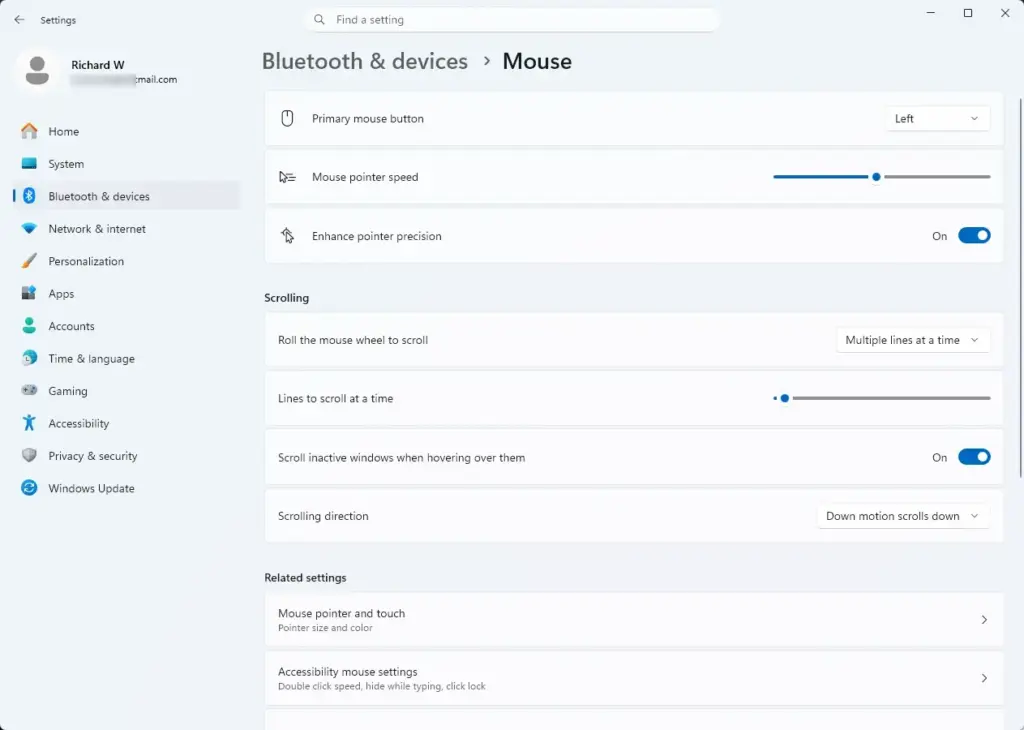
- On the Mouse page, find the Primary mouse button option near the top of the screen.
- Look at the drop-down menu next to it. By default, it says Left.
- Click the drop-down menu and choose Right. The buttons swap as soon as you pick it.
You do not need to restart your computer. Your right mouse button now selects and opens items. Your left mouse button opens context menus with extra options.
Keep one thing in mind: from this moment, the drop-down itself responds to the right button. To go back to the default, click the drop-down with the right button and choose Left. If you are stuck, you can also use the keyboard. Press Tab to reach the drop-down, press Enter or the arrow keys to change the value, and press Enter to confirm.
Other Helpful Mouse Settings in 🪟 Windows 11
The same Mouse page has a few other settings worth checking while you are here. Pointer speed, wheel scrolling, and double-click speed are the ones most people end up adjusting to get a mouse that feels right.
Change the Mouse Pointer Speed
You can change mouse pointer speed from the same Mouse page in Settings. Drag the slider to the left to slow the cursor down, or to the right to make it travel farther across the screen with the same hand movement.
- Open Settings and go to Bluetooth & devices Mouse

Settings - Find the slider labeled Mouse pointer speed.
- Click and drag the slider to the left to make your mouse move slower, or to the right to make it move faster. Move the mouse after each change to test it. The new speed applies right away.
If the pointer still feels inconsistent, look for the Enhance pointer precision toggle on the same page. It makes the pointer speed depend on how fast you move the mouse. Some people, gamers and designers especially, prefer it off, so the pointer moves the same distance every time.
Change How the Mouse Wheel Works
The scroll wheel settings are also on the Mouse page. You can choose how many lines the page moves with each notch, or have the wheel scroll one full screen at a time. You can also turn on scrolling of inactive windows by hovering over them.
- On the Mouse settings page, scroll down to the scrolling section.
- Set Scroll the mouse wheel to scroll to either Multiple lines at a time or One screen at a time.
- If you chose multiple lines, drag the Lines to scroll at a time slider to set how far each wheel notch moves the page. This slider does not apply when you choose one screen at a time.
- Turn on Scroll inactive windows when hovering over them if you want to scroll a window just by pointing at it, without clicking it first. This helps when you read in one window while working in another.
All of these changes apply immediately. To undo any of them, set the option back to its previous value.
Change Your Double-Click Speed
Double-click speed is not on the Settings page. It lives in the classic Mouse properties window, which you open through the Control Panel. On the Buttons tab, the slider sets how quickly you must click twice for Windows to count it as a double-click. A slower setting is easier on stiff hands, and a faster one suits quick clickers.
- Type Control Panel into your Windows search bar and open it.

Control Panel - Click Hardware and Sound, then click Mouse. If your Control Panel is in Large icons or Small icons view, click Mouse directly. The Mouse Properties window opens.
- In the window that pops up, look at the Buttons tab.
- Drag the Double-click speed slider until it feels comfortable for your hands. You can test it by double-clicking the folder icon in the test area next to the slider. If the folder opens or closes, the speed works for you.
- Click Apply and then OK to save your changes.
It does the same job as the setting in the Settings app, so use whichever you prefer, but do not use both at once.
Unique Expert Tips for Mouse Customization
Windows 11 mouse customization goes beyond swapping buttons and changing pointer speed. A few lesser-known options help reduce hand strain and save time during long sessions. You can use them to hold a click without pressing the button, fine-tune the scroll wheel, and make the pointer easier to see with pointer trails and a location ring.
Using ClickLock for Easy Dragging
ClickLock lets you highlight text or drag files without holding the mouse button down the whole time. You turn it on in the classic Mouse properties window, on the Buttons tab. It is useful if holding a button gets tiring or painful.
- Open the classic Mouse properties window through the Control Panel, as shown in the steps above.
- On the Buttons tab, check the box next to Turn on ClickLock.
- Click the Settings button next to it. A small dialog opens where you can set how long you must hold the button before the lock engages. Use the slider to move between a shorter and a longer time, then click OK.
- Click Apply and OK.
To use ClickLock, press and hold your primary mouse button on an item for a moment, then let go. The item stays locked, so you can move the pointer to where you want it to go without holding anything down. Click once more to drop the item in the new location. The same method works for selecting a block of text: hold, release, move to the end of the text, and click.
If clicks suddenly feel odd after you turn this on, you probably triggered the lock by accident. Return to the Buttons tab and clear the Turn on ClickLock check box to turn it off.
Finding a Lost Mouse Pointer
If you lose the pointer on a bright screen or a multi-monitor setup, Windows can show you where it is. Open the classic Mouse properties through the Control Panel and go to the Pointer Options tab. Then check the box at the bottom of the window that shows the pointer location when you press the Ctrl key.
- Open your classic Mouse properties window through the Control Panel.
- Click the Pointer Options tab at the top.
- At the very bottom of the window, check the box that says Show location of pointer when I press the CTRL key.
- Click Apply and OK.
After you turn this setting on, pressing the Ctrl key on your keyboard makes circles close in on your mouse pointer, so you can spot it right away. The check box is in the Visibility group on the Pointer Options tab. The same group has Display pointer trails, which leaves a short trail behind the pointer as it moves. That also makes the pointer easier to follow. Clear the check box at any time to turn the feature off.
Summary
Switching your primary mouse button in Windows 11 takes only a few seconds in the Settings app. Whether you are left-handed or working around a broken button, the change makes the mouse more comfortable to use, and you can reverse it at any time. Once you are happy with the buttons, take a few minutes to try pointer speed, wheel scrolling, and ClickLock as well. They often make the biggest difference to how the mouse feels.
Have a question about this guide?
Answered by AI from this guide. Good questions may be added to this page — please don't include personal details.
Did this guide fix your problem?

About the Author
Richard
Tech Writer, IT Professional
Richard is a writer at Geek Rewind who turns complex IT tasks into clear, step-by-step guides. He draws on years of hands-on experience in system administration and enterprise IT operations, focusing on Windows, Linux and WordPress: the problems people actually run into, and the fixes that work. His server and WordPress guides come from systems he runs himself. Richard builds and maintains the platform behind Geek Rewind, from its Ubuntu servers and Nginx configuration to its custom WordPress plugins. Many new tutorials start with readers' questions, and he's always glad to answer them in the comments.
No comments yet — be the first to share your thoughts!