How to Adjust Mouse Pointer Speed In Windows 11 Mouse Properties

Pointer speed in Windows 11 controls how far the cursor travels on your display relative to the physical distance you move your mouse across the desk. Changing this setting fixes a cursor that feels too fast to control or too slow to reach the edges of the screen.
You can adjust the speed using either the modern Settings app or the classic Mouse Properties window. Finding the right balance stops hand strain and helps you click small buttons accurately. Both methods work the same on Windows 11 Home and Pro, and neither needs a restart.
Open Settings , click Bluetooth & devices, select Mouse, then drag the Mouse pointer speed slider left to slow down or right to speed up the cursor. Windows applies the change with no restart required.
How to Change Mouse Pointer Speed Using the Settings App
The Settings app has a single slider that scales your cursor movement from slow to fast. This method avoids the legacy menus and takes just a few clicks. The slider has 20 levels, and the default sits at 10.
- Press the Win, type Settings, then press Enter. The Settings app opens.

- Click Bluetooth & devices in the left sidebar. The list of connected devices appears on the right.
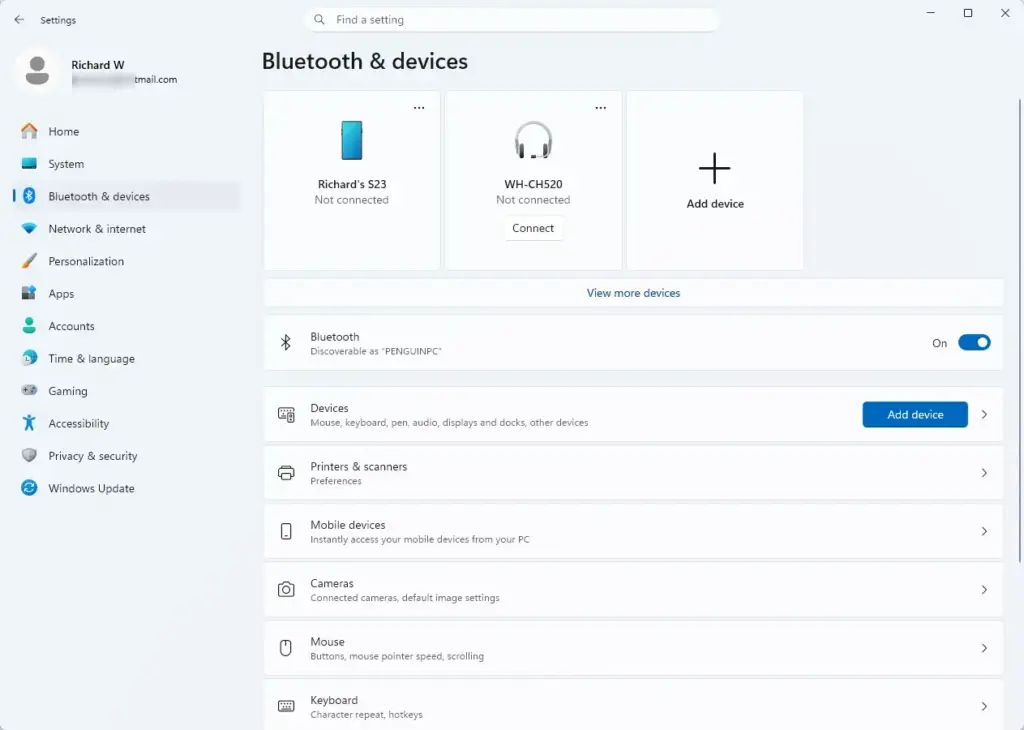
- Click Mouse on the right side of the window. If the entry is missing, check that a mouse is connected. A touchpad-only laptop shows Touchpad instead.
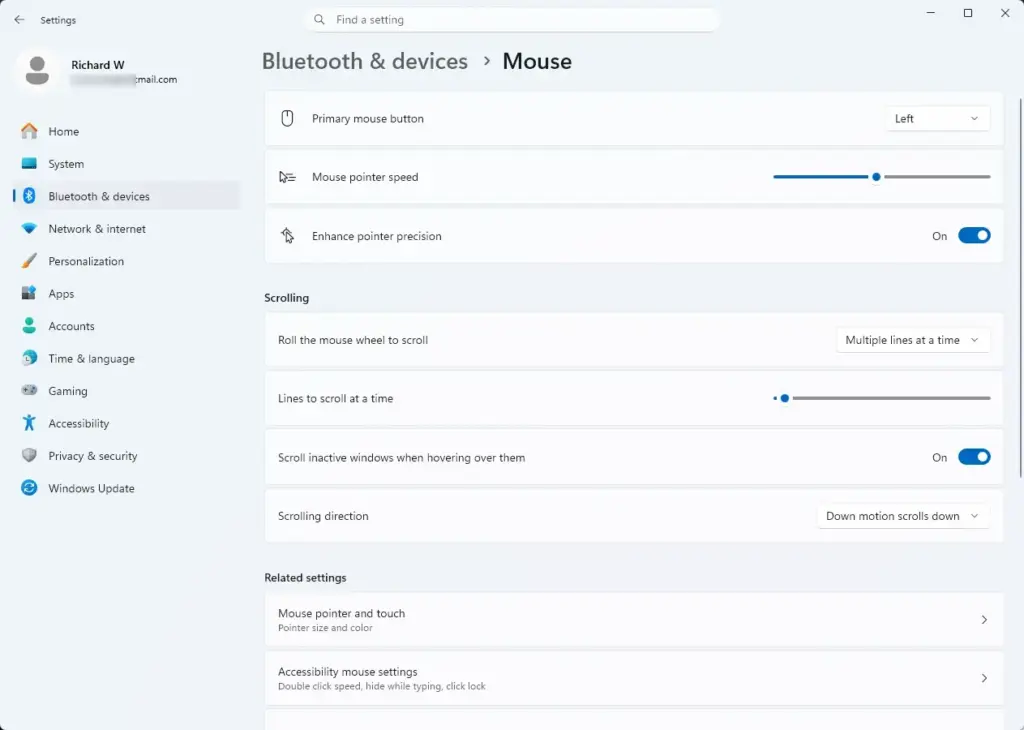
- Locate the slider labeled Mouse pointer speed.
- Click and drag the slider to the left to slow the pointer down, or to the right to speed it up. Windows applies the change instantly, so move the mouse around and test the new speed right away.
If the speed still feels wrong, nudge the slider a few notches at a time instead of making big jumps. To undo your change, drag the slider back to the middle (10).
How to Adjust Mouse Sensitivity via Control Panel
Its slider has 11 notches, and the default is the sixth notch, in the middle. Use this window if you also want the options that Settings does not show, such as Enhance pointer precision.
- Press the Win, type Control Panel , and press Enter.
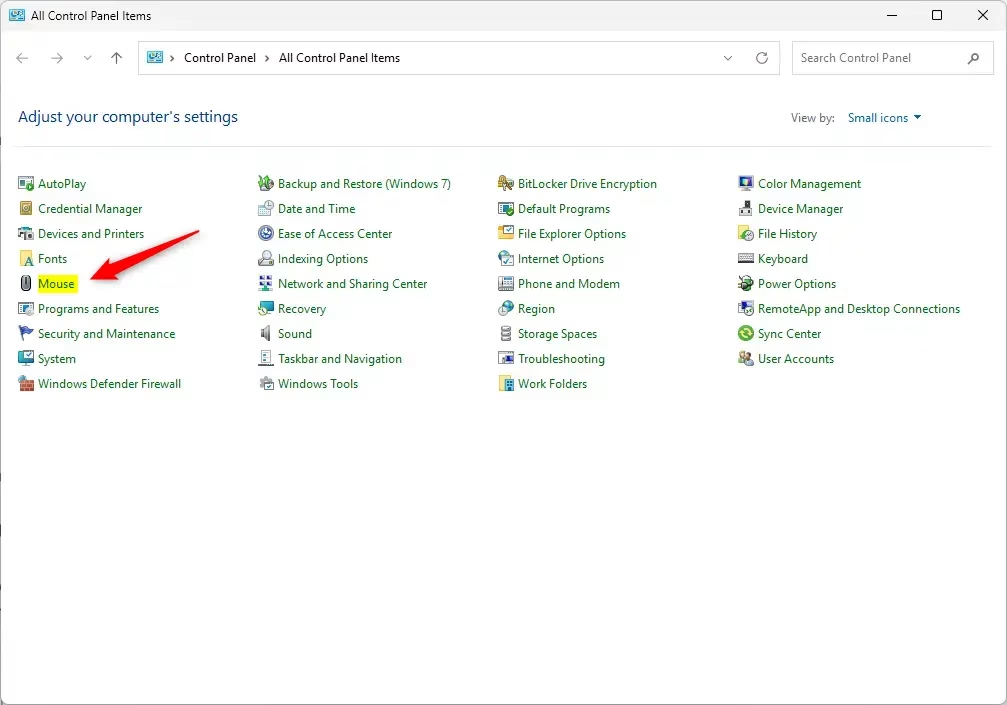
- Click Hardware and Sound, then click Mouse under Devices and Printers. The Mouse Properties window opens. If Control Panel is set to large or small icons, click Mouse directly.
- Click the Pointer Options tab at the top of the window.
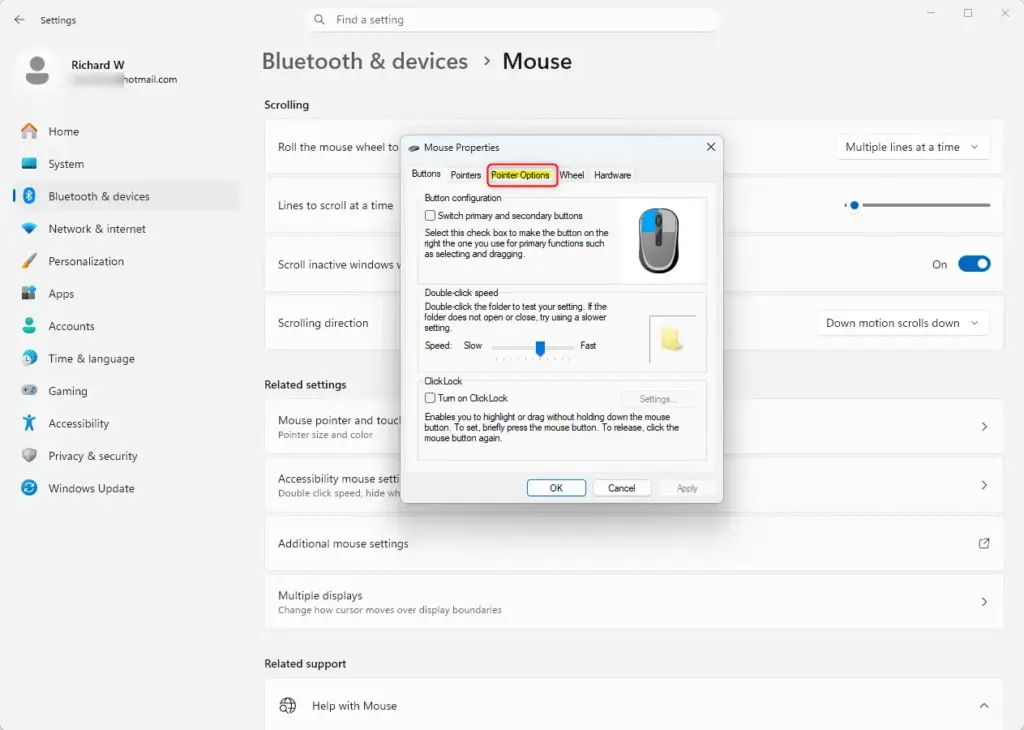
- Find the Motion section near the top of the tab.
- Click and drag the slider under Select a pointer speed to your preferred notch. The sixth notch is often recommended for precision work because, with Enhance pointer precision turned off, it gives a 1:1 pixel movement ratio for many standard sensors and avoids pixel skipping.
- Click Apply, then click OK to save your changes and close the window.
Use Apply first if you want to test the speed before committing. The change takes effect immediately, and you can come back and move the slider at any time.
Make the Pointer More Accurate with Precision Settings
The cursor moves farther when you swipe quickly and shorter distances when you move slowly, so the result depends on your hand speed and not on distance alone. Turned on, it helps you cross the screen quickly and still land on small targets.
- Open the Control Panel and navigate to Hardware and Sound, then click Mouse.

- Select the Pointer Options tab.
- Locate the Motion section.
- Check the box next to Enhance pointer precision to turn mouse acceleration on, or uncheck it to turn it off. Gamers and graphic designers usually turn this setting off to build consistent muscle memory, because the same hand movement always gives the same cursor distance. Office workers often prefer it on for everyday navigation.
- Click Apply and then OK.
Windows normally has this box checked. If you turn it off and dislike the result, reopen the window and tick the box again.
Change How the Mouse Wheel Works
Scroll wheel settings decide how far a long web page or document moves with each notch of the wheel. You can choose whether one notch moves a few lines or a whole screen, so pages do not jump past your viewing area too quickly.
- Open the Settings app and navigate to Bluetooth & devices, then click Mouse.
- Look for the setting titled Roll the mouse wheel to scroll. From its dropdown menu, choose whether scrolling moves Multiple lines at a time or One screen at a time.
- If you chose multiple lines, adjust the Lines to scroll at a time slider to make page scrolling faster or slower. Scroll a long page to test it.
- If you use a mouse with a tilt wheel, open the classic Mouse Properties window and click the Wheel tab to adjust horizontal tilting sensitivity. That tab only appears with some mouse drivers, so a basic mouse may not show it.
Change the Double-Click Speed
Double-click speed is the longest gap Windows allows between two clicks before it treats them as separate clicks. If Windows registers your double-clicks as two single clicks, you have to click frantically fast to open files. If folders open when you only meant to click twice in a row, the gap is too generous. Changing this setting fixes both problems.
- Open the classic Mouse Properties window through Control Panel (Hardware and Sound, then Mouse).
- Stay on the Buttons tab, which is the one that opens first.
- Locate the Double-click speed section.
- Drag the slider toward Fast if Windows opens folders when you only mean to click once, or toward Slow if you struggle to click fast enough for the system to recognize a double-click.
- Double-click the small folder icon on the right to test your speed. If the folder opens and closes, your setting is correct.
- Click Apply and then OK.
Turn on ClickLock for Easier Dragging
ClickLock lets you highlight or drag items without holding down the mouse button continuously. It helps prevent hand fatigue during heavy file management or text selection. You turn it on in the classic Mouse Properties window in Control Panel.
- Open the classic Mouse Properties window through Control Panel.
- Stay on the Buttons tab.
- Check the box next to Turn on ClickLock.
- Click the Settings button next to the checkbox to choose how long you must hold down the mouse button before the lock engages. A shorter time engages the lock sooner, but you may trigger it by accident.
- Click Apply and then OK.
- Test it. Press and briefly hold an item to grab it. Release the button, move the mouse to your destination, and click once to drop it.
If ClickLock gets in your way, uncheck Turn on ClickLock to go back to normal clicking.
Fine-Tuning DPI vs. Windows Pointer Speed for Precision Control
Hardware DPI controls how many physical dots the mouse sensor reads per inch of movement, while Windows pointer speed scales those dots digitally in software. Many mice let you change DPI with a button on the mouse or with the maker's software. Setting your hardware DPI to a moderate level like 800 or 1600 and keeping the Windows pointer speed slider at the middle notch gives you the most accurate cursor tracking without pixel skipping.
When you push the Windows slider above the middle mark, the operating system starts skipping pixels to cover ground faster, which makes the cursor jump across high-resolution displays. When you drop the slider below the middle mark, Windows interpolates the movement, which can make the cursor feel sluggish or jittery. Set your physical mouse hardware first, then make only small adjustments inside Windows.
What to do next
With your pointer speed configured, you can further personalize your workspace by customizing how your cursor looks and behaves. Check your system options to change your pointer color and size for better visibility, or set up custom keyboard shortcuts to navigate Windows even faster.
Frequently asked questions
How do I change the mouse cursor speed settings?
Open Settings, click Bluetooth & devices, then click Mouse. Drag the Cursor speed slider left to slow the pointer or right to speed it up. The slider has 20 levels, and the default is 10. Changes apply right away, so you can test the pointer as you go. No restart is needed.
How to fix a slow mouse cursor?
Raise the pointer speed. Open Settings, click Bluetooth & devices, then click Mouse, and move the Cursor speed slider to the right. A cursor that still feels slow on a large monitor may need a higher setting, so keep nudging the slider until it reaches the edges quickly.
What is the default mouse pointer speed in 🪟 Windows 11?
The default pointer speed in Windows 11 is 10. On the Cursor speed slider in Settings, that sits near the middle of the 20 levels, so the cursor moves at the standard rate. You can reset it to 10 at any time by dragging the slider back to the middle.
How to change mouse click speed in 🪟 Windows 11?
Windows 11 has no setting called click speed. The closest option is double-click speed, which controls how quickly two clicks must follow each other to count as a double-click. Open Control Panel, search for Mouse, and move the Double-click speed slider on the Buttons tab.
Still have a question?
Answered by AI from this guide. Good questions may be added to this page — please don't include personal details.
Did this guide fix your problem?

About the Author
Richard
Tech Writer, IT Professional
Richard is a writer at Geek Rewind who turns complex IT tasks into clear, step-by-step guides. He draws on years of hands-on experience in system administration and enterprise IT operations, focusing on Windows, Linux and WordPress: the problems people actually run into, and the fixes that work. His server and WordPress guides come from systems he runs himself. Richard builds and maintains the platform behind Geek Rewind, from its Ubuntu servers and Nginx configuration to its custom WordPress plugins. Many new tutorials start with readers' questions, and he's always glad to answer them in the comments.
No comments yet — be the first to share your thoughts!