How to Change Mouse Scroll Speed In Windows 11


Mouse scroll speed in Windows 11 controls how far a page moves each time you turn the mouse wheel. You can set anything from 1 to 100 lines per notch, or make the wheel scroll one whole screen at a time.
The default is 3 lines per notch. That feels slow on a long document and too fast on a page where you want to keep your place. Setting it to suit how you work saves a lot of wheel spinning. A lower number keeps text steady for careful reading. A higher number gets you through big files, long spreadsheets and endless web pages in a few turns.
Change your mouse scroll speed in Windows 11 via Settings. Go to Bluetooth & devices Mouse, then adjust “Lines to scroll at a time” or select “One screen at a time” under the Scrolling section.
Why Change Mouse Scroll Speed?
Everyone likes a different scroll rate. It depends on your mouse, your screen size and what you do all day. A wheel with fine notches feels different from a free-spinning one, and a 27-inch monitor calls for different settings than a small laptop screen. A rate that fits you makes daily navigation feel natural and cuts down on overshooting.
This guide covers three ways to change it: the Settings app , the classic Control Panel and the Registry. It also covers third-party tools and driver updates. The change applies to your user account only, and you can undo it at any time by setting the value back to 3.
What Happens When Done?
The value you choose is the number of lines that pass with each physical tick of the wheel. The relationship is direct. Double the number and the page moves twice as far per notch. Choose 1 and the page barely moves. Choose 100 and a single notch can take you far down the page.
Most apps follow this value, including browsers, Word, Excel and File Explorer . A few apps, such as some games and some design programs, use their own scroll behavior and may ignore it.
Change Scroll Speed Using Windows Settings
The Settings app is the quickest way to change scroll speed. It needs no extra software and works the same on Windows 11 Home and Pro. You adjust how many lines the page moves each time you turn the wheel, and the change takes effect right away.
- Open the Windows Settings app by pressing the Win+I on your keyboard. The Settings window opens with a list of categories on the left.
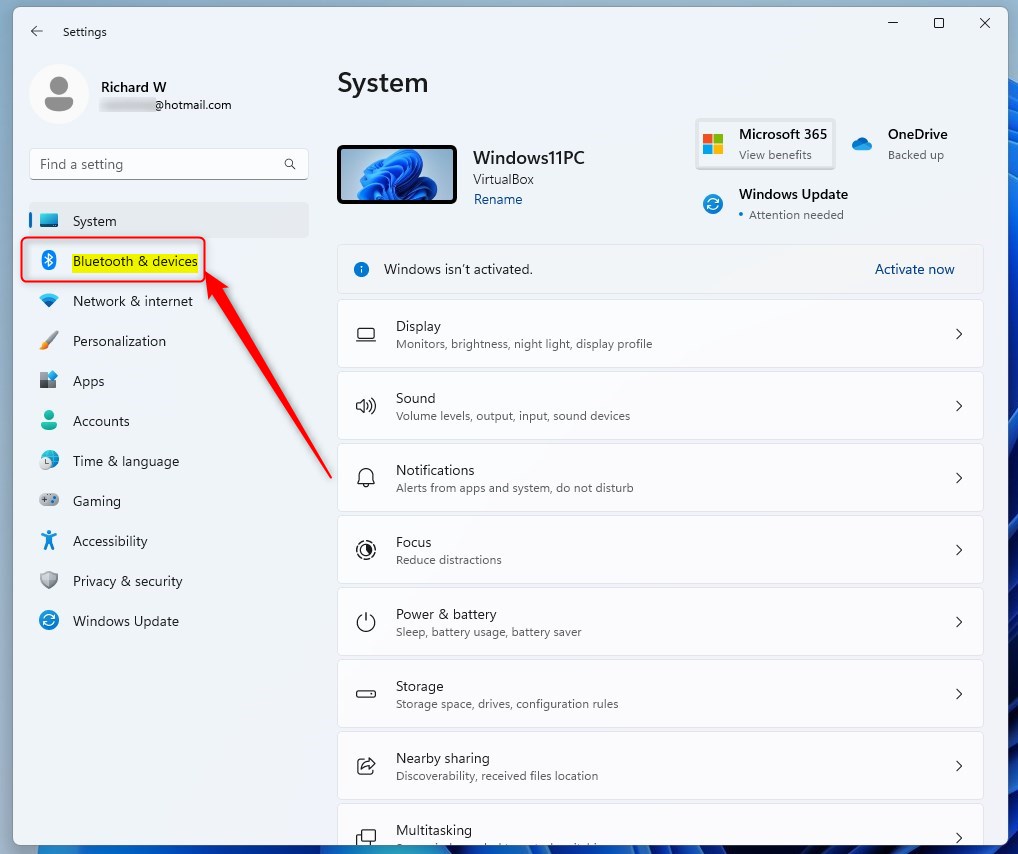
- Click Bluetooth & devices in the left-hand menu. A list of connected devices appears on the right.
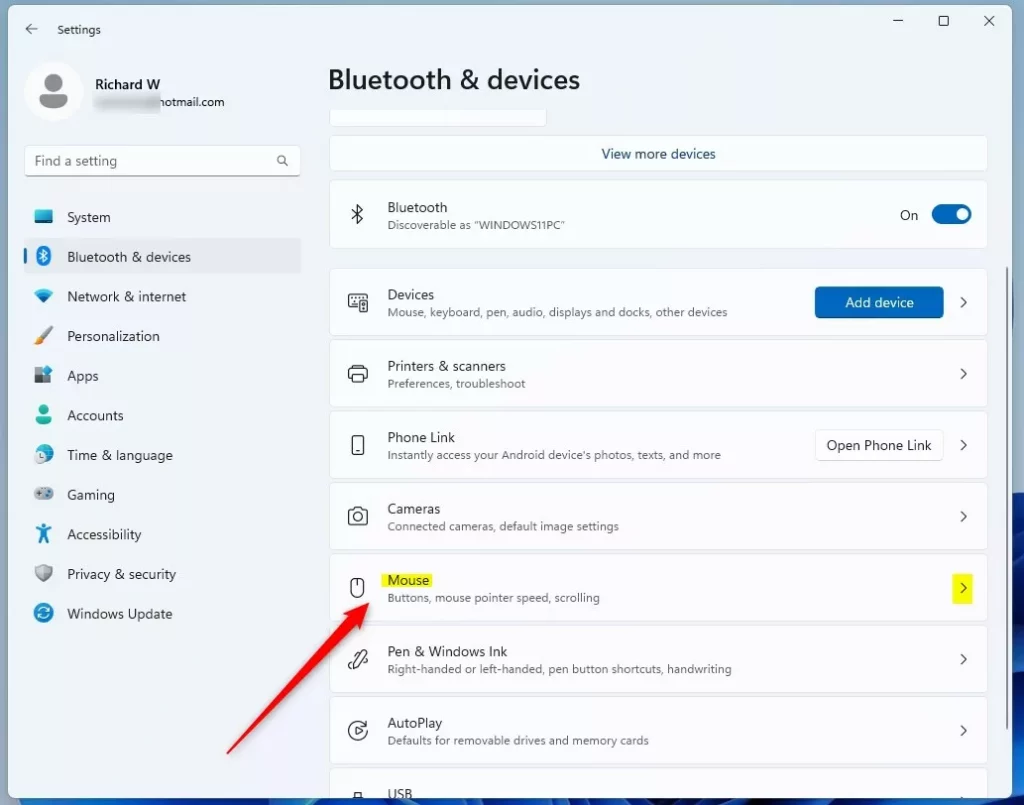
- Click the Mouse tile on the right. The mouse options page opens, with your primary button, pointer speed and scrolling settings.
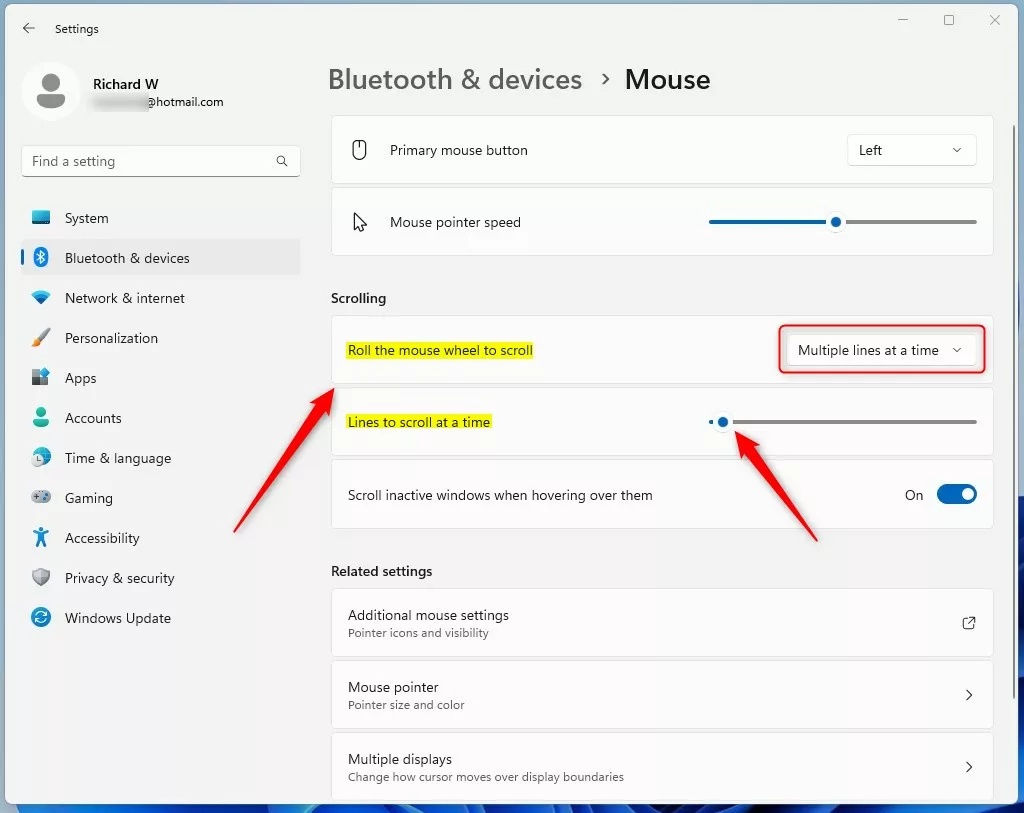
- Find the Scrolling section. Next to Roll the mouse wheel to scroll, make sure the option is set to Multiple lines at a time. The slider only works in this mode.
- Look for Lines to scroll at a time.
- Move the slider to increase or decrease the number of lines. Scroll the wheel over a web page or document to test it. The change is live, so you don’t need to click Save.
If you don’t like the result, drag the slider back to 3 to return to the default.
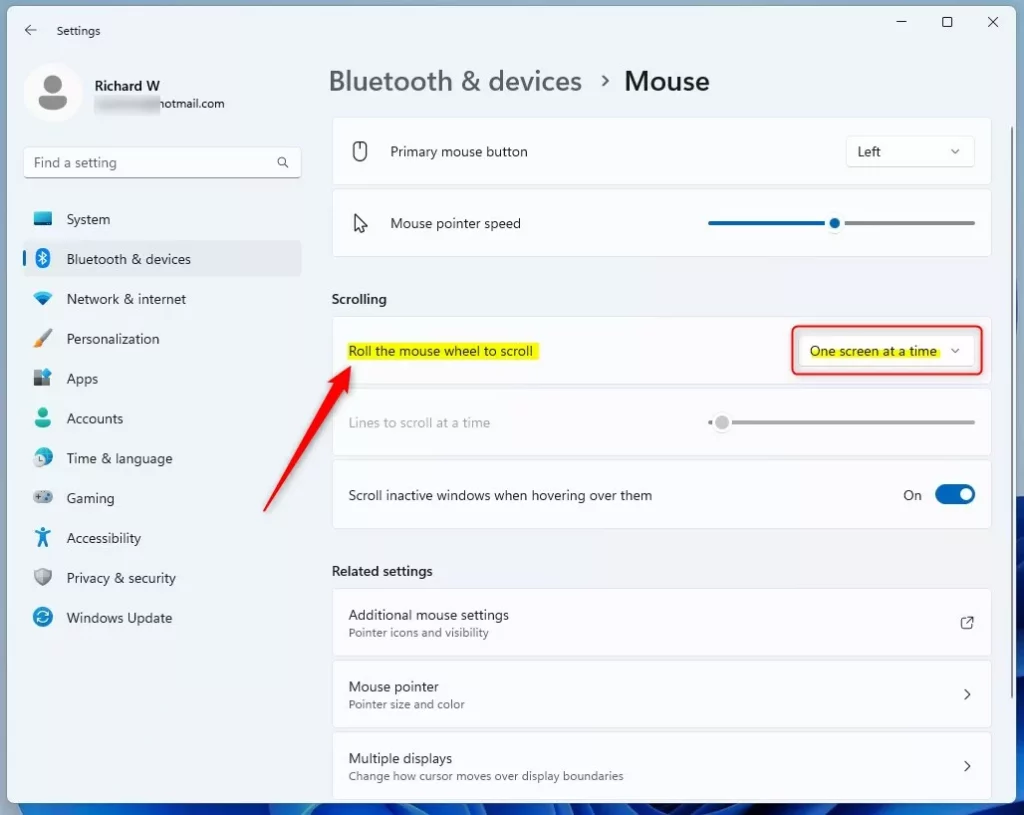
If you want rapid page-skipping, set Roll the mouse wheel to scroll to One screen at a time. Each notch then moves the view by a full screen, much like pressing Page Down. This works well for reading long documents, but it can feel jumpy on web pages. To go back, switch the option to Multiple lines at a time. The slider then comes back with the value you last used.
Change Scroll Speed Using the Control Panel
The classic Control Panel gives you the same control with the older Windows menus. It is useful if you already work there, or if the Settings page does not show the scroll options for your mouse. The change applies to your user account, and it works on both Home and Pro.
- Search for Control Panel in the Start menu and open it.
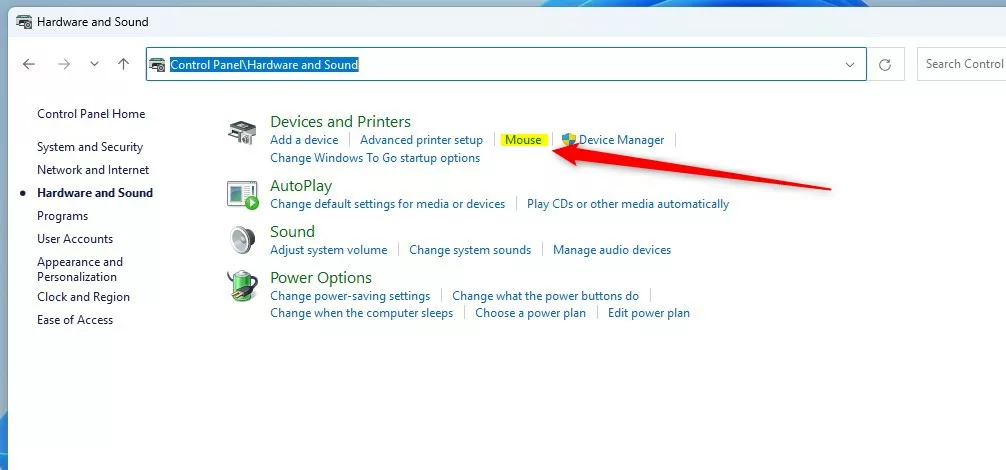
- Go to Hardware and Sound and click Mouse. The Mouse Properties window opens. If your Control Panel is in Large icons or Small icons view, click Mouse directly.
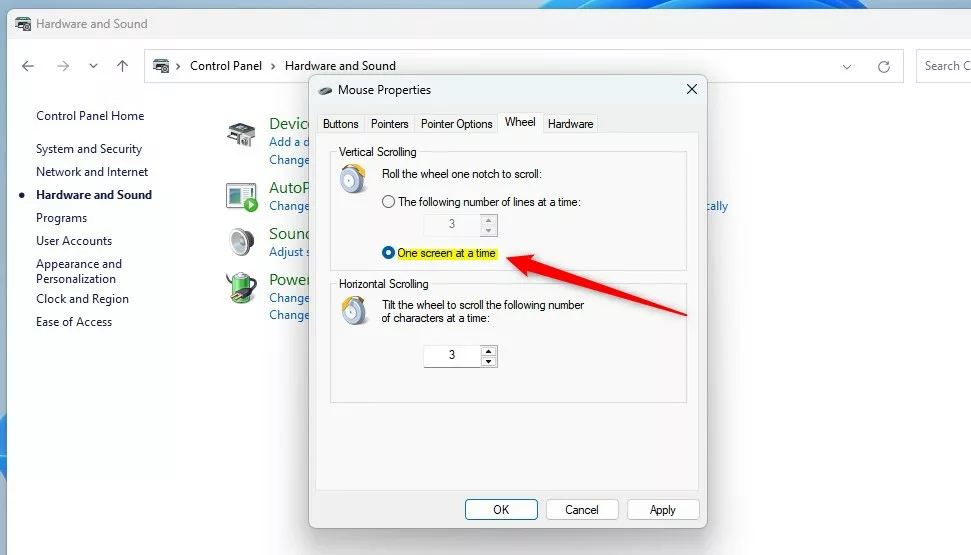
- Click the Wheel tab at the top of the window. The Vertical Scrolling options appear.
- Under Vertical Scrolling, choose The following number of lines at a time and type your number in the box. You can also pick One screen at a time.
If you can’t see a Wheel tab, your mouse is probably using a manufacturer driver, such as Logitech or Razer software. In that case the vendor’s own app controls the wheel, so use the Settings app or that software instead.

Click Apply to commit the new value to the system immediately. Then click OK to close the window. Test the wheel in a browser or document. If it feels wrong, reopen the tab and change the number again.
Advanced Customization: Registry Editor
The Windows Registry is a central database for system settings. Editing it lets you set a custom line count by hand. Use this method if the normal menus are unavailable, for example when a policy or driver hides them, or if you need to script the change. Be careful here: a wrong edit in the Registry can cause problems. Before you start, you can back up the Registry by choosing File Export in the Registry Editor. You only need to change one value, and you don’t need administrator rights because the key belongs to your own account.
- Press the Win+R, type
regedit, and hit Enter. Click Yes if User Account Control asks for permission. The Registry Editor opens. - Navigate to this path:
HKEY_CURRENT_USER\Control Panel\DesktopYou can paste it into the address bar at the top of the editor, or expand the folders in the left pane one by one.
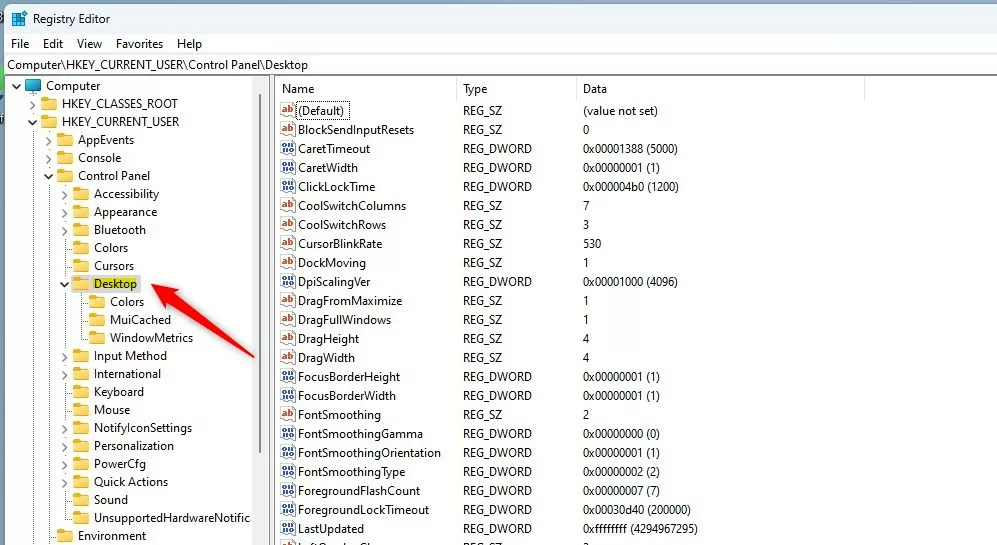
- Find the WheelScrollLines value in the right pane and double-click it. An Edit String box opens.
- Type a number between 1 and 100 in the Value data box. Windows stores this value as text, so just type the digits.
- Click OK and restart your computer to apply the change. Signing out and back in often works too, but a restart is the sure way.
To undo the change, open the same value again and set it back to 3, which is the Windows default. Or import the backup you exported earlier.

Third-Party Software: X-Mouse Button Control
Third-party utilities like X-Mouse Button Control fill the gap when the built-in options fall short. This kind of software lets you create application-specific profiles, so you can have one scroll behavior in your web browser and another in a design program. It can also remap buttons and change how the wheel behaves per app. Download such tools only from the developer's official site, and remember that they run in the background all the time.
Updating Mouse Drivers
Hardware drivers directly influence tracking and wheel response. Outdated mouse software frequently causes erratic page movement, such as jumpy or skipping scrolling. If the wheel acts strangely even after you set a sensible value, update the driver. The official Microsoft mouse driver download page provides current packages for any HID-compliant mouse. HID is a standard that most mice follow. If you use a gaming or high-end mouse, also check the manufacturer's site for its own software.
Frequently Asked Questions
Summary
There are several ways to change wheel behavior in Windows 11, and each one uses a different interface to adjust the same system parameters. For most people, the Settings app is the best choice. Use Control Panel if you prefer the classic dialog, the Registry for manual or scripted changes, and a third-party tool when you need per-app profiles. Whichever you pick, start with a modest change, test it in the apps you use most, and adjust from there.
Have a question about this guide?
Answered by AI from this guide. Good questions may be added to this page — please don't include personal details.
Did this guide fix your problem?

About the Author
Richard
Tech Writer, IT Professional
Richard is a writer at Geek Rewind who turns complex IT tasks into clear, step-by-step guides. He draws on years of hands-on experience in system administration and enterprise IT operations, focusing on Windows, Linux and WordPress: the problems people actually run into, and the fixes that work. His server and WordPress guides come from systems he runs himself. Richard builds and maintains the platform behind Geek Rewind, from its Ubuntu servers and Nginx configuration to its custom WordPress plugins. Many new tutorials start with readers' questions, and he's always glad to answer them in the comments.
No comments yet — be the first to share your thoughts!