How to Change Mouse Wheel Scroll Speed In Windows 11

Mouse scroll speed controls how fast web pages and long documents move across your screen when you spin your wheel. You can change this setting in Windows 11 to move anywhere from 1 to 100 lines at a time, or switch to jumping a full page with a single notch of the wheel.
Adjusting this speed helps you read long PDFs and browse heavy websites without wearing out your fingers. Windows 11 lets you pick between scrolling a few lines or a whole screen at once to match your reading habits. The setting is the same on Home and Pro, and you do not need administrator rights to change it.
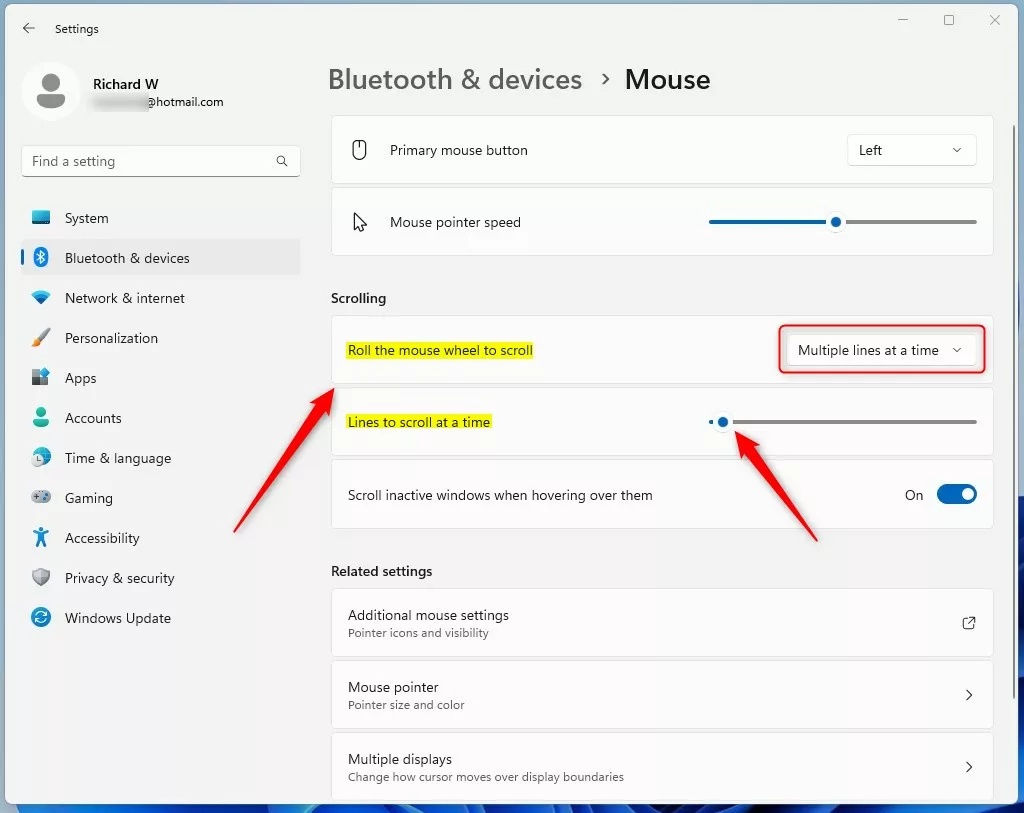
Open Settings, go to Bluetooth & devices, click Mouse, then adjust the Lines to scroll at a time slider under Roll the mouse wheel to scroll to pick between 1 and 100 lines. The change applies immediately without restarting.
Change Mouse Wheel Scroll Speed in Settings
The scroll setting lives on the Mouse page in Settings. Here is how to get there.
- Open Settings by pressing
Win+I. If the shortcut does not work, right-click the Start button and choose Settings instead. The Settings window opens with a list of categories on the left. - Click Bluetooth & devices on the left side. The right side now shows your connected devices.
- Click Mouse on the right side. You should now see the mouse options, including the primary mouse button, pointer speed and the “Roll the mouse wheel to scroll” dropdown.
This link may help if you want a quicker way to reach this page:
Scroll “Multiple lines at a time”
You can change your mouse wheel scroll speed in Windows 11 so you do not have to spin the wheel endlessly to read long documents. With the Mouse page open (Settings, then Bluetooth & devices, then Mouse), choose Multiple lines at a time to pick an exact number between 1 and 100 for your preferred scrolling speed. Windows applies the change as soon as you make it, so there is no Save button and no restart.
- Select Multiple lines at a time from the "Roll the mouse wheel to scroll" dropdown menu. The Lines to scroll at a time slider appears below it. If you do not see the slider, the dropdown is probably set to One screen at a time, which hides it.
- Move the Lines to scroll at a time slider to what you want. You can pick between 1 and 100 lines. The default is 3 lines.
- Test the new speed by scrolling in a browser or a long document. If it feels too fast or too slow, go back and nudge the slider until it feels right. Low numbers (2 to 5) suit careful reading. Higher numbers suit long spreadsheets and pages.
- Close Settings if you like. Your choice is saved automatically.
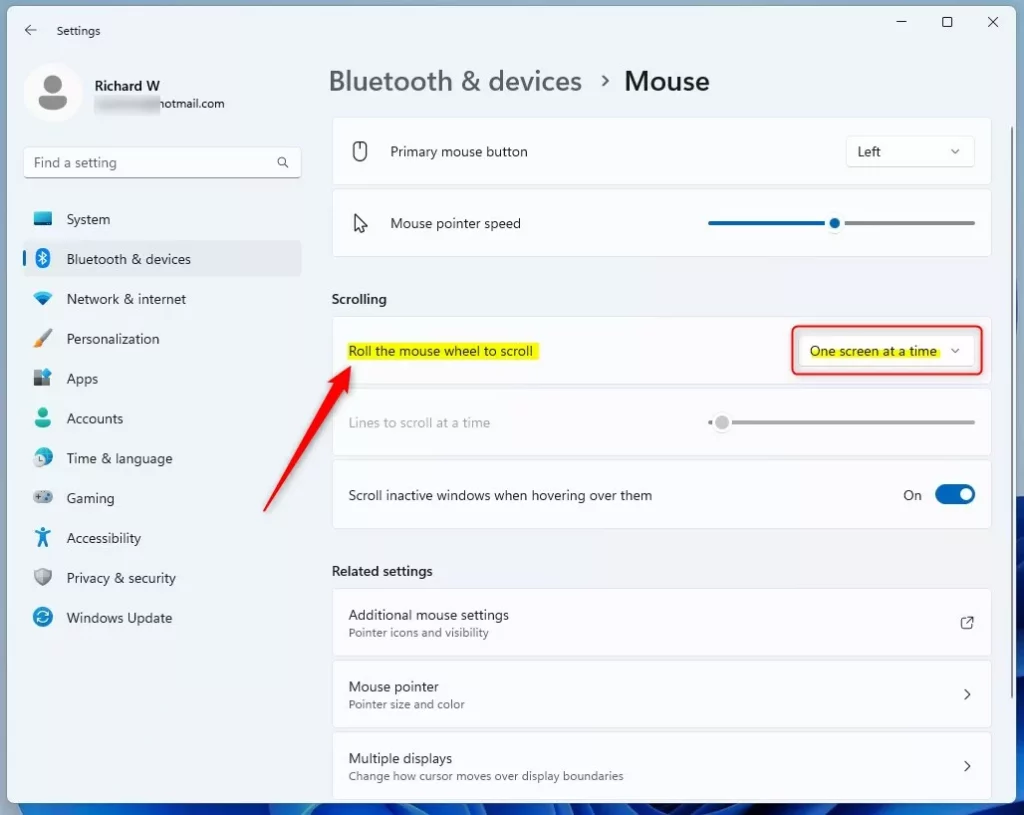
If you would rather jump a full screen with each notch, choose One screen at a time from the same dropdown. To undo any change, return to the same page and set the slider back to 3 lines.
Some apps use their own scrolling rules. Mouse software from the manufacturer can also override what Windows says. This setting applies to the mouse wheel only, so a laptop touchpad has its own scrolling options under Bluetooth & devices, then Touchpad.
Scroll "One screen at a time"
You can set your mouse wheel to jump an entire page with a single notch by choosing the one screen at a time option in Windows 11. Open Settings, go to Bluetooth & devices, select Mouse, and pick One screen at a time from the dropdown menu to fly through large PDF files and long web pages instantly.- Select One screen at a time from the "Roll the mouse wheel to scroll" dropdown menu.
- You can close Settings now if you like.
Option Two
Change Mouse Wheel Scroll Speed in Control Panel
- Open Control Panel and click the Mouse icon.
Scroll "Multiple lines at a time"
This setting defaults to 3 lines.
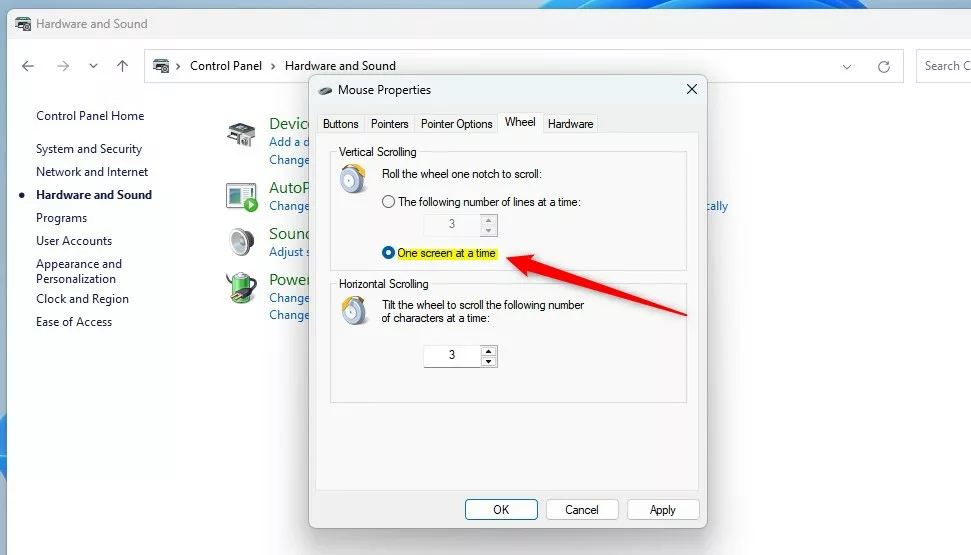
- Click the Wheel tab.
- Select the dot next to The following number of lines at a time under Vertical Scrolling.
- Type or pick a number between 1 and 100 for how many lines you want to scroll. The default is 3 lines.
- You can close Control Panel now if you like.
Scroll "One screen at a time"
- Click the Wheel tab.
- Select the dot next to One screen at a time under Vertical Scrolling.
- You can close Control Panel now if you like.

Option Three
Change Mouse Wheel Scroll Speed in Registry Editor
- ⚠️ Admin privileges required. Open Registry Editor by typing
regedit.exein the search box. - In the left pane, navigate to:
HKEY_CURRENT_USER\Control Panel\Desktop - In the right pane, find WheelScrollLines and double-click it to edit.
Scroll "Multiple lines at a time"
This setting defaults to 3 lines.
- Type a number between 1 and 100 for how many lines you want to scroll. The default is 3 lines.
- Click OK.
- Close Registry Editor.
Scroll "One screen at a time"
- Type
-1as the value. - Click OK.
- Close Registry Editor.
Summary
Mouse wheel scroll speed in Windows 11 changes through the Settings app, Control Panel, or Registry Editor.
Frequently asked questions
Why is my mouse wheel Scrolling so fast?
Windows sets wheel scrolling to a fixed number of lines per notch, and the default is three lines. Mouse software or a changed setting can raise that number, which makes scrolling feel fast. Also, a high-resolution mouse or a faster wheel setting can make it feel quick. Check the Mouse page in Settings and your mouse maker's software to lower the number of lines per notch.
What is Ctrl+Scroll?
Ctrl+Scroll is holding the Ctrl key while you roll the mouse wheel. Instead of moving the page, it zooms the view in or out. Roll up to zoom in and roll down to zoom out. It works in most web browsers, Microsoft Word, and Microsoft Edge, though some apps ignore it.
How to change mouse scroll direction in 🪟 Windows 10?
Windows 10 has no built-in switch in Settings to reverse wheel direction. Use your mouse maker's software, such as Logitech Options+ or Razer Synapse, and look for an option labeled Scroll direction or Reverse scrolling. If that software is missing, download it from the mouse maker's website.
How to make Mouse speed faster in 🪟 Windows 11?
To make the mouse pointer move faster in Windows 11, open Settings, go to Bluetooth & devices, then Mouse, and drag the pointer speed slider to the right. For more control, click Additional mouse settings, open the Pointer Options tab, and adjust Select a pointer speed. Enhance pointer precision adds acceleration.
Still have a question?
Answered by AI from this guide. Good questions may be added to this page — please don't include personal details.
Did this guide fix your problem?

About the Author
Richard
Tech Writer, IT Professional
Richard is a writer at Geek Rewind who turns complex IT tasks into clear, step-by-step guides. He draws on years of hands-on experience in system administration and enterprise IT operations, focusing on Windows, Linux and WordPress: the problems people actually run into, and the fixes that work. His server and WordPress guides come from systems he runs himself. Richard builds and maintains the platform behind Geek Rewind, from its Ubuntu servers and Nginx configuration to its custom WordPress plugins. Many new tutorials start with readers' questions, and he's always glad to answer them in the comments.
No comments yet — be the first to share your thoughts!