How to Add or Remove Mouse Keys Icon on Windows 11 Taskbar

You can add or remove the Mouse Keys icon from the Windows 11 taskbar system tray (the area near the clock where background apps often show icons) to easily manage cursor control with your numeric keypad.
Mouse Keys is a Windows accessibility feature that lets you move your mouse pointer and click using your keyboard’s numeric keypad. This is especially useful if you find it difficult to use a traditional mouse.
The Mouse Keys icon appears on the Windows 11 taskbar automatically when Mouse Keys is turned on. Typically, Num Lock must also be on for the icon to show. Users can choose to display or hide this shortcut.
This guide shows you how to control the Mouse Keys icon, giving you a quick visual cue for its status.
You can show or hide the Mouse Keys icon via Settings. Open Settings, go to Accessibility > Mouse, and toggle “Show the mouse keys icon on the taskbar.” Alternatively, use the taskbar’s hidden icon menu under Personalization > Taskbar > Other system tray icons.
Option 1Use Settings
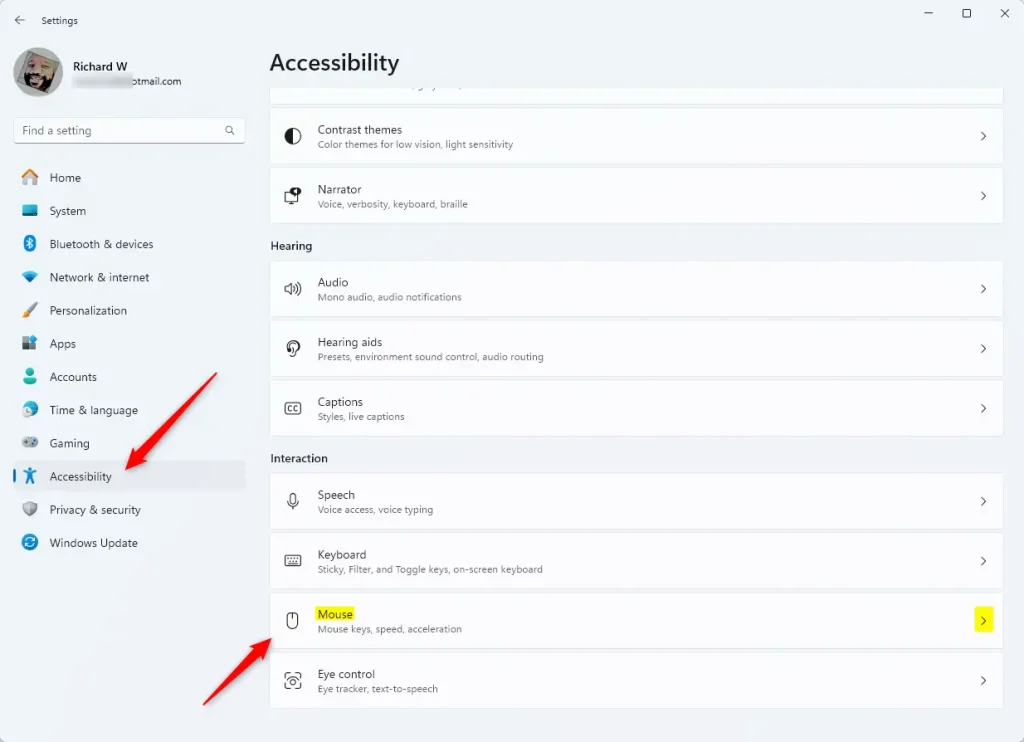
You can easily add or remove the Mouse Keys icon on your Windows 11 taskbar using the Settings app. Simply go to Accessibility, then Mouse, and check or uncheck the box to show the icon on your taskbar.- Open Settings by pressing
Win+I. - Click Accessibility on the left side, then click Mouse on the right side.
- Check the box next to Show the mouse keys icon on the taskbar to turn it on. Uncheck the box to turn it off.
- Note: This setting will be grayed out if Mouse Keys is turned off.
- You can close Settings now.
Option 2Use Control Panel
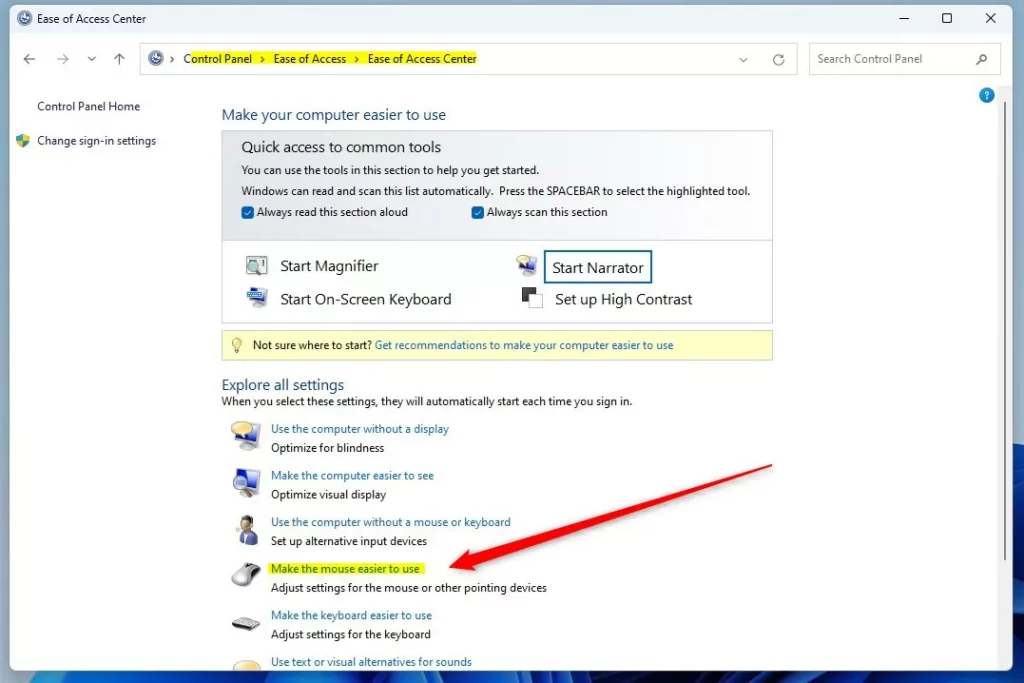
You can also manage the Mouse Keys icon using the Control Panel for more detailed options. Open the Control Panel, head to the Ease of Access Center, and then click ‘Make the mouse easier to use’ to find the Mouse Keys settings.
- Open Control Panel (in icons view) and click the Ease of Access Center icon.
- Click Make the mouse easier to use.
- Click Set up Mouse Keys under “Control the mouse with the keyboard”.
- Under Other settings, check the box next to Display the Mouse Keys icon on the taskbar to turn it on. Uncheck to turn it off. Then click OK.
- Click OK again.
- You can close the Ease of Access Center now.

Option 3Use the Taskbar Hidden Icon Menu
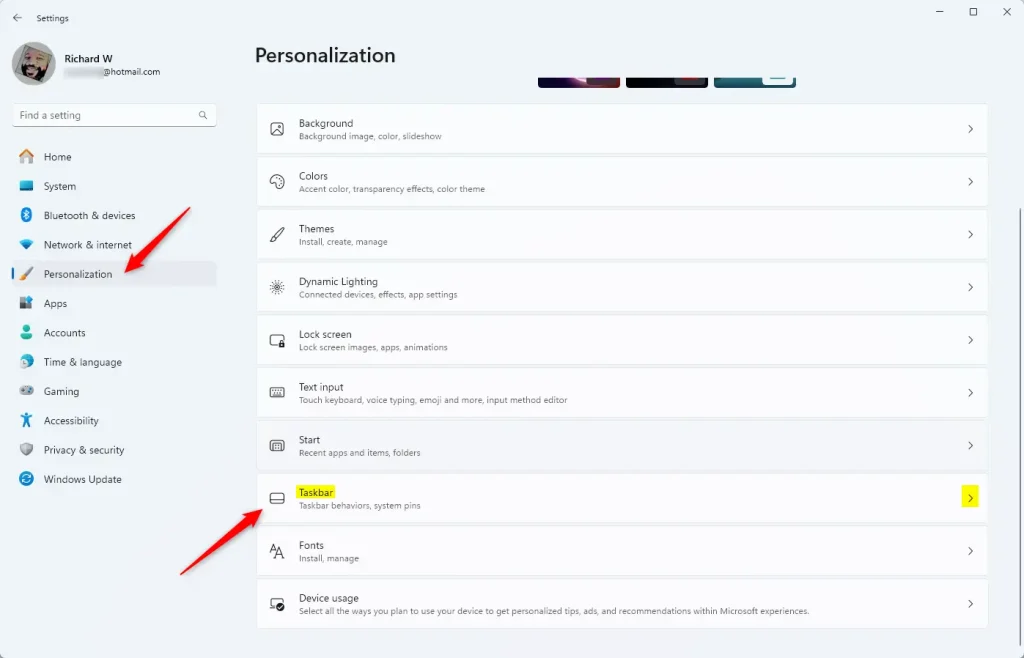
If you want to quickly show or hide the Mouse Keys icon from the system tray on your taskbar, this method is for you. Go to Settings, then Personalization, and Taskbar, and expand ‘Other system tray icons’ to find the Mouse Keys toggle.
- Open Settings by pressing
Win+I. - Click Personalization on the left side, then click Taskbar on the right side.
- Click Other system tray icons to expand that section.
- Turn On or Off the toggle next to Mouse Keys for what you want.
- You can close Settings now.
Summary
Mouse Keys lets you use your keyboard’s number pad to control your mouse cursor, and Windows 11 makes it simple to show or hide its icon on your taskbar. You can use the Settings app, the Control Panel, or Taskbar settings to manage the Mouse Keys icon.
- Settings app: Go to Accessibility > Mouse and toggle the mouse keys icon setting.
- Control Panel: Use Ease of Access Center > Set up Mouse Keys and check the display option.
- Taskbar settings: Use Personalization > Taskbar > Other system tray icons to manage the icon.
Pick the method that works best for you. All three ways work equally well in Windows 11.
How to enable Mouse Keys in 🪟 Windows 11?
You can turn on Mouse Keys in Windows 11 by opening the Settings app and going to Accessibility, then Mouse.
How do I turn off Mouse Keys in 🪟 Windows 11?
You can turn off Mouse Keys by navigating to Settings > Accessibility > Mouse and toggling the Mouse Keys switch to Off. Alternatively, if you have the shortcut enabled, you can quickly disable the feature by pressing the left Alt+← Shift + Num Lock keys simultaneously on your keyboard.
What are the 4 cursor control keys?
When using Mouse Keys on a standard numeric keypad, the primary directional keys are 8 for moving the pointer up, 2 for moving it down, 4 for moving it left, and 6 for moving it right. You can also use keys 7, 9, 1, and 3 for diagonal movement across the screen.
Is there a keyboard shortcut to enable Mouse Keys?
Yes, there’s a keyboard shortcut to quickly turn Mouse Keys on or off: press left Alt, left Shift, and Num Lock all at the same time.
Was this guide helpful?

About the Author
Richard
Tech Writer, IT Professional
Richard, a writer for Geek Rewind, is a tech enthusiast who loves breaking down complex IT topics into simple, easy-to-understand ideas. With years of hands-on experience in system administration and enterprise IT operations, he’s developed a knack for offering practical tips and solutions. Richard aims to make technology more accessible and actionable. He's deeply committed to the Geek Rewind community, always ready to answer questions and engage in discussions.


No comments yet — be the first to share your thoughts!