How to Hide or Show System Tray Icons in the Taskbar Overflow Menu on Windows 11


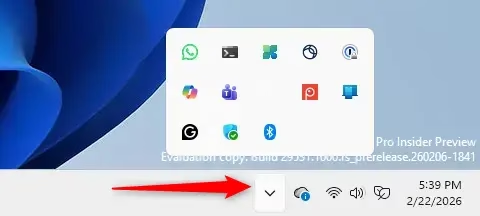
The taskbar overflow menu on Windows 11 is the small upward-pointing arrow (^) in the bottom-right corner of the screen. Clicking it opens a flyout holding the system tray icons that don’t fit on the taskbar . It keeps the taskbar from getting crowded when many background apps are running.
You can manage these icons in a few clicks. Drag the tools you use most onto the main taskbar, and tuck the less important ones into the overflow flyout. There are three ways to do it: dragging, the Settings app, and the registry. Dragging and Settings work on both Home and Pro editions.
One limit applies to all of them. Core system icons, such as the clock and the network, volume and battery icons, are handled by Windows itself. They usually can’t be moved into the overflow menu the way an app icon can.
Click the up arrow (^) in the bottom-right corner of the taskbar to open the overflow menu, then drag icons up into it to hide them or down onto the taskbar to show them. In Settings, go to Personalization Taskbar Other system tray icons and toggle each app’s switch On to show or Off to hide.
How to Move Icons Using Drag and Drop
Hide Icons (Move from Taskbar to Overflow Menu)
This is the quickest way to hide an icon, and you can use it on any icon that is allowed to move.
- Click and hold the icon you want to hide on the taskbar .
- Drag it upward, away from the taskbar . Keep holding the mouse button.
- Drop it into the overflow menu area above the taskbar . The overflow flyout opens as you hover there. Release the button once the icon is over it.
To check, click the up arrow (^). If the icon snaps back to its old spot, it is probably one of the fixed system icons. Use the Settings method below for that icon instead.
Show Icons (Move from Overflow Menu to Taskbar)
Reverse the process to bring an icon back onto the taskbar .
- Click the little up arrow (^) on the taskbar to open the overflow menu. The icons currently hidden appear in a small flyout.
- Click and hold the icon you want to show on the taskbar.
- Drag it down onto the taskbar and release it.
The icon should now sit next to the other tray icons and no longer appear in the flyout. To undo the change, drag it back up into the overflow menu.
Change Which Icons Appear Using Settings
Use Settings if dragging doesn't work, or if you want to see every app icon in one list.
- Press
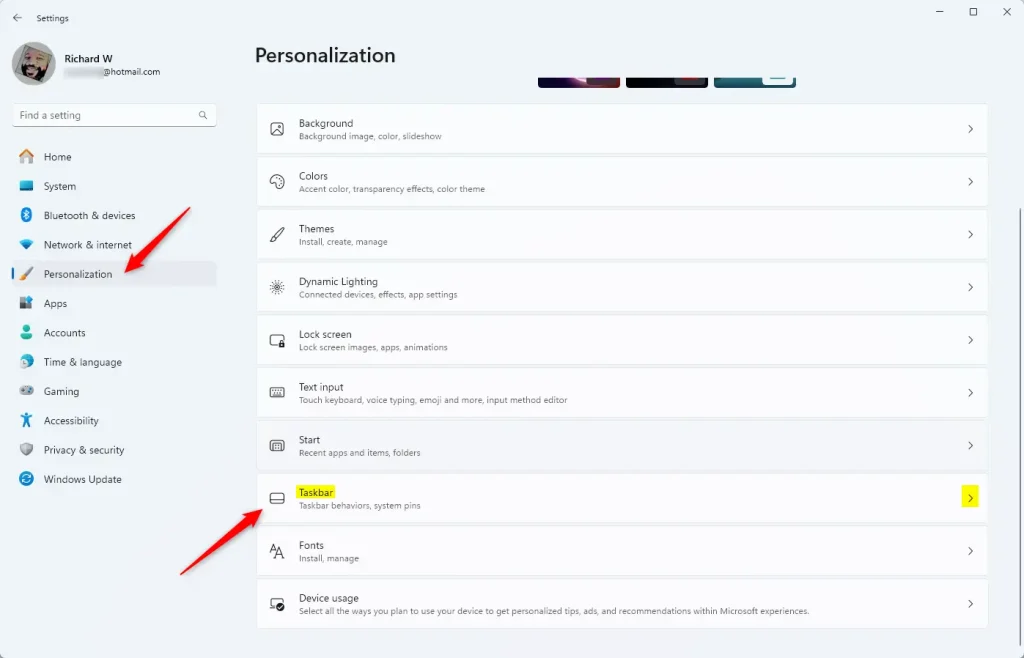
Win + Ikeys to open Settings. - On the left, click Personalization, then select Taskbar on the right.
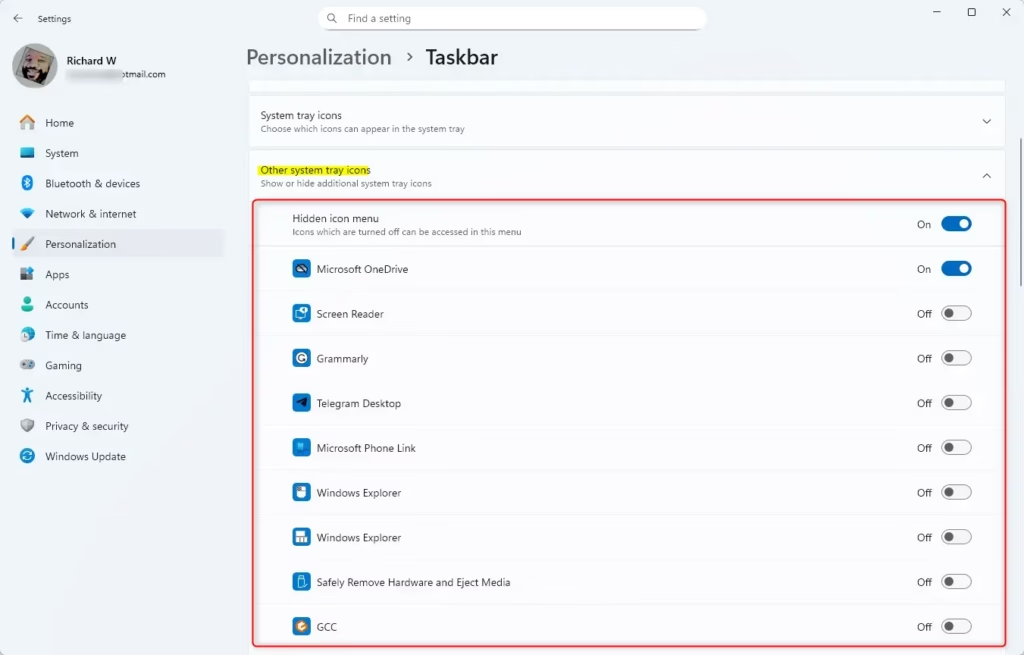
- Click on Other system tray icons to expand the list. You should see one row per app, each with its own switch. An app only appears here after it has run and put an icon in the tray at least once.
- Turn the switch On to show an icon on the taskbar, or Off to hide it in the overflow menu.
The change takes effect straight away, and no restart is needed. To undo it, flip the same switch back.
The Settings app gives you control over the overflow menu and lets you choose exactly which app icons stay visible. Your screen stays clean, and the important app icons stay easy to reach.
Note for Advanced Users
Windows saves each icon's preference in the system registry. Specific binary values inside these keys dictate whether an icon stays hidden or remains visible.
Settings is safer. If you do edit the registry, export the key first so you can restore it. Changes made here may not show up until you sign out and back in, or restart Windows Explorer.
HKEY_CURRENT_USER\Control Panel\NotifyIconSettings\App ID\IsPromoted0means the icon is hidden (in overflow menu)1means the icon is shown on the taskbar
About "Always Show All Icons and Notifications"
The "Always show all icons and notifications" option behaves differently in Windows 11 than in older versions. Microsoft removed the direct master toggle from the main settings menu. To force every background app icon to stay visible on the taskbar at all times, you now need a special command in the Run dialog box.
Follow these steps:
- Press
Win + Rto open Run. - Type or paste
shell:::{05d7b0f4-2121-4eff-bf6b-ed3f69b894d9}and press Enter. This opens the classic notification area icons window. - In the window that opens, check or uncheck Always show all icons and notifications on the taskbar, then click OK.
If you check the box, the overflow menu will usually empty out because every icon moves onto the taskbar. If the taskbar then feels too crowded, run the same command again and uncheck the box. If the window doesn't open on your build, use the per-icon switches in Settings instead.
Summary
The taskbar overflow menu in Windows 11 keeps your screen tidy by hiding less frequently used app icons behind a small flyout arrow. You can easily manage these icons and customize your setup using either the Windows Settings app or quick drag-and-drop actions directly on the taskbar.- The taskbar corner overflow menu holds hidden app icons and notifications.
- You can customize which icons show on the taskbar by dragging icons or using Settings.
- Settings are found under Settings Personalization Taskbar Other system tray icons.
- Advanced users can tweak registry settings for more control.
- The "Always show all icons" option is outdated and may not work as expected.
- By following these simple steps, you can keep your taskbar clean and only show the icons you need.
Have a question about this guide?
Answered by AI from this guide. Good questions may be added to this page — please don't include personal details.
Did this guide fix your problem?

About the Author
Richard
Tech Writer, IT Professional
Richard is a writer at Geek Rewind who turns complex IT tasks into clear, step-by-step guides. He draws on years of hands-on experience in system administration and enterprise IT operations, focusing on Windows, Linux and WordPress: the problems people actually run into, and the fixes that work. His server and WordPress guides come from systems he runs himself. Richard builds and maintains the platform behind Geek Rewind, from its Ubuntu servers and Nginx configuration to its custom WordPress plugins. Many new tutorials start with readers' questions, and he's always glad to answer them in the comments.
No comments yet — be the first to share your thoughts!