How to Add the Safely Remove Hardware and Eject Media Icon to the System Tray in Windows 11

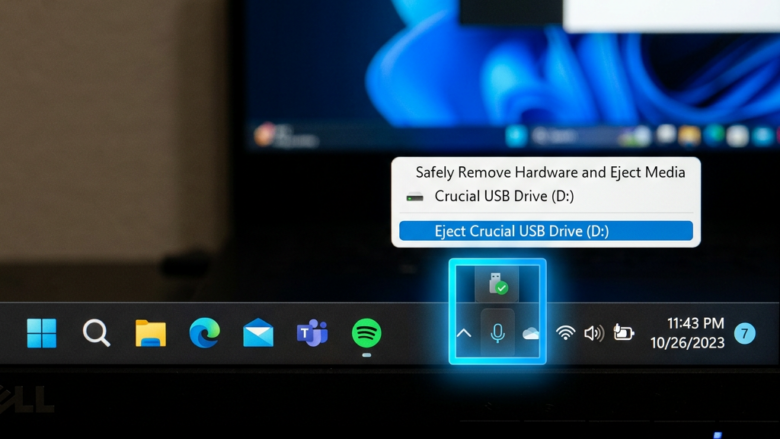
The Safely Remove Hardware and Eject Media icon closes Windows’ background connections to a USB drive or external hard drive before you unplug it. In Windows 11 it sits in the system tray next to the clock while a removable device is connected.
When the icon is missing, you have to guess whether it is safe to unplug, and a wrong guess can corrupt files. The fix takes under a minute. You turn the icon on in the Taskbar settings, and Windows then shows it whenever a removable device is connected. No restart is needed.
Right-click the taskbar , select Taskbar settings, then under Notification area , click Other system tray icons and toggle “Windows Explorer : Safely Remove Hardware and Eject Media” to On. The icon should then appear in your system tray .
Why You Need to Safely Remove Hardware
Windows sometimes holds on to data in memory and writes it to the drive a little later, because that makes copying and saving feel faster. If you pull the drive out during that window, the last files you saved can be incomplete or damaged. In the worst case the drive’s file system gets corrupted and Windows asks you to repair it the next time you plug it in.
For most external drives, Windows 11 uses a “quick removal” policy by default, which cuts that risk. It does not remove it. Large copies, drives in use by an app, and drives set to “Better performance” are still at risk. Ejecting first costs you two seconds.
Bringing Back the “Safely Remove Hardware” Icon
The "Safely Remove Hardware and Eject Media" icon disappears from the Windows 11 system tray (the area near the clock) when no removable device is connected. That is normal. The steps below make sure the icon is allowed to show whenever a device is plugged in.
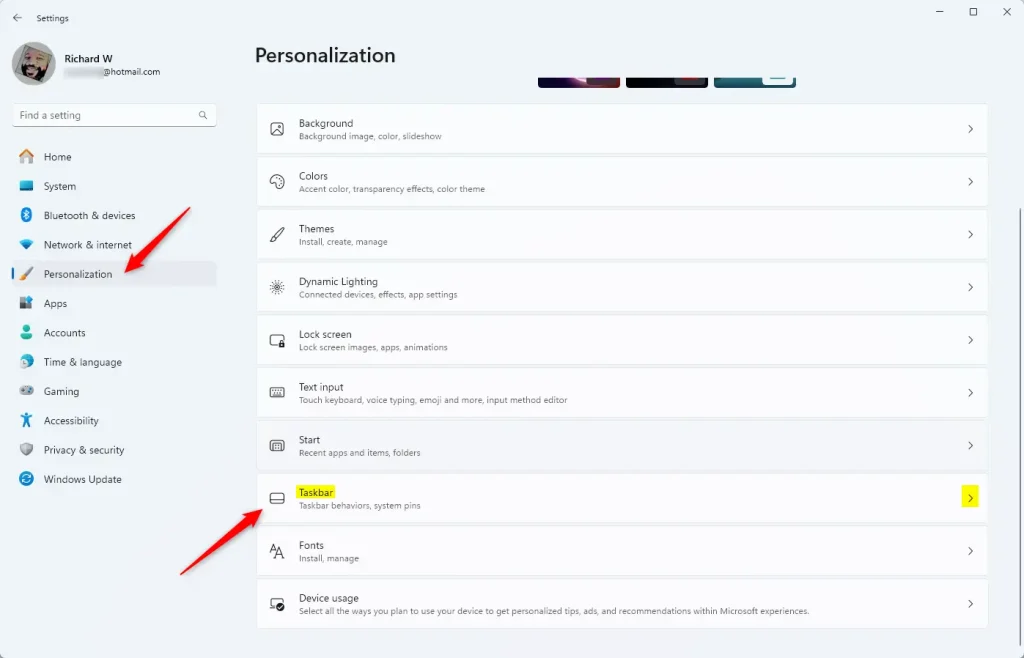
Step 1Open Taskbar Settings
- Right-click an empty spot on your taskbar .
- Select Taskbar settings from the menu. The Settings app opens on the Taskbar page.
If right-clicking does nothing, click an empty area, not an app icon or the clock.
Step 2Find System Tray Options
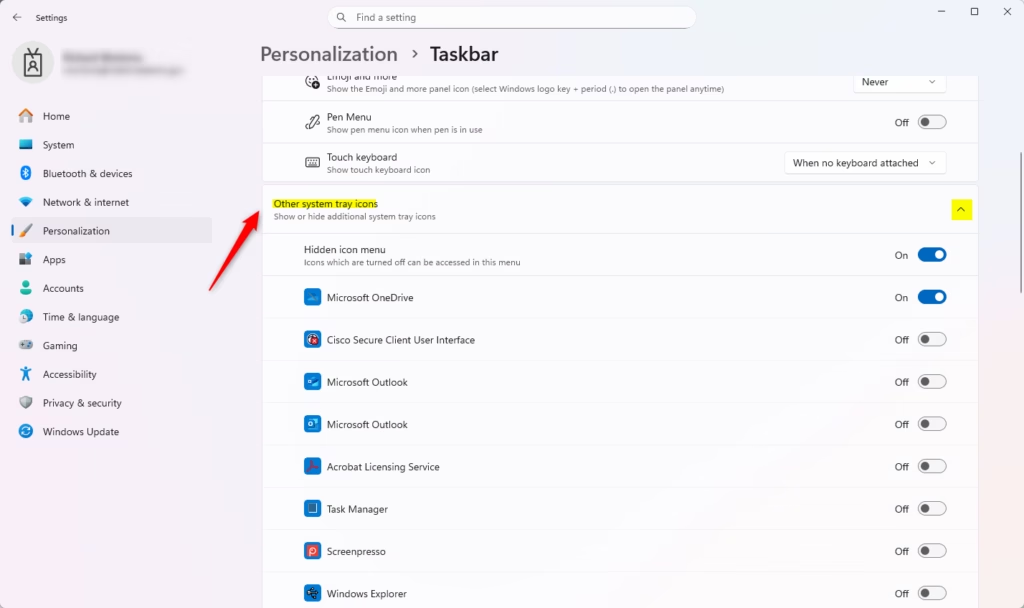
- In the Taskbar settings window, scroll down to the Notification area section. On some builds it is called System tray icons.
- Click Other system tray icons to expand it. You should now see a list of icons with an On/Off switch beside each one.
Step 3Turn On the Safely Remove Hardware Icon
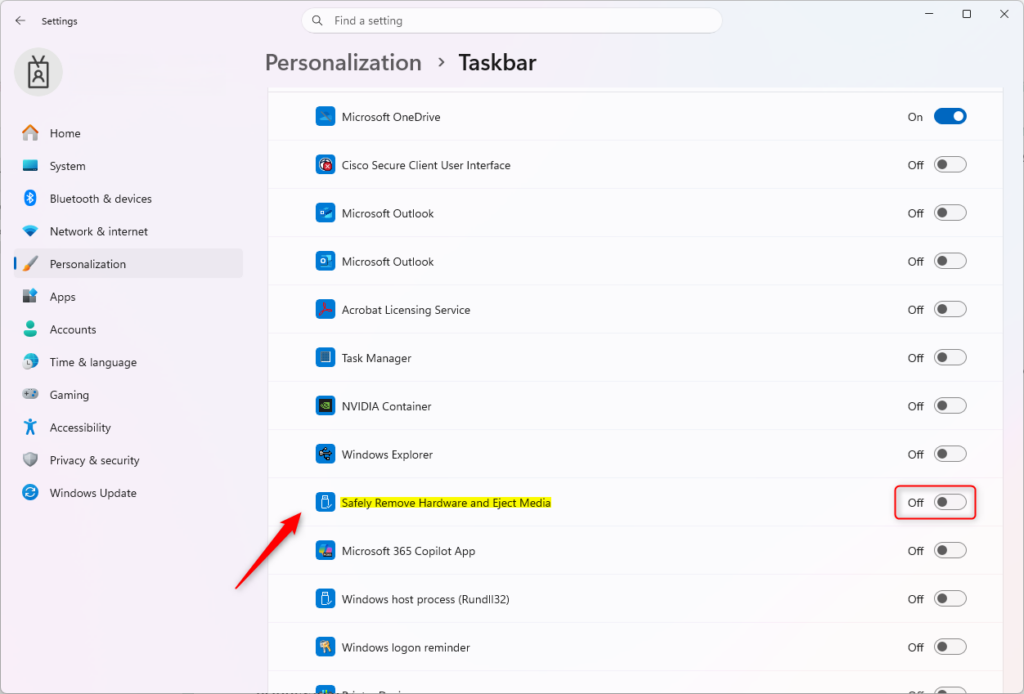
- Find the Safely Remove Hardware and Eject Media entry in the list. On some Windows 11 builds this switch is listed under the name Windows Explorer, with the Safely Remove Hardware description underneath. It is the same switch.
- Set the switch to On.
Settings saves the change as soon as you flip the switch. There is no Apply or OK button. To undo it later, come back to Settings Personalization Taskbar and set the switch to Off.
The "Safely Remove Hardware and Eject Media" icon now appears in the system tray whenever a removable device is connected. If you don't see it, click the small up arrow (Show hidden icons) next to the tray. Windows may have put it in the overflow flyout. Drag the icon from there onto the taskbar if you want it always visible.
To use it, click the icon, then click the device you want to remove. Wait for the "Safe to remove hardware" message before you unplug the drive. If Windows says the device is still in use, close any open files or folders on that drive, or any app that was using it, and try again.
When the Icon Still Doesn't Show Up
If you turned the setting on and the icon is still missing, the usual cause is that no removable drive is connected. Windows hides the icon when there is nothing to eject. Plug a USB flash drive into an open port, wait a few seconds, and check the system tray again.
- No Removable Device Connected: Windows hides the icon when it doesn't detect a device that needs safe removal. Plug in a USB drive and see if the icon appears. Check the hidden icons arrow too.
- Device Not Recognized: Your PC might not be recognizing the connected device properly. If the icon still won't show up, try a different USB port or cable first. Then check for a driver issue, and test the device on another computer to rule out a fault in the device itself.
As a fallback, you can open This PC in File Explorer, right-click the drive, and choose Eject. It does the same job as the tray icon.
Reference:
https://support.microsoft.com/en-US/Windows/Hardware/safely-remove-hardware-in-windows
Summary
Getting the "Safely Remove Hardware and Eject Media" icon back is a common need, and it only takes a few settings. Once it is on, the icon is there whenever you need to disconnect external storage, which protects your data. Make a habit of using it before you pull any drive.
Did this guide fix your problem?

About the Author
Richard
Tech Writer, IT Professional
Richard is a writer at Geek Rewind who turns complex IT tasks into clear, step-by-step guides. He draws on years of hands-on experience in system administration and enterprise IT operations, focusing on Windows, Linux and WordPress: the problems people actually run into, and the fixes that work. His server and WordPress guides come from systems he runs himself. Richard builds and maintains the platform behind Geek Rewind, from its Ubuntu servers and Nginx configuration to its custom WordPress plugins. Many new tutorials start with readers' questions, and he's always glad to answer them in the comments.
No comments yet — be the first to share your thoughts!