Restore the Default Windows Lock Screen in Windows 11

The Windows 11 lock screen is the picture and clock you see before you sign in. To bring back the default one, set it to Windows Spotlight in Settings Personalization Lock screen. Windows Spotlight downloads new photos from Microsoft and rotates them, and a fresh Windows 11 install uses it by default.
The Settings steps do not need administrator rights. Only the registry fix for a disabled lock screen does.
If Windows Spotlight is missing or greyed out, or the lock screen no longer shows at all, the sections below cover the likely causes.
To restore the default Windows 11 lock screen, open Settings , go to Personalization Lock screen, and set Personalize your lock screen to Windows Spotlight. Spotlight rotates Microsoft photos and is what a fresh install uses. No administrator rights are needed. Press Win+L afterwards to check the result.
What the default 🪟 Windows 11 lock screen is
The lock screen is the full-screen image you see when the PC starts, wakes from sleep, or locks with Win+L. Three things make up the default setup:
- Background: Windows Spotlight, which shows a changing set of photos and can add tips and suggestions.
- Lock screen status: a small widget showing detailed information from one app. Weather is the usual default on a fresh install.
- Sign-in screen background: the same picture shows behind the sign-in box after you dismiss the lock screen.
Changing the background to Picture or Slideshow does not delete anything. Spotlight stays available, so you can switch back at any time.
Restore the default lock screen from Settings
This method puts the background back to Windows Spotlight. It works on Windows 11 Home and Pro, and it needs no administrator rights. Wording can differ slightly between Windows 11 builds, but the layout stays the same.
- Press Win+I to open Settings.

Windows 11 Start menu with Settings gear icon highlighted. - Select Personalization in the left pane. The Personalization page opens with a list of options such as Background, Colors, and Themes.
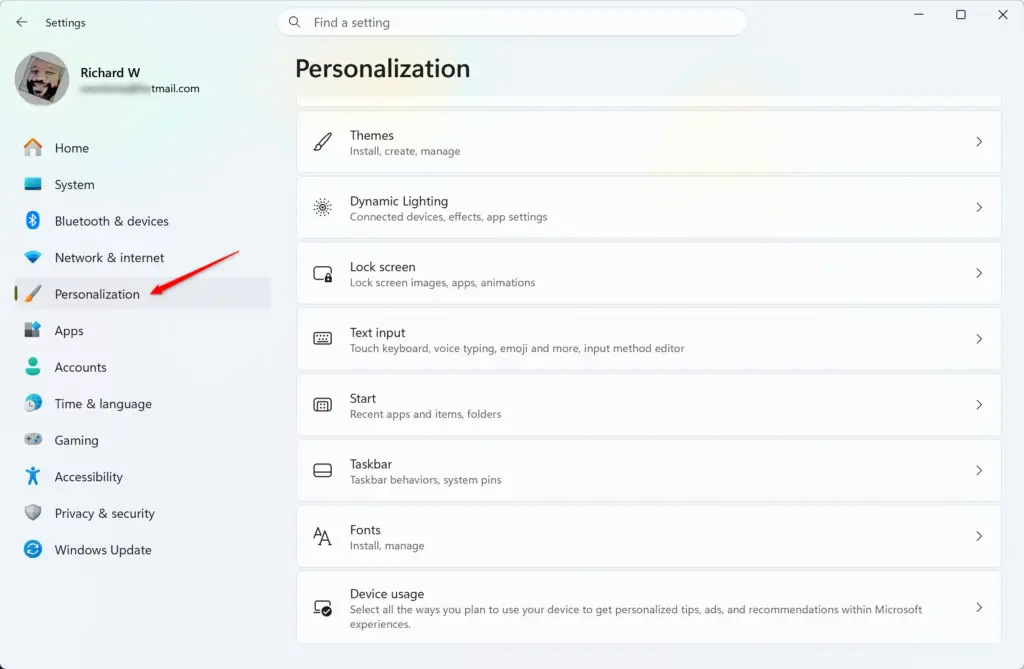
Settings › Personalization - Select Lock screen. The page shows a preview of your current lock screen at the top, with a Personalize your lock screen dropdown below it.
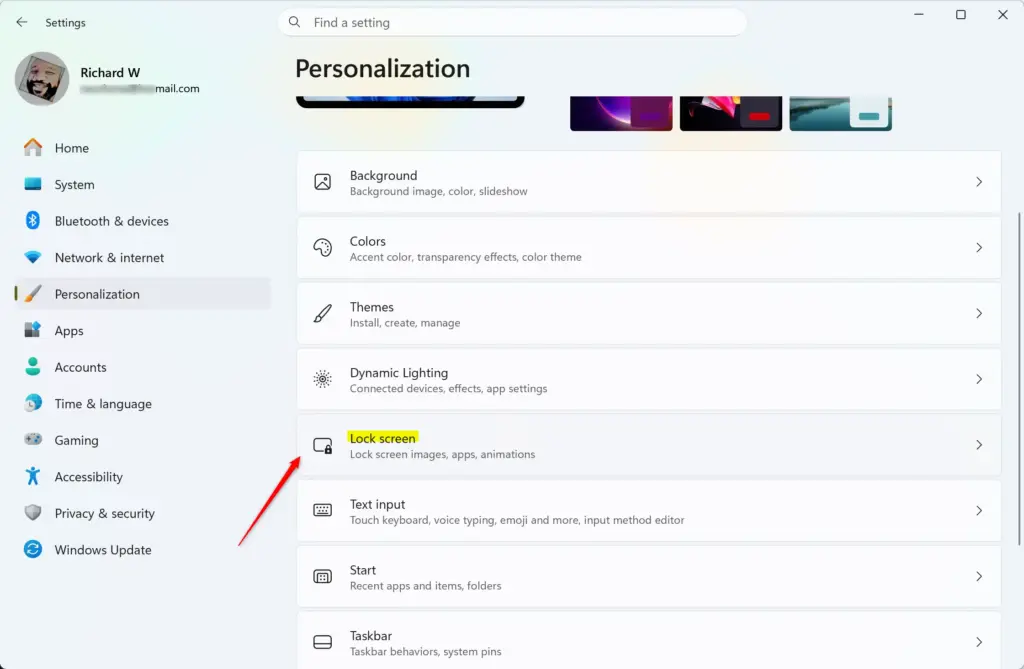
Settings › Personalization › Lock screen - Open the Personalize your lock screen dropdown.
- Select Windows Spotlight. The preview changes to a Spotlight photo. Windows may need a few seconds to download the first image, so the preview can stay blank briefly.
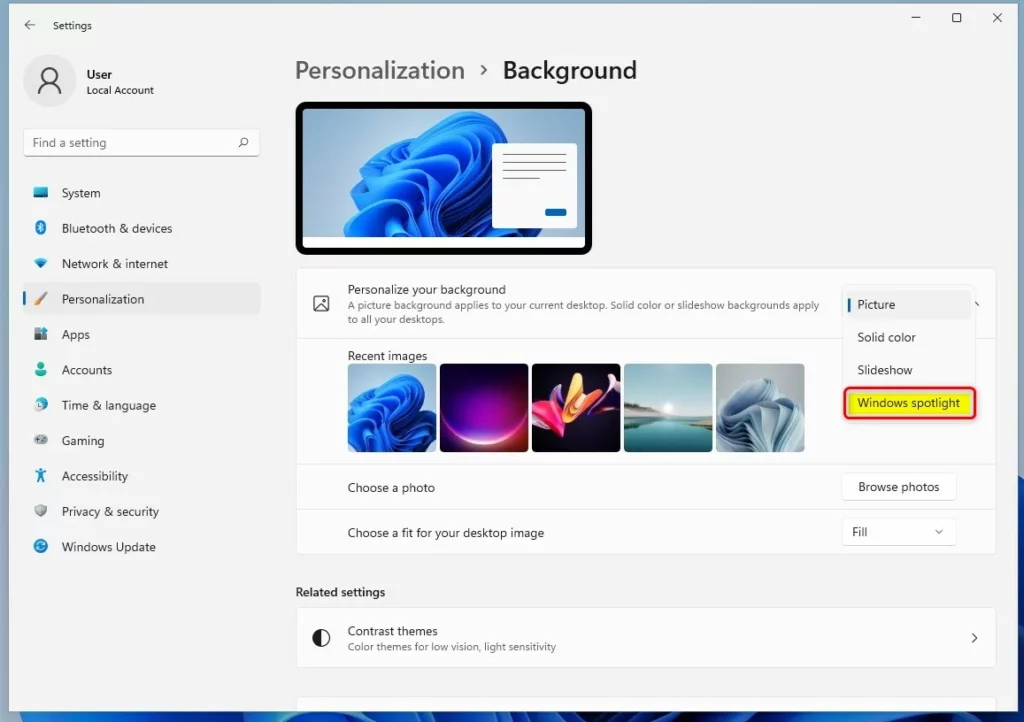
windows 11 personalization background windows spotlight
If the dropdown lists only Picture and Slideshow, or the whole page is locked, go to the "If Windows Spotlight is missing or greyed out" section below.
Reset the lock screen status and sign-in screen options
Two more settings on the same page are part of the default look. Check them if the lock screen still looks different from what you remember.
- On the Lock screen page, find the Lock screen status dropdown. This controls which app shows detailed information, such as the weather, on the lock screen.
- Open the dropdown and select Weather. The list also offers None and other apps, depending on what you have installed. If you want no widget, choose None.
- Scroll down to Show the lock screen background picture on the sign-in screen.
- Turn the toggle On. The same background then appears behind the sign-in box after you dismiss the lock screen.
If you see a Get fun facts, tips, tricks, and more on your lock screen checkbox, it applies to the Picture and Slideshow modes. You do not need it while Spotlight is selected.
Check that the lock screen changed
- Press Win+L. The screen locks and the lock screen appears with your Spotlight image and the status widget.
- Press any key or click to dismiss it. The sign-in screen appears with the same background, if you turned on the sign-in toggle.
- Sign in to return to your desktop. You do not need to restart Windows for these settings to apply.
If Win+L takes you straight to the sign-in box with no lock screen image at all, the lock screen has been disabled. See "Bring back a lock screen that has been turned off".
If Windows Spotlight is missing or greyed out
Settings can hide or lock the Spotlight option for several reasons. Work out which one applies before changing anything else.
Settings says "Some settings are managed by your organization"
A work or school PC, or a PC where someone applied a policy, can lock the lock screen options. The message appears at the top of the page and the dropdown is greyed out or missing options. This is not a fault, and Settings cannot override it.
Ask your IT administrator to change or remove the policy. On a personal PC, a tweak tool or an old script may have applied a policy years ago. The registry section below covers the one policy value on this subject that is safe to check yourself.
Spotlight is selected but the picture never changes
Spotlight downloads its photos from Microsoft, so it needs a working internet connection. If the PC has been offline or the download stalls, you may see one fixed image or a fallback picture. Do this to nudge it:
- Open Settings Personalization Lock screen
- Change Personalize your lock screen to Picture. The preview switches to a still image.
- Open the dropdown again and select Windows Spotlight. Windows requests a fresh image.
windows 11 personalization background windows spotlight - Lock the PC with Win+L and check the result. The image may take a short while to refresh, and a new photo often appears the next time you lock the PC.
If the picture still does not change, check that the PC is online and try again later. No further fix is confirmed for this yet, so none is listed here.
Bring back a lock screen that has been turned off
If the lock screen never appears, a value named NoLockScreen may be set in the registry. When it is set, Windows skips the lock screen and goes straight to the sign-in screen. Removing the value restores the normal lock screen. Registry Editor (the built-in tool for viewing and changing Windows configuration entries) works on both Home and Pro, but this step needs an administrator account because the value sits under HKEY_LOCAL_MACHINE (the part of the registry that applies to every user on the PC).
The steps below export a backup first so you can restore it.
The value in question is:
HKEY_LOCAL_MACHINE\SOFTWARE\Policies\Microsoft\Windows\Personalization\NoLockScreenThe key is everything before the last backslash. NoLockScreen is the value inside it.
Settings has no route for this fix, so use Registry Editor instead. Settings has no option to turn the lock screen back on. This section uses Registry Editor only.
- Press Win+R, type
regedit, and press Enter. This opens Registry Editor. - Select Yes if User Account Control asks for permission. This requires administrator rights. If you are not an administrator, Windows asks for an admin password. If you do not have one, stop here and ask the PC's administrator.
- Click the address bar below the menu and paste
HKEY_LOCAL_MACHINE\SOFTWARE\Policies\Microsoft\Windows\Personalization, then press Enter. The left pane jumps to the Personalization key and the right pane lists its values. - If you get a message that the key cannot be found, or if the right pane has no
NoLockScreenvalue, this fix does not apply. Close Registry Editor and use the Settings steps above instead. - Select File Export to back up the key. Choose a location, name the file
personalization-backup.reg, and select Save. - Right-click the
NoLockScreenvalue in the right pane and select Delete. - Select Yes when Registry Editor asks you to confirm. The value disappears from the list.
- Close Registry Editor and restart the PC.
- Press Win+L after you sign in. The lock screen should now appear.
If the lock screen is still missing after the restart, the value may have come back. A policy (a rule set by an employer or school) can rewrite it each time Windows reapplies its rules. This happens on PCs managed by an employer or school. In that case only the administrator who applies the policy can fix it.
To undo the change, double-click personalization-backup.reg and confirm the merge. Restart the PC afterwards.
Switch back to your own picture later
Restoring Spotlight does not remove your earlier choices. To go back to a custom image, open Settings Personalization Lock screen, set Personalize your lock screen to Picture, and choose one from the recent images or select Browse photos. For a rotating set of your own photos, choose Slideshow instead. The change applies the next time you lock the PC.
What to do next
Lock the PC with Win+L now and let the lock screen sit for a moment to confirm that the Spotlight image and status widget appear. A feature update or a refreshed work policy can change these options again, so recheck Settings Personalization Lock screen after a major update. If the page shows the managed-by-your-organization message again, the administrator who set the policy is the person to ask.
How do I reinstall 🪟 Windows 11?
Open Settings, go to System Recovery, and click Reset PC next to Reset this PC. Choose Keep my files to reinstall Windows without deleting your personal files, or Remove everything for a clean install. Back up your files first, because the reset cannot be undone once it starts.
How do I change the lock screen settings in 🪟 Windows 11?
Open Settings, select Personalization, then click Lock screen. Use the Personalize your lock screen drop-down to choose Windows Spotlight, Picture, or Slideshow. Turn the tips toggle on or off to control extra content. Changes show the next time you lock the PC with Win+L.
What is the difference between a lock screen and a screensaver?
A lock screen is the image you see when the PC starts, wakes, or is locked with Win+L. You must dismiss it before you can sign in. A screensaver is an animation or slideshow that appears after a set period of no activity. You set screensavers separately, through Screen saver settings on the Lock screen page.
How do I get the classic start menu in 🪟 Windows 11?
Windows 11 has no built-in option to bring back the classic Windows 10 Start menu. Third-party apps such as Start11 or StartAllBack add a Windows 10-style menu. Check the publisher and download from its official site before installing. To change the current menu, open Settings, select Personalization, then click Start.
Have a question about this guide?
Answered by AI from this guide. Good questions may be added to this page — please don't include personal details.
Did this guide fix your problem?

About the Author
Richard
Tech Writer, IT Professional
Richard is a writer at Geek Rewind who turns complex IT tasks into clear, step-by-step guides. He draws on years of hands-on experience in system administration and enterprise IT operations, focusing on Windows, Linux and WordPress: the problems people actually run into, and the fixes that work. His server and WordPress guides come from systems he runs himself. Richard builds and maintains the platform behind Geek Rewind, from its Ubuntu servers and Nginx configuration to its custom WordPress plugins. Many new tutorials start with readers' questions, and he's always glad to answer them in the comments.
No comments yet — be the first to share your thoughts!