How to Change Your Windows 11 Lock Screen Status


Lock screen status in Windows 11 shows live updates from a single app, such as Weather, Calendar or Mail, on your sign-in screen. You can check important details in Windows 11 build 22000 or later without unlocking your PC.
You can change the lock screen status app at any time. Open Settings , go to Personalization, and select Lock screen. From there you can pick a different app that fits your daily routine, or turn the status off completely.
To change your Windows 11 lock screen status, open Settings , go to Personalization Lock screen, and pick a different app under Lock screen status, or choose None to turn it off. The choice saves automatically with no Apply button or restart. Press Win+L to check the result. Status needs build 22000 or later.
What Is the Lock Screen?
The Windows 11 lock screen is the first thing you see when you turn on your computer or when it locks. It shows the time, the date, your background and, if you set one up, the status from one app. You dismiss it with a click, a key press or a swipe, and then you reach the sign-in prompt.
What’s New With 🪟 Windows 11 25H2 Lock Screen Widgets?
In the Windows 11 25H2 update, Microsoft introduced more interactive lock screen widgets. These widgets provide live, dynamic data. You can now see weather, sports scores, and stock updates directly on the lock screen.
If you prefer a clean look, you can disable these features. Look for the related options on the same Personalization Lock screen page Which options you see depends on your Windows 11 version and update level, so a setting described here may be missing or named differently on an older build.
How to Customize Your Lock Screen Background
You can change your Windows 11 lock screen background to show off your personal style. You do this on the same Lock screen page that holds the status setting, using the Personalize your lock screen list at the top. Changing the background does not change which app shows status, so you can adjust each one separately.
How to Select Your Lock Screen Status App
- Open the Settings app by pressing
Windows key + I. The Settings window opens with a list of categories on the left.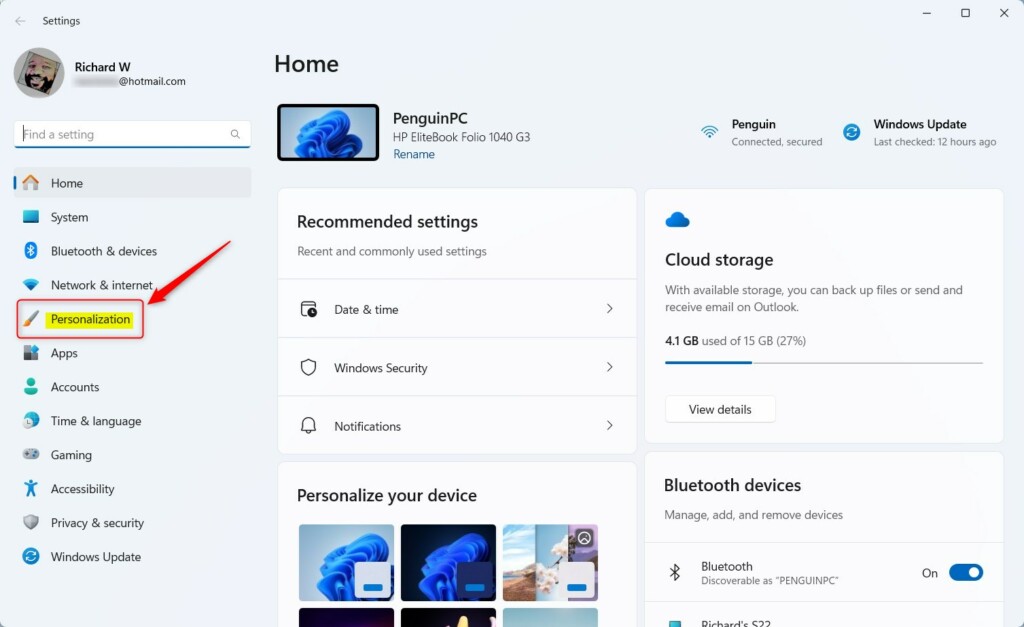
Windows 11 Settings menu with Personalization highlighted. - Click Personalization on the left menu. The personalization options appear on the right.
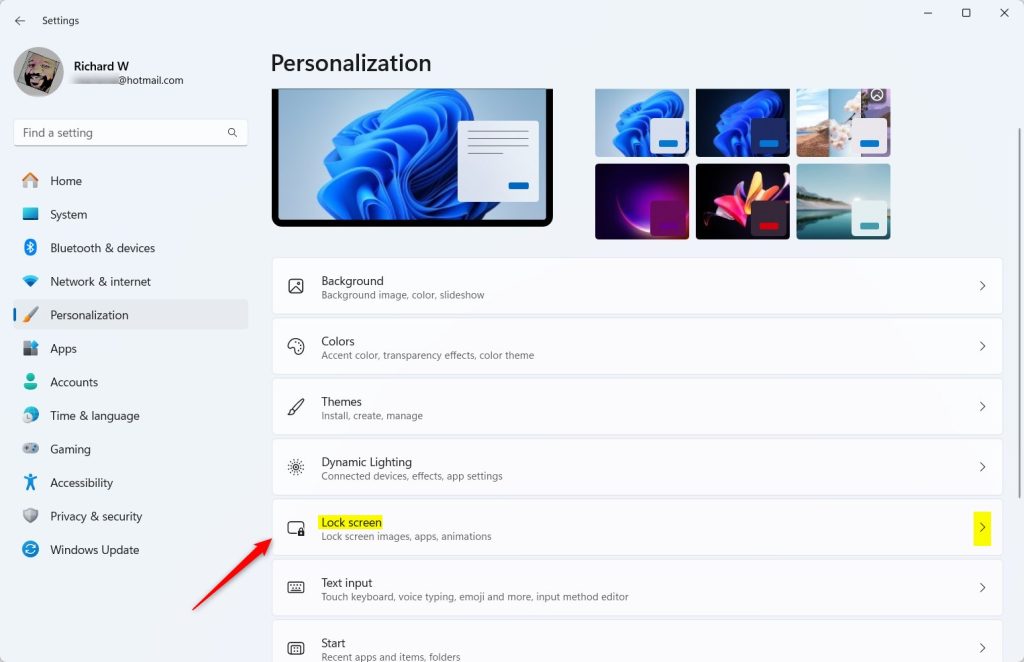
Windows 11 Personalization settings showing Lock screen options. - Select Lock screen on the right. You should now see a preview of your lock screen and a set of lock screen options below it.
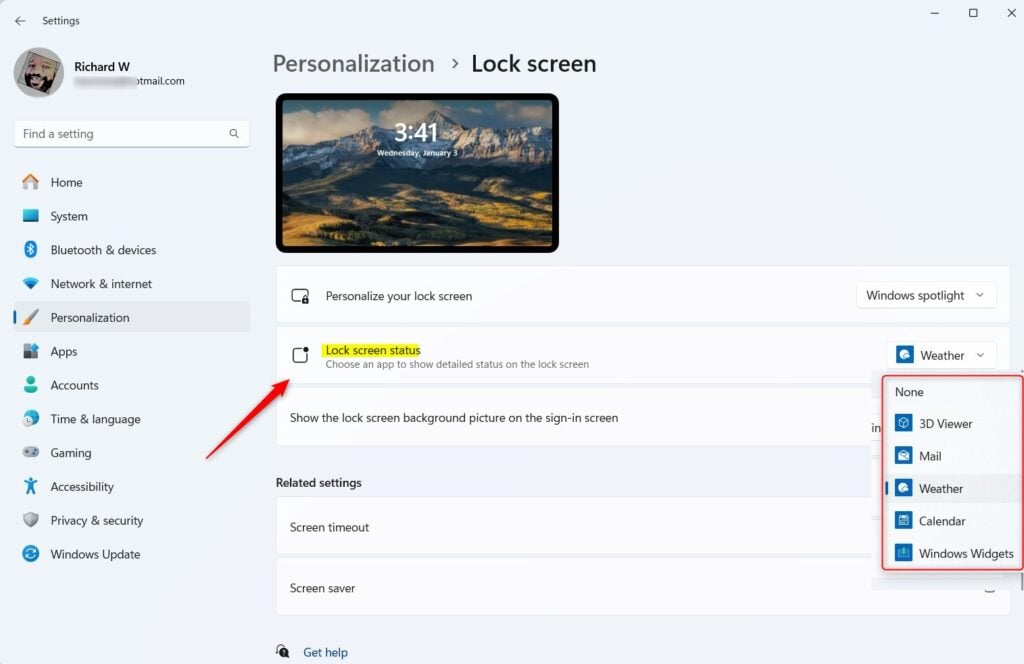
Lock screen status options - Find Lock screen status and pick an app from the list. The list shows the apps that can display status on the lock screen, and you can choose only one. If you want no status at all, choose None to undo the change.
- Close the app when finished. The choice saves automatically, so there is no Apply button and no restart is needed. To check it, press Win+L to lock your PC and look at the lock screen.
It needs Windows 11 build 22000 or later. The list only includes apps that support lock screen status, so an app you expect may not appear. The steps are the same on Home and Pro.
Privacy and Security: Hiding Sensitive Info
Windows 11 lock screen customization lets you hide your email address and personal details from the lock screen. This stops people walking by from seeing your private information. You can turn off account details in your settings so your email stays hidden whenever your computer is locked.
On current builds this option sits in the account sign-in settings rather than on the Lock screen page. It is usually labeled as showing account details, such as your email address, on the sign-in screen. Turn it off, then lock your PC to confirm the address no longer shows. Turn it back on the same way if you change your mind.
Advanced Settings: Dynamic Lighting and Screen Savers
Windows 11 supports Dynamic Lighting for compatible keyboards and mice. You can manage these under Personalization Dynamic lighting If you have no compatible device connected, there is little to configure on that page.
For classic users, you can still access Screen saver settings. Search for "Change screen saver" in the Start menu. This opens the legacy C:\Windows\System32\control.exe window, where you can pick a screen saver, set the wait time, and choose whether to show the sign-in screen when it ends.
Summary
Customizing your Windows 11 lock screen helps you see important info at a glance. By adjusting your background, disabling sensitive email displays, and managing widgets, you create a personalized and secure experience. Follow the steps in Settings to toggle these features on or off as needed. If a change does not look right, return to Personalization Lock screen and switch the setting back.
Have a question about this guide?
Answered by AI from this guide. Good questions may be added to this page — please don't include personal details.
Did this guide fix your problem?

About the Author
Richard
Tech Writer, IT Professional
Richard is a writer at Geek Rewind who turns complex IT tasks into clear, step-by-step guides. He draws on years of hands-on experience in system administration and enterprise IT operations, focusing on Windows, Linux and WordPress: the problems people actually run into, and the fixes that work. His server and WordPress guides come from systems he runs himself. Richard builds and maintains the platform behind Geek Rewind, from its Ubuntu servers and Nginx configuration to its custom WordPress plugins. Many new tutorials start with readers' questions, and he's always glad to answer them in the comments.
No comments yet — be the first to share your thoughts!