Move the Pointer with Mouse Keys in Windows 11

Mouse keys in Windows 11 lets you move the pointer with the numeric keypad instead of a mouse or touchpad. To turn it on, open Settings Accessibility Mouse and switch on Mouse keys. Alternatively, press Left Alt+← Shift + Num Lock.
Mouse keys is an accessibility feature. It helps if your mouse fails, if holding a mouse is painful, or if you need fine control over pointer position. Turning it on does not need administrator rights, and it works the same in Windows 11 Home and Pro.
This article covers turning it on, moving and clicking, tuning the speed, and fixing the usual problems. Menu labels below follow current Windows 11 builds. Wording can differ slightly on older releases.
Turn on Mouse keys in Windows 11 by opening Settings Accessibility Mouse and switching Mouse keys to On, or by pressing Left Alt+← Shift + Num Lock. Then, with Num Lock on, use the numeric keypad to move the pointer: 4, 6, 8 and 2 move left, right, up and down, and 5 clicks. No administrator rights are needed.
What You Need Before You Start
Mouse keys depends on the numeric keypad, the block of number keys on the right side of a full-size keyboard. The keys 4, 6, 8 and 2 act as left, right, up and down.
Check two things first:
- A numeric keypad. Most desktop keyboards have one. Many laptops and compact keyboards do not. See the troubleshooting section if yours does not.
- Num Lock. This key switches the keypad between typing numbers and its other jobs. Mouse keys needs Num Lock on for the keypad to move the pointer, unless you change that behaviour in Settings.
How to Move the Pointer with Mouse Keys in 🪟 Windows 11
These steps turn on Mouse keys and show you how to move the pointer and click with it. The first steps use keyboard shortcuts, so you can follow them without a working mouse.
- Open Settings. Press the Windows key + I.
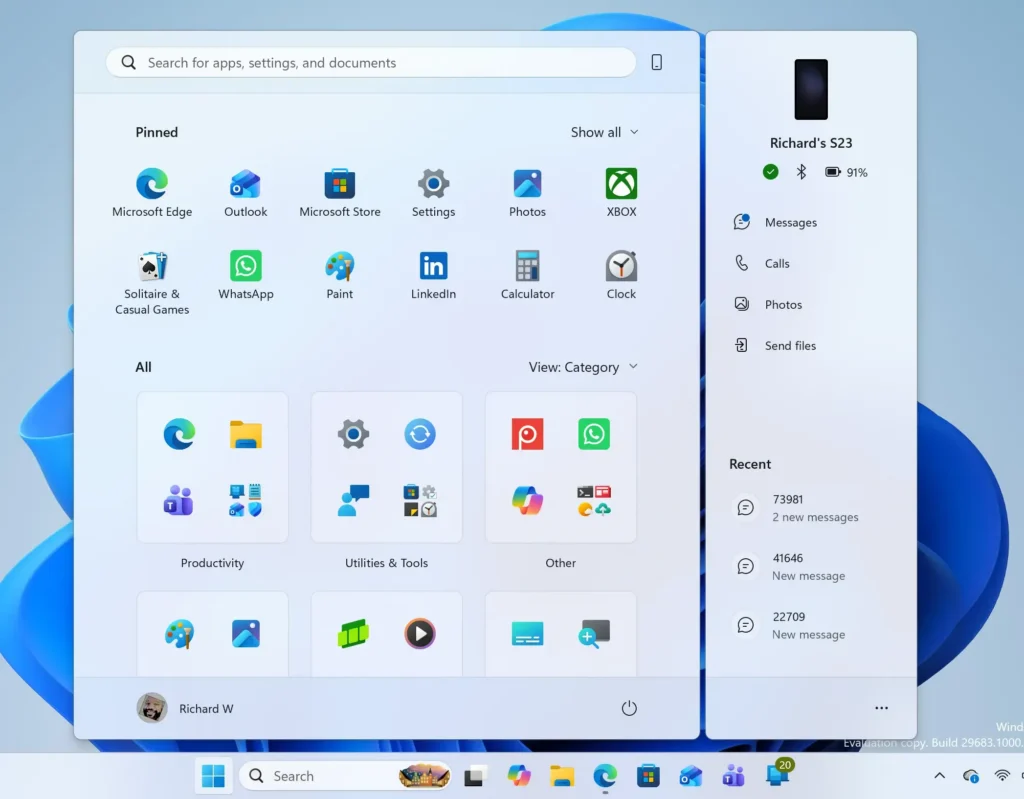
The Settings window opens. If you prefer, press the Windows key + U to open the Accessibility page directly, then skip to step 3. - Select Accessibility in the left pane. Press Tab to reach the list, use the Down Arrow key to highlight it, then press Enter.
The Accessibility page opens on the right.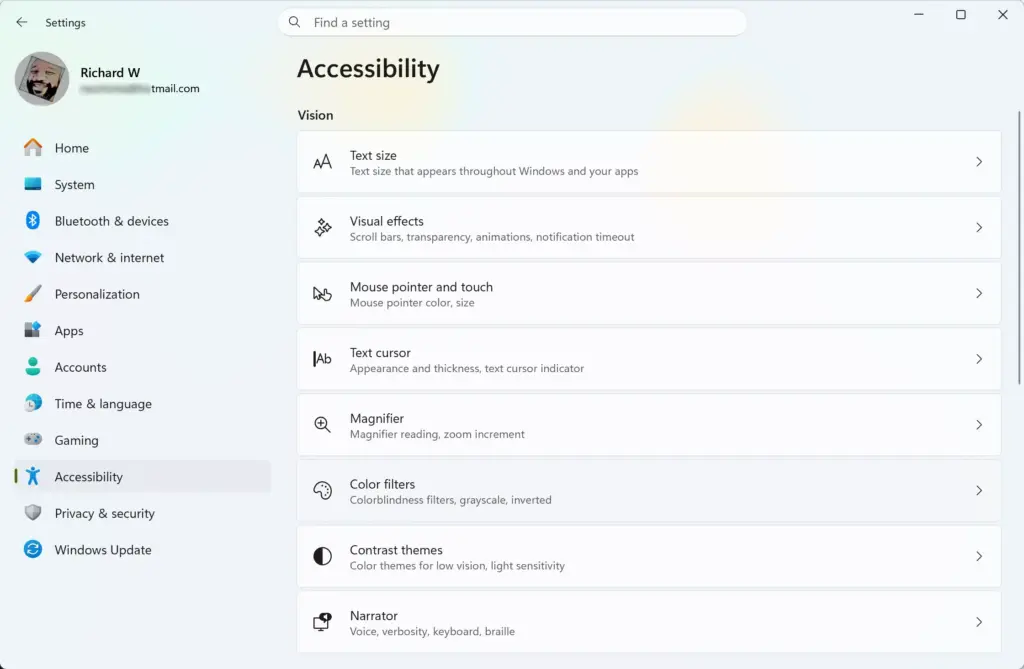
Settings › Accessibility - Select Mouse under the Interaction group. Use Tab and the arrow keys to highlight it, then press Enter.
The Mouse accessibility page opens. You should see a Mouse keys row near the top.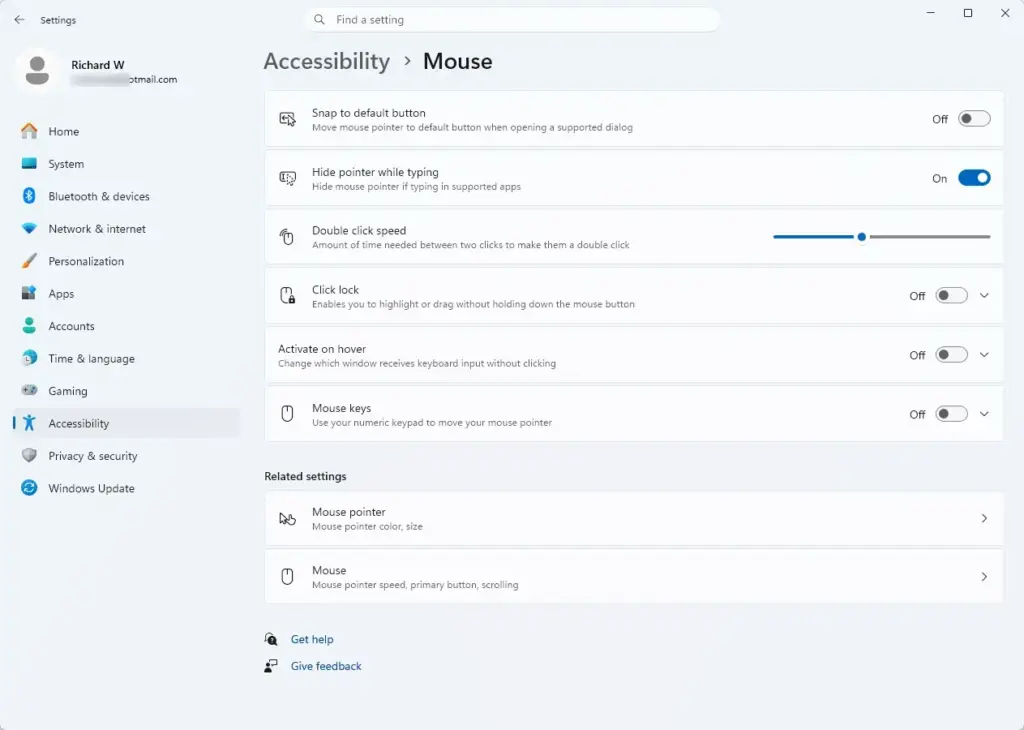
Settings › Accessibility › Mouse - Switch the Mouse keys toggle to On. Tab to the toggle and press the Spacebar.
The toggle moves to the right and reads On. The row also expands, or can be expanded, to show extra options.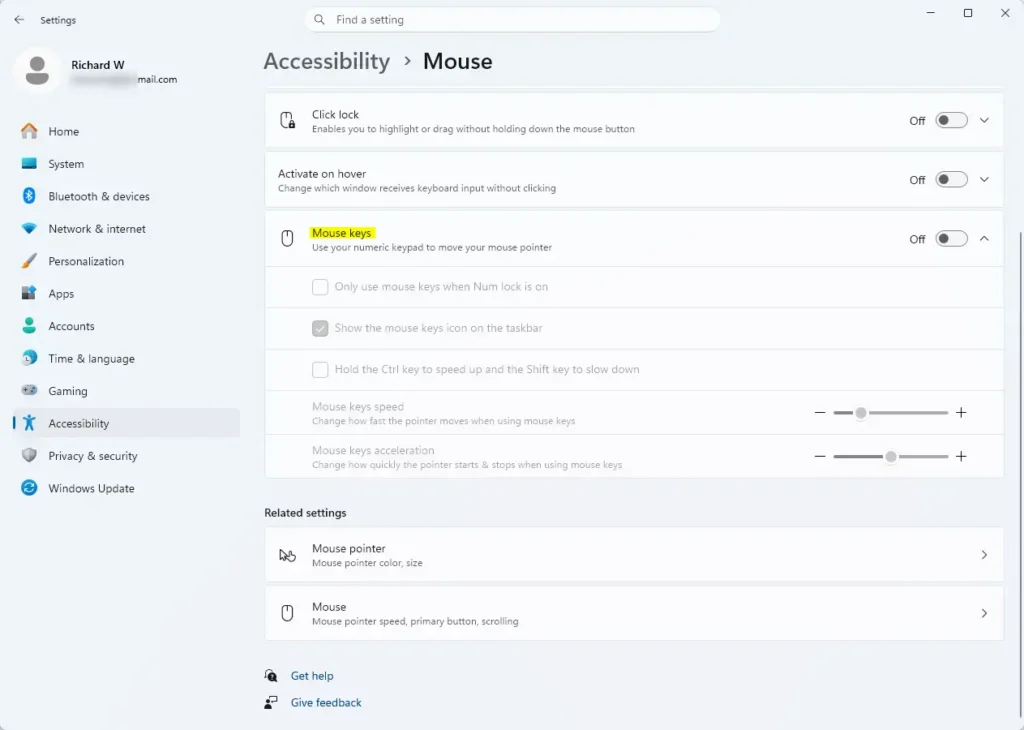
- Press Num Lock if the keypad is not active. Look at the Num Lock light on your keyboard.
With the light on, the keypad controls the pointer. Some keyboards have no light, so test in the next step. - Press 6 on the numeric keypad. Hold it down for a moment.
The pointer moves to the right across the screen. If nothing happens, go to the troubleshooting section. - Press 4, 8 and 2 in turn. Each key moves the pointer in one direction.
The pointer moves left with 4, up with 8 and down with 2. - Press 7, 9, 1 or 3 to move diagonally. These sit at the corners of the keypad's number block.
The pointer moves up-left with 7, up-right with 9, down-left with 1 and down-right with 3. - Hold Ctrl while you press a movement key to speed up. This works when the matching option is enabled in the Mouse keys settings.
The pointer jumps across the screen faster. - Hold Shift while you press a movement key to slow down. Use this for precise placement over small buttons.
The pointer moves in smaller increments. - Move the pointer over a button or link, then press 5. This clicks with the active mouse button, which is the left button by default.
The item reacts as if you had clicked it with a mouse. - Press the + key on the keypad to double-click. Place the pointer on a file or folder first.
A folder opens, or a file launches in its default app. - Press * then 5 to right-click. The asterisk key switches the active button to the right button.
A context menu (the menu that appears on right-click) opens. The right button stays active until you change it. - Press / to switch back to the left button. Do this after every right-click if you want normal clicks to return.
Pressing 5 now left-clicks again. - Press 0 to hold the mouse button down, move the pointer, then press . (the Del key on the keypad) to release it. This drags an item.
The item follows the pointer while the button is held, and drops where you release it.
Mouse Keys Key Reference
Keep this table close while you learn the layout. All keys refer to the numeric keypad, not the number row above the letters.
| Key | What it does |
|---|---|
| 4 / 6 | Moves the pointer left / right |
| 8 / 2 | Moves the pointer up / down |
| 7 / 9 | Moves the pointer up-left / up-right |
| 1 / 3 | Moves the pointer down-left / down-right |
| 5 | Clicks with the active button |
| + | Double-clicks |
| / | Makes the left button active |
| * | Makes the right button active |
| - | Makes both buttons active |
| 0 | Holds the active button down |
| . (Del) | Releases the held button |
| Ctrl + movement key | Moves the pointer faster |
| Shift + movement key | Moves the pointer slower |
Turn On Mouse Keys with the Keyboard Shortcut
It also works when the mouse has stopped responding.
Use Left Alt + Left Shift + Num Lock
Hold Left Alt and Left Shift together, then press Num Lock. Use the Alt and Shift keys on the left side of the keyboard, not the ones on the right. A prompt appears asking whether you want to turn on Mouse keys. Select Yes, or press the Spacebar or Enter while the button is highlighted.
If no prompt appears, the shortcut is probably switched off. Open Settings Accessibility Mouse, expand the Mouse keys row and look for the option that allows the shortcut. Turn it on, then try again. The exact label can vary between Windows 11 builds.
Use the same shortcut to turn Mouse keys off again. The shortcut toggles the feature, so it does not need a second visit to Settings.
Adjust Pointer Speed and Acceleration
The defaults suit many people, but they often feel too slow on a large or high-resolution screen. The Mouse keys row in Settings has controls for this.
Change the Speed Settings
Open Settings Accessibility Mouse and expand the Mouse keys row. You will see two sliders:
- Pointer speed sets the top speed the pointer reaches while you hold a key.
- Pointer acceleration sets how quickly the pointer builds up to that speed.
Change one slider at a time, then press a movement key to test it. Low acceleration with a higher top speed gives fine control at the start of a move. It also gives quick travel over long distances. If you only need a temporary speed change, leave the sliders alone. Hold Ctrl to speed up or Shift to slow down, as in the numbered steps above.
Choose How Num Lock Affects Mouse Keys
The same expanded row has an option that ties Mouse keys to the Num Lock state. When it is on, the keypad moves the pointer only while Num Lock is on. When Num Lock is off, the keypad goes back to its normal navigation functions, such as Home, End and the arrow keys.
Toggle Num Lock to switch between typing and pointer control. If you do not need the keypad for anything else, turn the option off so the pointer does not stop responding when Num Lock changes.
Scrolling and Other Limits
Mouse keys moves the pointer and clicks. It does not have a scroll wheel equivalent. To scroll a page, use Page Up, Page Down, the Spacebar or the arrow keys, depending on the app.
Mouse keys does not replace moving between controls with the Tab key. In a dialog box, Tab and Enter are often quicker than steering the pointer to a button. Use Mouse keys for places where the keyboard alone cannot reach, such as images, maps and custom app controls.
Mouse Keys Not Working or Missing
Most problems come from the keyboard hardware, the Num Lock state or a locked-down setting. Work through the cases below.
The Keypad Types Numbers Instead of Moving the Pointer
Mouse keys is probably off, or the pointer is waiting on Num Lock. Open Settings Accessibility Mouse and check that Mouse keys reads On. Then check Num Lock. If the keypad still types numbers, confirm that Mouse keys is on, because the shortcut may have switched it off.
The Keypad Does Nothing at All
Press Num Lock once and test again. If the keypad still does nothing, the Num Lock option in the Mouse keys settings may be working against you. Turn that option off, then test again. Also try a different USB port or fresh batteries if the keyboard is wireless.
The Keyboard Has No Numeric Keypad
Many laptops and compact keyboards leave out the keypad. Some laptops build a numeric keypad into the letter keys, usually printed in a different color and reached with Fn or Num Lock. Check the key legends on your keyboard or the manual for your model.
If your keyboard has no keypad at all, use the On-Screen Keyboard. Open it from Settings Accessibility Keyboard. Open its Options key and select Turn on numeric keypad.
Clicking the on-screen keypad keys does not always move the pointer. Use this only as a fallback. A USB numeric keypad is a cheap hardware fix.
The Mouse Keys Toggle Is Greyed Out or Missing
On a work or school computer, an administrator may manage accessibility settings, which can lock the toggle. If you see a message that your organization manages some settings, contact your IT team. On a personal PC, restart the computer and check Settings again. If the Mouse page itself is missing under Accessibility, install the latest Windows updates from Settings Windows Update, because older builds label some pages differently.
The Shortcut Prompt Never Appears
Check that you are holding Left Alt and Left Shift, not the right-hand keys. Then confirm the shortcut option is enabled in the expanded Mouse keys row. Some keyboards also need you to hold the Fn key (the function key, often labelled Fn) to send Num Lock. If the shortcut stays unresponsive, use the Settings route in the numbered steps above.
Turn Off Mouse Keys
Mouse keys does not change any permanent setting. You can turn it off at any time. To turn it off, open Settings Accessibility Mouse and switch the Mouse keys toggle to Off. Alternatively, press Left Alt + Left Shift + Num Lock again.
The keypad returns to normal at once. Your speed and acceleration settings stay saved, so they apply again the next time you turn Mouse keys on.
What to Do Next
Practise on a harmless page for a few minutes. The diagonal keys (7, 9, 1 and 3) and the right-click sequence take a little time to learn. If the pointer feels slow or hard to control, return to the Mouse keys sliders and adjust them one at a time. If you want other ways to drive Windows 11 without a mouse, look at the options on the Keyboard and Narrator pages under Settings Accessibility
Have a question about this guide?
Answered by AI from this guide. Good questions may be added to this page — please don't include personal details.
Did this guide fix your problem?

About the Author
Richard
Tech Writer, IT Professional
Richard is a writer at Geek Rewind who turns complex IT tasks into clear, step-by-step guides. He draws on years of hands-on experience in system administration and enterprise IT operations, focusing on Windows, Linux and WordPress: the problems people actually run into, and the fixes that work. His server and WordPress guides come from systems he runs himself. Richard builds and maintains the platform behind Geek Rewind, from its Ubuntu servers and Nginx configuration to its custom WordPress plugins. Many new tutorials start with readers' questions, and he's always glad to answer them in the comments.
No comments yet — be the first to share your thoughts!