Swap your left and right mouse buttons to accommodate left-handed use or hand injuries. The change takes effect straight away, needs no restart, and you can reverse it at any time by repeating the steps and choosing the original setting.
Advertisement
⚡ Quick Answer
Open Settings ⚙️ with Win+I, then go to Bluetooth 🔷 & devices›Mouse and set the Primary mouse button dropdown to Left or Right. The change applies immediately with no restart and no Save button. To undo it, reopen the same dropdown and pick the original option.
Advertisement
Using the Settings App in 🪟 Windows 11
You can change the primary mouse button in Windows 11 through the modern Settings app ⚙️ if you are left-handed or prefer your right-click to act as the main selection tool. The steps are the same on Home and Pro. The setting applies to your user account and takes effect as soon as you pick an option.
Press Win+I to open Settings. You should see the Settings ⚙️ window with a list of categories on the left.
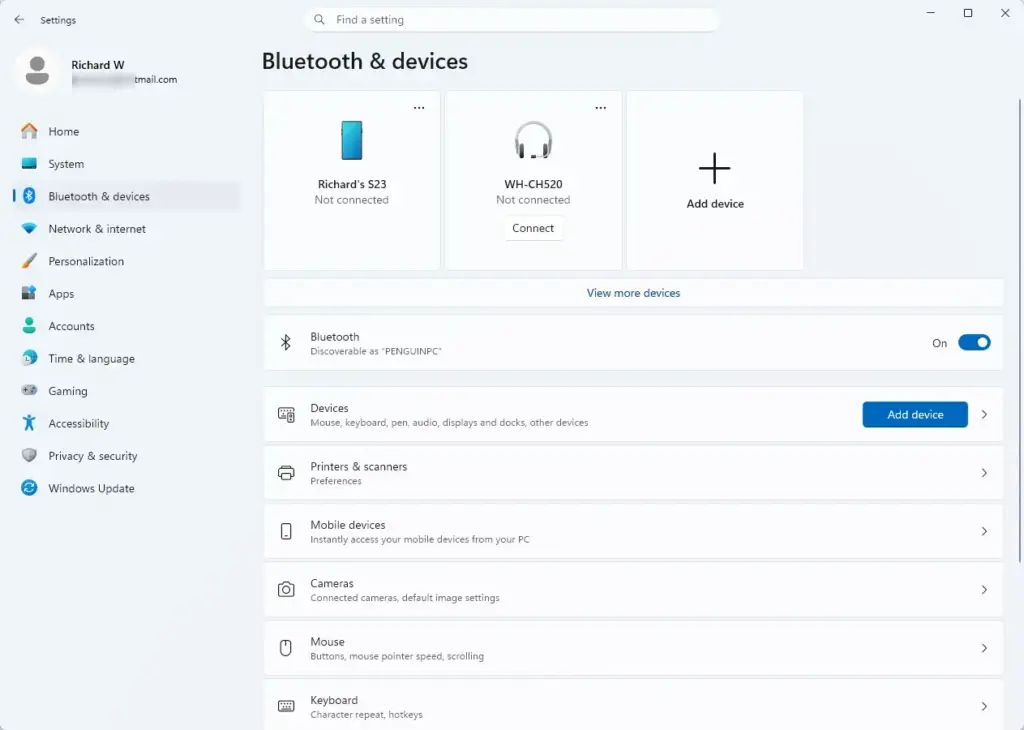
Click Bluetooth 🔷 & devices in the left-hand menu. The device options appear on the right.
Windows Settings menu highlighting the Bluetooth and devices option for printers
Select Mouse from the available hardware options on the right side of the window.
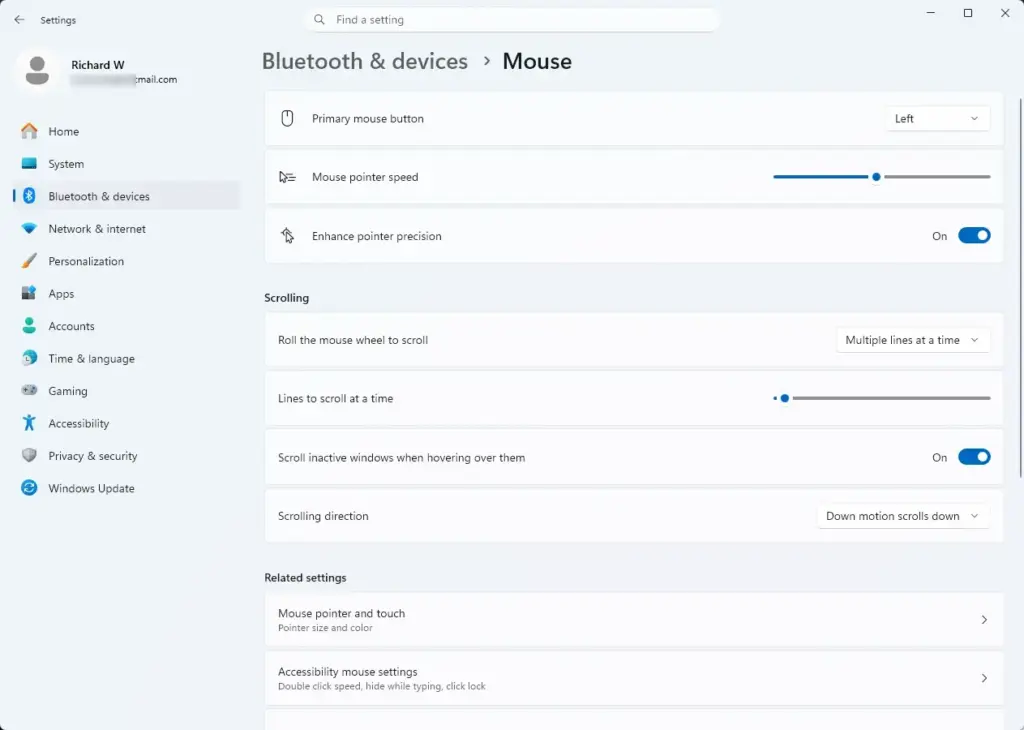
Settings › Bluetooth › Mouse
The page now lists your mouse settings, such as pointer speed and scrolling.
Locate the dropdown menu labeled Primary mouse button. It is usually near the top of the page.
Click the dropdown and choose either Left or Right depending on your preference. The change applies immediately, with no Save button to press.
Click a file or an empty part of the desktop with the button you chose to confirm that it now does the selecting.
To undo the change, open the same dropdown and select your original option. If you have already swapped the buttons, remember that the new primary button is the one that clicks. If the dropdown is hard to reach, press Tab to move between controls and Enter to open the list.
If the Mouse page is missing or the setting seems to have no effect, check whether a manufacturer utility is managing your buttons. The last method below covers that.
Using the Settings App in 🪟 Windows 10
Windows 10 reached end of support on October 14, 2025. It no longer receives free security updates, and the only way to get them is through the paid Extended Security Updates (ESU) program. If your PC meets the requirements, upgrade to Windows 11 and use the steps above. The Windows 10 steps below are kept for machines that cannot be upgraded yet. The wording and layout differ from Windows 11, so follow them only if you are on Windows 10.
Press Win+I to open Settings.
Click the Devices category.
Select Mouse from the left sidebar. The mouse options appear on the right.
Locate the dropdown menu titled Select your primary button.
Choose Left or Right from the list to update your click behavior instantly.
No restart or sign-out is needed. To go back, reopen the dropdown and pick the other option.
Advertisement
Using Control Panel Mouse Properties
You can change the primary mouse button through the classic Mouse Properties window (main.cpl) if you prefer using older system menus. This window is available in both Windows 10 and Windows 11, and it is a useful fallback if the Settings page does not behave as expected.
Press Windows + R to open the Run box.
Type control mouse and press Enter. The Mouse Properties window opens.
Stay on the Buttons tab, which opens by default.
Check or uncheck the box next to Switch primary and secondary buttons in the button configuration section. The icon graphic near the top of the window will swap its blue highlighting to show you which button is now primary.
Click Apply at the bottom of the window to save the change.
Click OK to close the Mouse Properties window.
⚠️WarningBe careful with the order here.
As soon as you tick the box, the mouse may already behave in the swapped way, depending on the version. If so, the right button is now the one that clicks, so use it to press Apply and OK. You can also press Tab to move between controls and Enter or Space to activate them. To undo the change, return to the same tab, clear the checkbox, and click Apply again.
Using Third-Party Mouse Software
You can change the primary mouse button using third-party software like Logitech Options or Razer Synapse if you use a gaming mouse that overrides native Windows settings. These tools are only installed if you added them, so check first whether your mouse has one.
Open your specific mouse manufacturer's software utility from your system tray or Start menu.
Navigate to the button assignment or customization tab. The name varies by manufacturer, so look for a screen that shows a picture of your mouse with its buttons labeled.
Select the primary click function and reassign it to your preferred physical button.
Save or apply the change if the software has a button for that, then test the buttons.
⚠️WarningKeep in mind that changes made inside dedicated manufacturer software will take precedence over the standard Windows settings apps.
If the Windows setting seems to have no effect, or the buttons swap back, check this software first. Avoid swapping the buttons in both places at once, because the two changes can cancel each other out. Some manufacturer tools also store settings per profile, so the buttons may differ between profiles.
What to do next
With your mouse buttons successfully remapped, you can now customize your cursor speed, scroll wheel behavior, or pointer trails. Cursor speed and scrolling are on the same Mouse page in Settings, and the Mouse Properties window has further tabs, including pointer options. Test your new setup by opening apps or navigating web pages to ensure the click response matches your workflow. If something feels wrong, change the setting back using the method you used above.
📬 Get new Windows tips in your inbox
One email when we publish something worth your time. No spam, unsubscribe anytime.
Have a question about this guide?
Answered by AI from this guide. Good questions may be added to this page — please don't include personal details.
Richard is a writer at Geek Rewind who turns complex IT tasks into clear, step-by-step guides. He draws on years of hands-on experience in system administration and enterprise IT operations, focusing on Windows, Linux and WordPress: the problems people actually run into, and the fixes that work.
His server and WordPress guides come from systems he runs himself. Richard builds and maintains the platform behind Geek Rewind, from its Ubuntu servers and Nginx configuration to its custom WordPress plugins.
Many new tutorials start with readers' questions, and he's always glad to answer them in the comments.
One email when we publish a guide worth your time — new Windows features, the fixes that actually
work, and a heads-up when Microsoft breaks something. Unsubscribe in one click.
📬 Get new Windows tips in your inbox
One email when we publish something worth your time. No spam, unsubscribe anytime.


No comments yet — be the first to share your thoughts!